Paper Menu >>
Journal Menu >>
 Materials Sciences and Applications, 2011, 2, 497-503 doi:10.4236/msa.2011.25067 Published Online May 2011 (http://www.SciRP.org/journal/msa) Copyright © 2011 SciRes. MSA 497 Experimental and Numerical Analysis of Forming Limit Diagram (FLD) and Forming Limit Stress Diagram (FLSD) Mehdi Safari1*, Seyed Jamal Hosseinipour2, Hamed Deilami Azodi3 1Department of Mechanical Engineering, Islamic Azad University, Aligoodarz Branch, Aligoodarz, Iran; 2Department of Mechanical Engineering, Babol University of Technology, Babol, Iran; 3Department of Mechanical Engineering, Iran University of Science and Technology, Tehran, Iran. Email: m.safari@me.iut.ac.ir, ms_safari2005@yahoo.com Received August 13th, 2010; revised September 25th, 2010; accepted May 11th, 2011. ABSTRACT In this work, forming limit diagram for aluminum alloy 3105 is performed experimentally and forming limit based on stress (FLSD) calculated from strains that resulted from experimental procedure. In addition, numerical prediction by ductile fracture criteria using simulation is considered and it is shown that they are well suited with the experimental results. The strain paths from finite element simulations are found fairly acceptable to represent both sides of the FLD. Keywords: Forming Limit Diagram, Forming Limit Stress Diagram, Aluminum Alloy 3105, Ductile Fracture Criteria 1. Introduction Sheet metal formability is generally defined as the ability of metal to deform into d esired shape without necking or fracture. Each type of sheet metal can be deformed only to a certain limit that is usually imposed by the onset of localized necking, which eventually leads to the ductile fracture. A well-known method of describing this limit is the forming limit diagram (FLD), which is a graph of the major str ain (11 ) at the onset of localized necking for all values of the minor strain (22 ).The diagram can be split into two sides; “left side” and “right side”. At the “right side”, which was first introduced by Keeler and Back- ofen [1], only po sitive Major and Minor Strains are plot- ted. Goodwin [2] completed the FLD by adding the “left side”, with positive Major and negative Minor Strains. Various strain paths can be generated in order to create different combinations of limiting Major and Minor Strains. The “left side” represents strain paths with strain ratios (22 11 ) that vary from uniaxial tension (0.5 ) to plain strain (0 ). On the “right side” the strain ratios differ from plain strain to full biaxial (1 ) stretching. Usually FLDs are determined by us- ing one of the following two types of test methods. The first one is the Marciniak in-plane test where a sheet metal sample is strained by a flat-bottomed cylindrical punch. Between the punch and the metal sheet is a steel driver with a hole in the centre. This creates a frictionless in-plane deformation of the sheet. The other test is the Nakazima (Dome) out-of-plane test, which uses a he- mispherical punch. Since for this test deformations are not frictionless, lubricants are used. The necessary strain paths are obtained by using different lubricants, creating different friction cond itions, and also with different sam- ple widths. In this work, Nakazima (Dome) out-of-plane test is used and sch ematic of this test has sh owed in Fig- ure 1. The strain-path dependent nature of the FLD causes the method to become ineffective in the analysis of complex forming process, especially restrikes, flang- ing operations, hydroforming, and even first draw dies with deep pockets or embossments. Experimental evi- dence for a path-independent stress-based FLD has been reported in the literature, suggesting that the path depen- dency of the strain-based approach arises from the path dependent constitutive laws governing the relationship between the stress and strain tensors. Kleemola and Pelkkikangas [3] addressed the limitations of the FLD for analysis of flanging operations involving copper, brass and steel alloys following a draw forming operation. They proposed using a stress-based FLD as an alternative and gave some experimental results that supported the 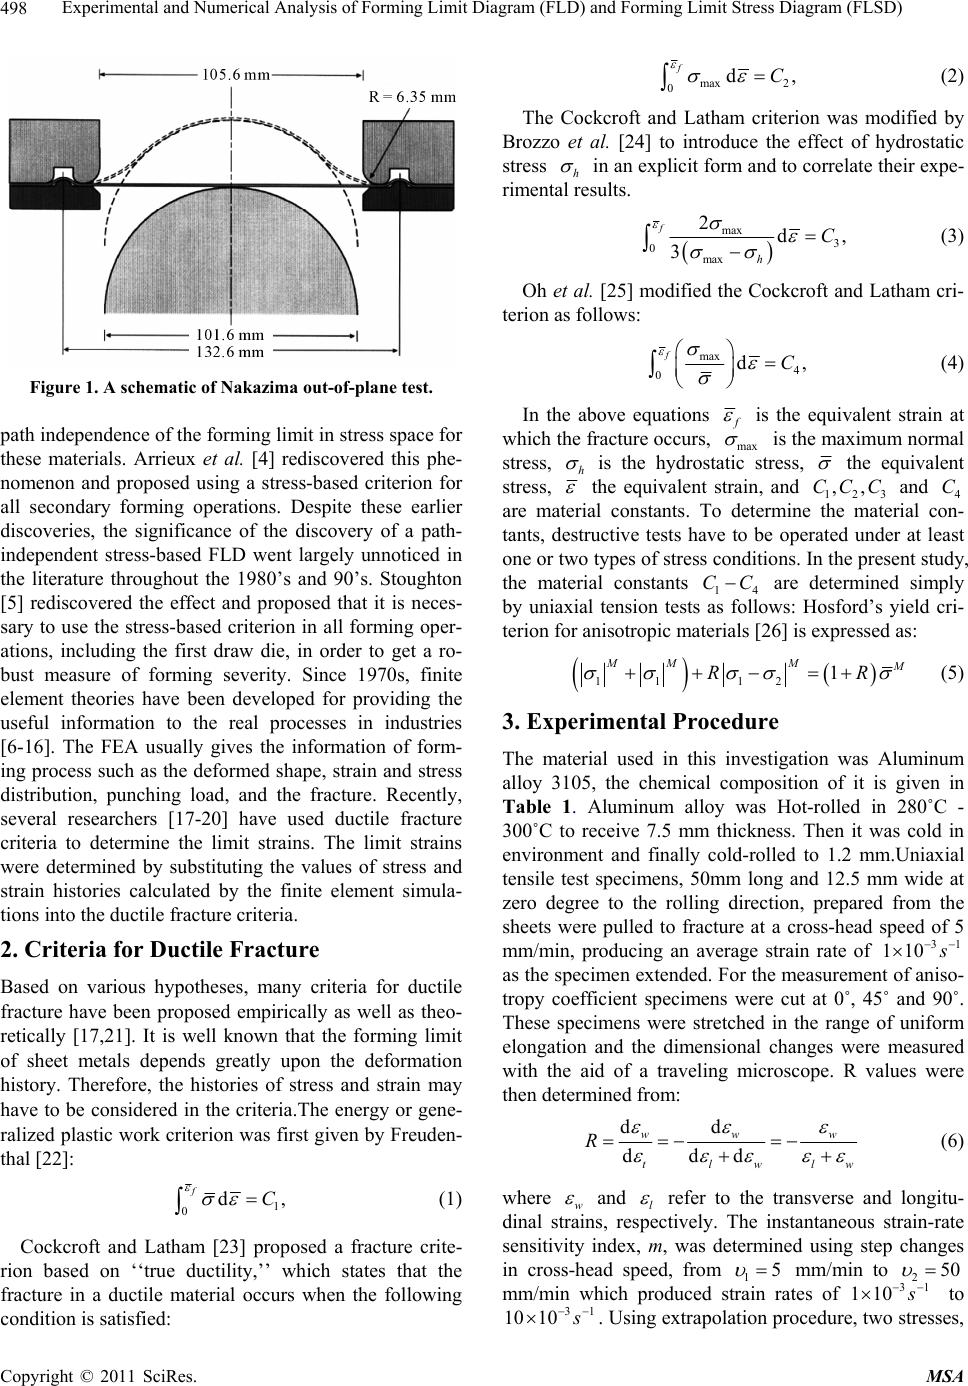 Experimental and Numerical Analysis of Forming Limit Diagram (FLD) and Forming Limit Stress Diagram (FLSD) Copyright © 2011 SciRes. MSA 498 Figure 1. A schematic of Nakazima out-of-plane test. path independence of the forming limit in stress space for these materials. Arrieux et al. [4] rediscovered this phe- nomenon and proposed using a stress-based criterion for all secondary forming operations. Despite these earlier discoveries, the significance of the discovery of a path- independent stress-based FLD went largely unnoticed in the literature throughout the 1980’s and 90’s. Stoughton [5] rediscovered the effect and proposed that it is neces- sary to use the stress-based criterion in all forming oper- ations, including the first draw die, in order to get a ro- bust measure of forming severity. Since 1970s, finite element theories have been developed for providing the useful information to the real processes in industries [6-16]. The FEA usually gives the information of form- ing process such as the deformed shape, strain and stress distribution, punching load, and the fracture. Recently, several researchers [17-20] have used ductile fracture criteria to determine the limit strains. The limit strains were determined by substituting the values of stress and strain histories calculated by the finite element simula- tions into the ductile fracture criteria. 2. Criteria for Ductile Fracture Based on various hypotheses, many criteria for ductile fracture have been proposed empirically as well as theo- retically [17,21]. It is well known that the forming limit of sheet metals depends greatly upon the deformation history. Therefore, the histories of stress and strain may have to be considered in the criteria.The energy or gene- ralized plastic work criterion was first given by Freuden- thal [22]: 1 0d, fC (1) Cockcroft and Latham [23] proposed a fracture crite- rion based on ‘‘true ductility,’’ which states that the fracture in a ductile material occurs when the following condition is satisfied: max 2 0d, fC (2) The Cockcroft and Latham criterion was modified by Brozzo et al. [24] to introduce the effect of hydrostatic stress h in an explicit form and to correlate their expe- rimental results. max 3 0max 2d, 3 f h C (3) Oh et al. [25] modified the Cockcroft and Latham cri- terion as follows: max 4 0d, fC (4) In the above equations f is the equivalent strain at which the fracture occurs, max is the maximum normal stress, h is the hydrostatic stress, the equivalent stress, the equivalent strain, and 123 ,,CC C and 4 C are material constants. To determine the material con- tants, destructive tests have to be operated under at least one or two types of str ess conditio ns. In th e present stud y, the material constants 14 CC are determined simply by uniaxial tension tests as follows: Hosford’s yield cri- terion for anisotropic materials [26] is expressed as: 11 12 1 MM M M RR (5) 3. Experimental Procedure The material used in this investigation was Aluminum alloy 3105, the chemical composition of it is given in Table 1. Aluminum alloy was Hot-rolled in 280˚C - 300˚C to receive 7.5 mm thickness. Then it was cold in environment and finally cold-rolled to 1.2 mm.Uniaxial tensile test specimens, 50mm long and 12.5 mm wide at zero degree to the rolling direction, prepared from the sheets were pulled to fracture at a cross-head speed of 5 mm/min, producing an average strain rate of 31 110 s as the specimen extended. For the measurement of aniso- tropy coefficient specimens were cut at 0˚, 45˚ and 90˚. These specimens were stretched in the range of uniform elongation and the dimensional changes were measured with the aid of a traveling microscope. R values were then determined from: dd ddd ww w tlwlw R (6) where w and l refer to the transverse and longitu- dinal strains, respectively. The instantaneous strain-rate sensitivity index, m, was determined using step changes in cross-head speed, from 15 mm/min to 250 mm/min which produced strain rates of 31 110 s to 31 10 10 s . Using extrapolation procedure, two stresses,  Experimental and Numerical Analysis of Forming Limit Diagram (FLD) a nd Forming Limit Stress Diagram (FLSD) Copyright © 2011 SciRes. MSA 499 Table 1. Chemical composition of Al 3105. Material Al Ga V Cr Ti Zn Mg Mn Cu Fe Si AA3105 0.9695 0.01 0.01 0.02 0.01 0.33 0.61 0.67 0.23 0.81 0.27 1 and 2 , are compared at the same strain and the m value was obtained from 21 21 ln lnm . Rectangular strips of various widths, were cut from the sheets with the long dimension of the rectangle parallel to rolling direction according to Sadough et al. method [27]. All specimens were grided with 4.4 mm diameter circles that the distances between their centers were maintained 5.4 mm. The grids were marked on the specimen by a rubber stamp. In the Figure 2 the specimen with marked grids of Aluminum alloy 3105 is showed. The deep drawing machine that was used in this investigation was an auto- matic hydraulic press (Figure 3). This machine has a ma- ximum load cap acity of 60 kN, a punching strok e of 250 mm and a variable punch speed up to 200 mm/min. The strips were clamped firmly at the periphery by a lock bead and then stretched over a 100 mm diameter hemispherical punch until they fractured, using polye- thylene film as a lubricant. The grid circles were de- formed to elliptic shapes because of stretching strain that was inserted in the plane of the sheet metal during the test. For each specimen the major and minor limited strains were measured from the major and minor axes of the ellipse that was located at the nearest distance to the necking zone. The localized necking zone appears as a groove in the deformed region of the sheet metal. Figure 4 shows the localized necking zone of 200 × 200 speci- men. In the Figure 5 stretched specimens of Aluminum alloy 3105 have been showed. Profile projector was used to measure the major and minor strains in the deformed circles. The values of the surface strains at the onset of localized necking constitute the FLDs. 4. Numerical Work All the geometries in Figure 2 were simulated using commercially available finite element code ABAQUS/ Standard. In this state, experimental conditions were duplicated in numerical simulation. During simulation the analysis of data is done and the ductile fracture crite- ria used for this purpose. So, when the value of ductile fracture criteria receive to a critical value obtained from experimental tensile test, necking has been occurred and simulation stopped. The punch, die and blank-holder are modeled as rigid bodies. The Coulomb friction model with a constant coefficient of friction, μ = 0.11 was ap- plied. One-quarter of the geometry is used due to sym- metry for easier to visualize. The appropriate nodal con strains are applied in the global X, Y directions to impose symmetry. In Figure 6 simulated 200 × 200 sample is Figure 2. Speciemen marked with circular grids. Figure 3. Deep drawing test machine. Figure 4. Necking zone of 200 × 200 speciemen.  Experimental and Numerical Analysis of Forming Limit Diagram (FLD) and Forming Limit Stress Diagram (FLSD) Copyright © 2011 SciRes. MSA 500 Figure 5. Stretched specimens of Aluminum alloy 3105. Figure 6. Simulated 200 × 200 sample. shown. 5. Evaluation of Forming Limit Stress Diagram (FLSD) We obtained from experimental work some data in the strain form. For accommodating forming limit stress dia- gram, these data need to be converted first into stress form. The process of this strain conversion is summa- rized as the following: Step 1: Obtain 1 and 2 experimentally. Step 2: Find Y from Swift hardening law equation. In the present work, the effective strain is obtained for Hosford’s yield function through the corresponding plas- tic strain rate potential presented by Stoughton in his paper [5] . Step 3: Calculate , a function of material para- meters derived from the applied yield function. The strain path is characterized by the strain rate ratio: 22 11 d d (7) And the stress ratio 2 1 (8) 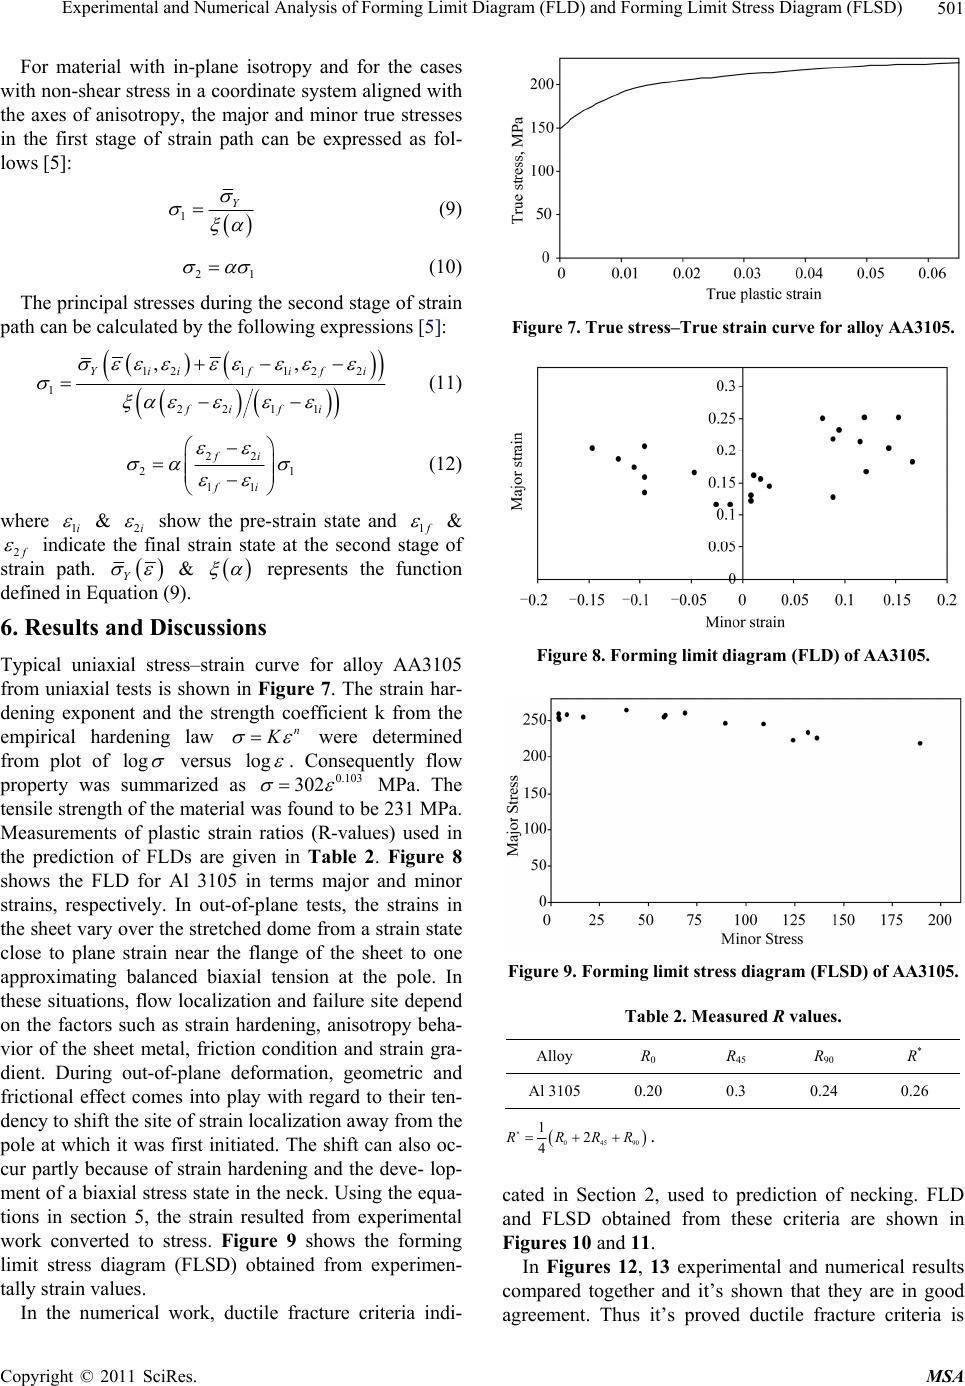 Experimental and Numerical Analysis of Forming Limit Diagram (FLD) a nd Forming Limit Stress Diagram (FLSD) Copyright © 2011 SciRes. MSA 501 For material with in-plane isotropy and for the cases with non-shear stress in a coordinate system aligned with the axes of anisotropy, the major and minor true stresses in the first stage of strain path can be expressed as fol- lows [5]: 1Y (9) 21 (10) The principal stresses during the second stage of strain path can be calculated by the following expressions [5]: 121 122 1 22 11 ,, Yii fifi fi fi (11) 22 21 11 fi fi (12) where 1i & 2i show the pre-strain state and 1 f & 2 f indicate the final strain state at the second stage of strain path. Y & represents the function defined in Equation (9). 6. Results and Discussions Typical uniaxial stress–strain curve for alloy AA3105 from uniaxial tests is shown in Figure 7. The strain har- dening exponent and the strength coefficient k from the empirical hardening law n K were determined from plot of lo g versus log . Consequently flow property was summarized as 0.103 302 MPa. The tensile strength of the material was found to be 231 MPa. Measurements of plastic strain ratios (R-values) used in the prediction of FLDs are given in Table 2. Figure 8 shows the FLD for Al 3105 in terms major and minor strains, respectively. In out-of-plane tests, the strains in the sheet vary over the stretched dome from a strain state close to plane strain near the flange of the sheet to one approximating balanced biaxial tension at the pole. In these situations, flow localization and failure site depend on the factors such as strain hardening, anisotropy beha- vior of the sheet metal, friction condition and strain gra- dient. During out-of-plane deformation, geometric and frictional effect comes into play with regard to their ten- dency to shift the site of strain localization away from the pole at which it was first initiated. The shift can also oc- cur partly because of strain hardening and the deve- lop- ment of a biaxial stress state in the neck. Using the equa- tions in section 5, the strain resulted from experimental work converted to stress. Figure 9 shows the forming limit stress diagram (FLSD) obtained from experimen- tally strain values. In the numerical work, ductile fracture criteria indi- Figure 7. True stress–True strain curve for alloy AA3105. Figure 8. Forming limit diagram (FLD) of AA3105. Figure 9. Forming limit stress diagram (FLSD) of AA3105. Table 2. Measured R values. Alloy R0 R45 R90 R* Al 3105 0.20 0.3 0.24 0.26 04590 12 4 RRRR . cated in Section 2, used to prediction of necking. FLD and FLSD obtained from these criteria are shown in Figures 10 and 11. In Figures 12, 13 experimental and numerical results compared together and it’s shown that they are in good agreement. Thus it’s proved ductile fracture criteria is 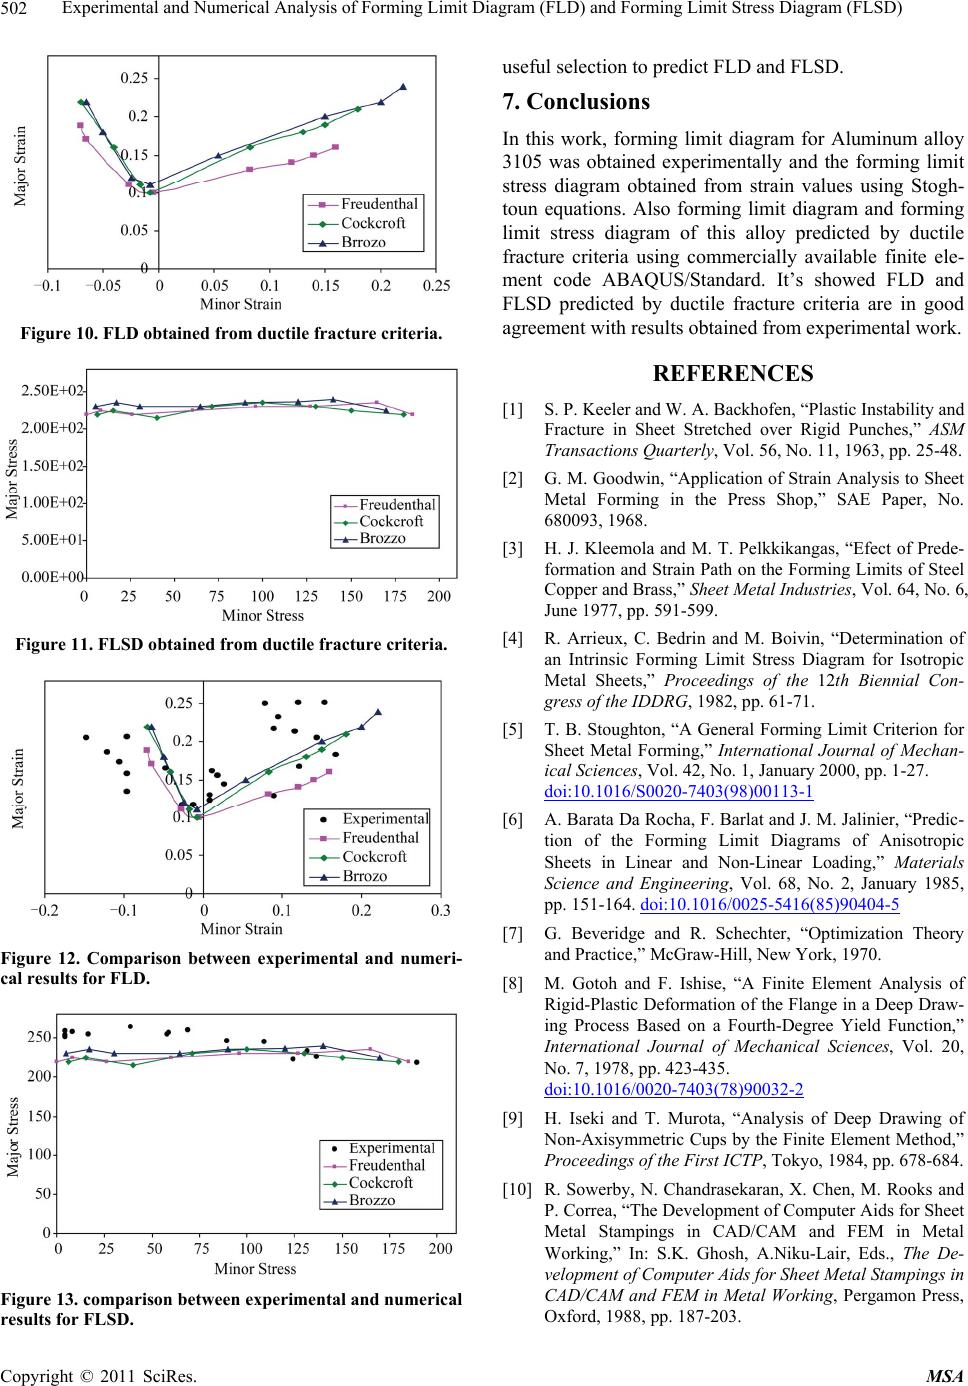 Experimental and Numerical Analysis of Forming Limit Diagram (FLD) and Forming Limit Stress Diagram (FLSD) Copyright © 2011 SciRes. MSA 502 Figure 10. FLD obtained from ductile fracture criteria. Figure 11. FLSD obtained from ductile fracture criteria. Figure 12. Comparison between experimental and numeri- cal results for FLD. Figure 13. comparison be twe en expe rimental and numer ic al results for FLSD. useful selection to predict FLD and FLSD. 7. Conclusions In this work, forming limit diagram for Aluminum alloy 3105 was obtained experimentally and the forming limit stress diagram obtained from strain values using Stogh- toun equations. Also forming limit diagram and forming limit stress diagram of this alloy predicted by ductile fracture criteria using commercially available finite ele- ment code ABAQUS/Standard. It’s showed FLD and FLSD predicted by ductile fracture criteria are in good agreement with results obtained from experimental work. REFERENCES [1] S. P. Keeler and W. A. Backhofen, “Plastic Instability and Fracture in Sheet Stretched over Rigid Punches,” ASM Transactions Quarterly, Vol. 56, No. 11, 1963, pp. 25-48. [2] G. M. Goodwin, “Application of Strain Analysis to Sheet Metal Forming in the Press Shop,” SAE Paper, No. 680093, 1968. [3] H. J. Kleemola and M. T. Pelkkikangas, “Efect of Prede- formation and Strain Path on the Forming Limits of Steel Copper and Brass,” Sheet Metal Industries, Vol. 64, No. 6, June 1977, pp. 591-599. [4] R. Arrieux, C. Bedrin and M. Boivin, “Determination of an Intrinsic Forming Limit Stress Diagram for Isotropic Metal Sheets,” Proceedings of the 12th Biennial Con- gress of the IDDRG, 1982, pp. 61-71. [5] T. B. Stoughton, “A General Forming Limit Criterion for Sheet Metal Forming,” International Journal of Mechan- ical Sciences, Vol. 42, No. 1, January 2000, pp. 1-27. doi:10.1016/S0020-7403(98)00113-1 [6] A. Barata Da Rocha, F. Barlat and J. M. Jalinier, “Predic- tion of the Forming Limit Diagrams of Anisotropic Sheets in Linear and Non-Linear Loading,” Materials Science and Engineering, Vol. 68, No. 2, January 1985, pp. 151-164. doi:10.1016/0025-5416(85)90404-5 [7] G. Beveridge and R. Schechter, “Optimization Theory and Practice,” McGraw-Hill, New York, 1970. [8] M. Gotoh and F. Ishise, “A Finite Element Analysis of Rigid-Plastic Deformation of the Flange in a Deep Draw- ing Process Based on a Fourth-Degree Yield Function,” International Journal of Mechanical Sciences, Vol. 20, No. 7, 1978, pp. 423-435. doi:10.1016/0020-7403(78)90032-2 [9] H. Iseki and T. Murota, “Analysis of Deep Drawing of Non-Axisymmetric Cups by the Finite Element Method,” Proceedings of the First ICTP, Tokyo, 1984, pp. 678-684. [10] R. Sowerby, N. Chandrasekaran, X. Chen, M. Rooks and P. Correa, “The Development of Computer Aids for Sheet Metal Stampings in CAD/CAM and FEM in Metal Working,” In: S.K. Ghosh, A.Niku-Lair, Eds., The De- velopment of Computer Aids for Sheet Metal Stampings in CAD/CAM and FEM in Metal Working, Pergamon Press, Oxford, 1988, pp. 187-203. 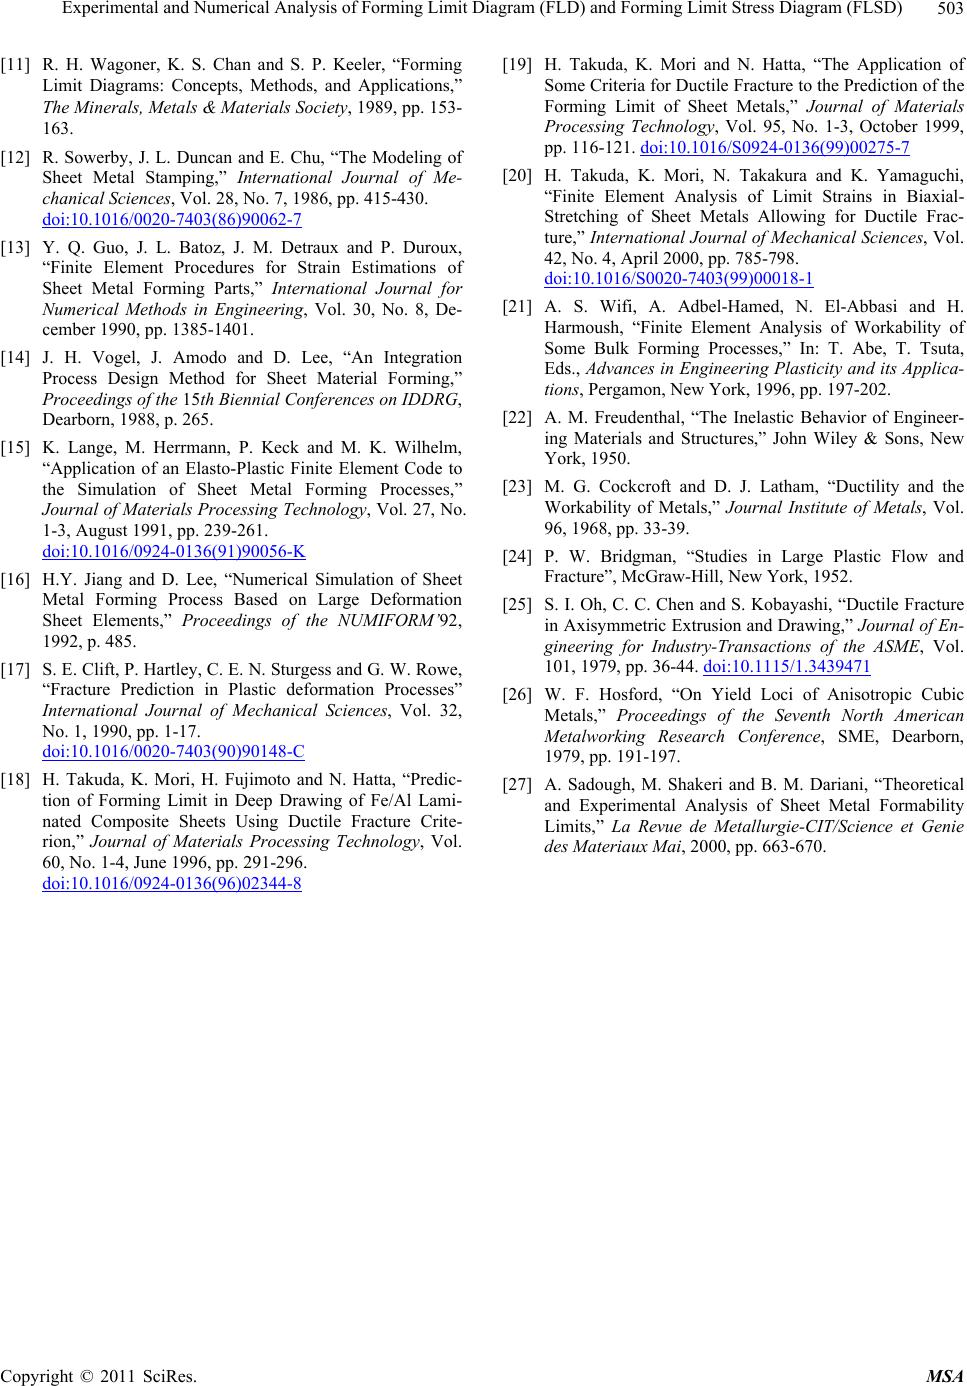 Experimental and Numerical Analysis of Forming Limit Diagram (FLD) a nd Forming Limit Stress Diagram (FLSD) Copyright © 2011 SciRes. MSA 503 [11] R. H. Wagoner, K. S. Chan and S. P. Keeler, “Forming Limit Diagrams: Concepts, Methods, and Applications,” The Minerals, Metals & Materials Society, 1989, pp. 153- 163. [12] R. Sowerby, J. L. Duncan and E. Chu, “The Modeling of Sheet Metal Stamping,” International Journal of Me- chanical Sciences, Vol. 28, No. 7, 1986, pp. 415-430. doi:10.1016/0020-7403(86)90062-7 [13] Y. Q. Guo, J. L. Batoz, J. M. Detraux and P. Duroux, “Finite Element Procedures for Strain Estimations of Sheet Metal Forming Parts,” International Journal for Numerical Methods in Engineering, Vol. 30, No. 8, De- cember 1990, pp. 1385-1401. [14] J. H. Vogel, J. Amodo and D. Lee, “An Integration Process Design Method for Sheet Material Forming,” Proceedings of the 15th Biennial Conferences on IDDRG, Dearborn, 1988, p. 265. [15] K. Lange, M. Herrmann, P. Keck and M. K. Wilhelm, “Application of an Elasto-Plastic Finite Element Code to the Simulation of Sheet Metal Forming Processes,” Journal of Materials Processing Technology, Vol. 27, No. 1-3, August 1991, pp. 239-261. doi:10.1016/0924-0136(91)90056-K [16] H.Y. Jiang and D. Lee, “Numerical Simulation of Sheet Metal Forming Process Based on Large Deformation Sheet Elements,” Proceedings of the NUMIFORM’92, 1992, p. 485. [17] S. E. Clift, P. Hartley, C. E. N. Sturgess and G. W. Rowe, “Fracture Prediction in Plastic deformation Processes” International Journal of Mechanical Sciences, Vol. 32, No. 1, 1990, pp. 1-17. doi:10.1016/0020-7403(90)90148-C [18] H. Takuda, K. Mori, H. Fujimoto and N. Hatta, “Predic- tion of Forming Limit in Deep Drawing of Fe/Al Lami- nated Composite Sheets Using Ductile Fracture Crite- rion,” Journal of Materials Processing Technology, Vol. 60, No. 1-4, June 1996, pp. 291-296. doi:10.1016/0924-0136(96)02344-8 [19] H. Takuda, K. Mori and N. Hatta, “The Application of Some Criteria for Ductile Fracture to the Prediction of the Forming Limit of Sheet Metals,” Journal of Materials Processing Technology, Vol. 95, No. 1-3, October 1999, pp. 116-121. doi:10.1016/S0924-0136(99)00275-7 [20] H. Takuda, K. Mori, N. Takakura and K. Yamaguchi, “Finite Element Analysis of Limit Strains in Biaxial- Stretching of Sheet Metals Allowing for Ductile Frac- ture,” International Journal of Mechanical Sciences, Vol. 42, No. 4, April 2000, pp. 785-798. doi:10.1016/S0020-7403(99)00018-1 [21] A. S. Wifi, A. Adbel-Hamed, N. El-Abbasi and H. Harmoush, “Finite Element Analysis of Workability of Some Bulk Forming Processes,” In: T. Abe, T. Tsuta, Eds., Advances in Engineering Plasticity and its Applica- tions, Pergamon, New York, 1996, pp. 197-202. [22] A. M. Freudenthal, “The Inelastic Behavior of Engineer- ing Materials and Structures,” John Wiley & Sons, New York, 1950. [23] M. G. Cockcroft and D. J. Latham, “Ductility and the Workability of Metals,” Journal Institute of Metals, Vol. 96, 1968, pp. 33-39. [24] P. W. Bridgman, “Studies in Large Plastic Flow and Fracture”, McGraw-Hill, New York, 1952. [25] S. I. Oh, C. C. Chen and S. Kobayashi, “Ductile Fracture in Axisymmetric Extrusion and Drawing,” Journal of En- gineering for Industry-Transactions of the ASME, Vol. 101, 1979, pp. 36-44. doi:10.1115/1.3439471 [26] W. F. Hosford, “On Yield Loci of Anisotropic Cubic Metals,” Proceedings of the Seventh North American Metalworking Research Conference, SME, Dearborn, 1979, pp. 191-197. [27] A. Sadough, M. Shakeri and B. M. Dariani, “Theoretical and Experimental Analysis of Sheet Metal Formability Limits,” La Revue de Metallurgie-CIT/Science et Genie des Materiaux Mai, 2000, pp. 663-670. |

