Engineering
Vol. 2 No. 10 (2010) , Article ID: 3178 , 5 pages DOI:10.4236/eng.2010.210101
Surface Roughness Evaluation in Dry-Cutting of Magnesium Alloy by Air Pressure Coolant
1Department of mechanical Engineering, Sejong University, Seoul, South Korea
2Department of mechanical Engineering, Korea Polytechnic College IV, Deajeon, South Korea
E-mail: jdkim@sejong.ac.kr
Received July 12, 2010; revised September 1, 2010; accepted September 19, 2010
Keywords: Machinability, Surface Roughness, Number of Inserts, Dry Milling, Air Pressure Coolant
ABSTRACT
In this paper, a studying of surface roughness in dry milling with air pressure coolant of wrought magnesium alloy AZ31B will be carried out. The effects of air flow, feed-rate per tooth, cutting velocity and number of inserts in a cutting tool on surface roughness have been examined. Surface roughness increases with increasing feed-rate per tooth and increasing number of inserts in the cutting tool. However, it is nearly unchanged under a specific range of cutting velocity in the experiment and improved by the flow of air cooling.
1. Introduction
Magnesium alloy is one of the lightest materials and is attractive in many applications such as aircraft engines, airframes, helicopter components, cars, light trucks, automotive parts, computers and so much more [1]. Following the recent trend in using magnesium material, B. L. Mordike and T. Ebert show that many researches in magnesium alloy have been made, [2] and obviously include the machining process.
In 1997, H. K. Tönshoff and J. Winkler researched the interactions between work-piece material AZ91HP, tool material and coating [3].
In 2005, F. Z. Fang, L. C. Lee and X. D. Liu measured the mean flank temperature in dry milling magnesium alloy AZ91 [4]. They recognize that when the maximum temperature is 302˚C, it occurs at cutting speed 816 m/min and under-formed chip thickness 9 µm.
Wrought magnesium alloy has good behavior during crashes and is utilized in parts with high safety concerns. When machining magnesium alloy with a water-base coolant, water will reacts with magnesium to create hydrogen. It is very dangerous because hydrogen is flammable and potentially explosive [5,6]. In addition, coolants and lubricants represent 16-20% of manufacturing costs, which should be diminished [7]. Cutting fluids are also harmful for the environment and costs for waste disposal, so air pressure coolant has been chosen to investigate.
In this paper, I will study the surface roughness in high-speed end milling of wrought magnesium alloy AZ31B with carbide inserts under effects of air coolant and number of cutting tool inserts.
2. Effects of the Number of Inserts
In this case, cutting edge is straight. The length of cutting edge, the number of inserts in the cutting tool and the feed-rate per revolution affect surface roughness profile.
We consider
 (1)
(1)
 (2)
(2)
In the multipoint cutting tool, we use more than one insert. Figure 1 shows the effects of insert run-out errors on the surface roughness profile. Whenever the feed-rate per revolution is smaller than length of the cutting edge, the lowest insert mainly forms the surface roughness profile. Using multiple inserts in face milling will generate axial and radial run-out errors. These errors will change the cutting force acting on the cutting tool and work-piece. These cutting forces in turn will generate more vibration and increase surface roughness.
Consider z-direction, the higher inserts will contact and cut the material, but the lowest insert will cut once again and negate the effects of higher inserts.
Cutting force in vertical direction FT [8]

Figure 1. Effects of run-out errors on surface roughness profile.
 (3)
(3)
where
θ =  + λ – α (4)
From Figure 2, we obtain chip ratio:
 (5)
(5)
where Real under-formed chip thickness
 (6)
(6)
Consider multi-point milling tool with six inserts as shown in Figure 3.
At the same cutting velocity and same feed-rate per tooth, changing the number of inserts in the cutting tool will change the contacting frequency between cutting tool and work-piece.
The contact angle will also affect cutting force profile. The contact angle:
 (7)
(7)
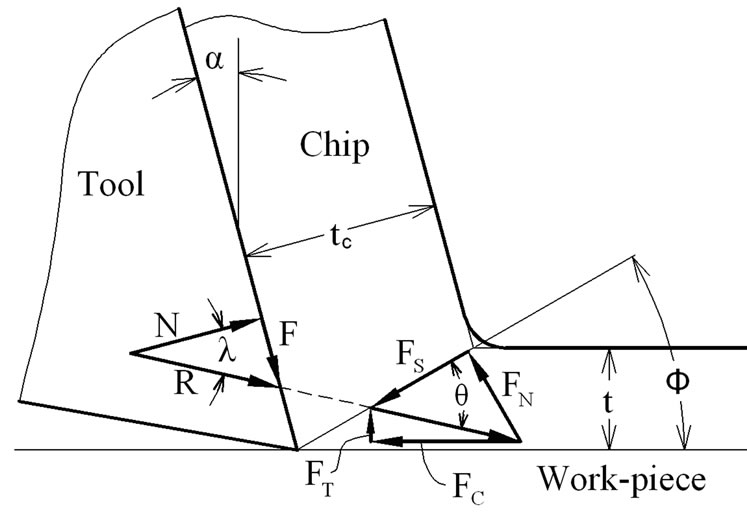
Figure 2. Orthogonal chip model.
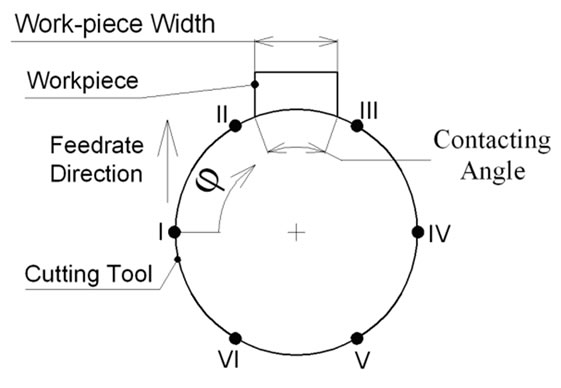
Figure 3. Contacting angle between cutting tool and work -piece.
The cutting force profile in the z-direction for one insert within half revolution is a thin curve in Figure 4. The cutting force will force the work-piece and cutting tool to vibrate at the same frequency to cutting force’s frequency.
As shown in Figure 4, with only one insert in the cutting tool, if the contact angle is equal to 180˚, the cutting force profile in z-direction will continue as a thin curve from 0˚ to 180˚. When the contact angle is smaller than 180˚, there is a suddenly a change at the entry and exit points as shown in this figure. This change will increase the vibrations of the system.
Increasing the number of inserts in the cutting tool will decrease angle between two consecutive sections. Therefore, vibration frequency will increase. This factor will increase the number of peaks and valleys on the surface roughness profile.
Increasing the feed-rate per tooth ft will increase the value on the cutting forces; and so increase the amplitude of vibration. This factor will increase the distance between the peaks and valleys of the surface roughness profile. As we can see in Equations (3) and (5), the cutting force and feed-rate per tooth have linear dependence. However, the cutting energy required to remove a unit volume of magnesium alloy is small, increasing the feed -rate per tooth when machining magnesium alloy will increase small amount of cutting force compare with other materials.
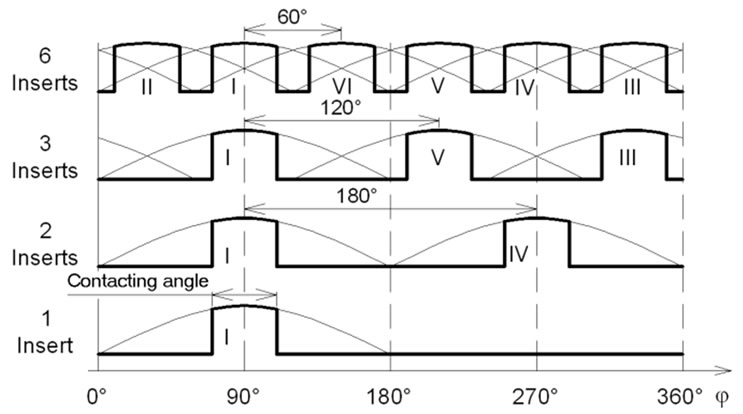
Figure 4. Cutting force in z-direction.
3. Experimental Conditions
This experiment uses a milling machine, HMV-F-1100N. The maximum spindle speed and feed-rate are respectively 1400 rpm and 720 mm/min. The cutting tool diameter is Φ100 mm. The uncoated carbide inserts, TPKN 2204 (follow ISO standard), are supplied by Taegu-Tech manufacturing, South Korea.
Magnesium alloy AZ31B by Doowon Korea. The chemical composition is 3% aluminum, 1% zinc, 0.2% manganese, 0.1% copper, 0.01% ferrite. Density is 1.77 g/cm3 [9]. The work-piece dimension is 34 mm.
Air pressure is 4.5 kg/cm2. Airflow at room temperature sprays directly to the machining zone as shown in Figure 5.
The experiment will check two cases: case 1 is dry milling, case 2 is air-coolant milling with incline angle 45˚, distance from the nozzle to cutting point is da = 25 ± 2 mm. The nozzle diameter is 5.5 mm.
Table 1 shows cutting parameters.
There are four cutting velocities, four feed-rates at a 0.2 mm depth of cut and only one insert the in cutting tool.
The cutting parameter is shown in Table 2. There are two cutting velocities, two feed-rates and four numbers of inserts in the cutting tool at depth of 0.2 mm.
The surface test equipment SJ-301 of Mitutoyo manufacturer has been used to check the surface roughness. The measurement process is performed at three positions and an average value will be calculated to represent for surface roughness.
Point micrometer and dial test indicator of Mitutoyo manufacturing are used to measure chip thickness, and a microscope is used to examine the chip shape.
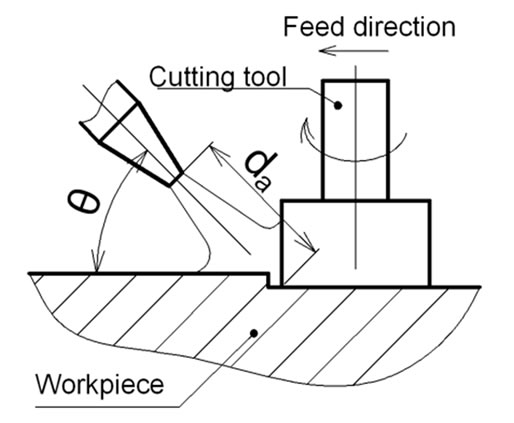
Figure 5. Air coolant flow setting.

Table 1. First cutting parameters.

Table 2. Second cutting parameters.
4. Results and Discussion
Figure 6 is surface roughness at a feed-rate of f = 0.08 mm/tooth. In dry cutting, the surface roughness is also nearly unchanged. Airflow has a small effect in improving the surface roughness.
Figure 7 shows that air coolant has a similar effect at various cutting velocities.
The air coolant cutting slightly improves the surface roughness. Magnesium alloy machining produc-es low cutting pressure, so the cutting energy and temperature are low. In addition, it also has a high thermal conductivity. This will dissipate heat rapidly. Because of this, the temperature difference between work-piece and airflow is small. This will reduce the cooling effect of air flow.
Figure 8 shows the surface roughness under changing feed-rate per tooth at the same cutting velocity V = 116 m/min.
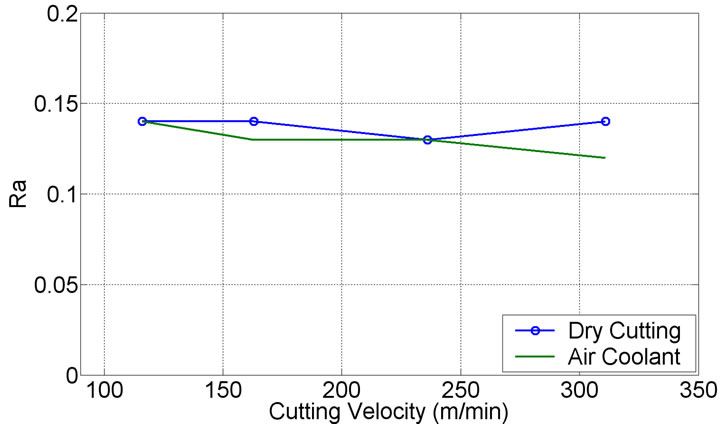
Figure 6. Surface roughness at d = 0.2 mm, ft = 0.08 mm/tooth. Air pressure: 4.5 kg/cm2.
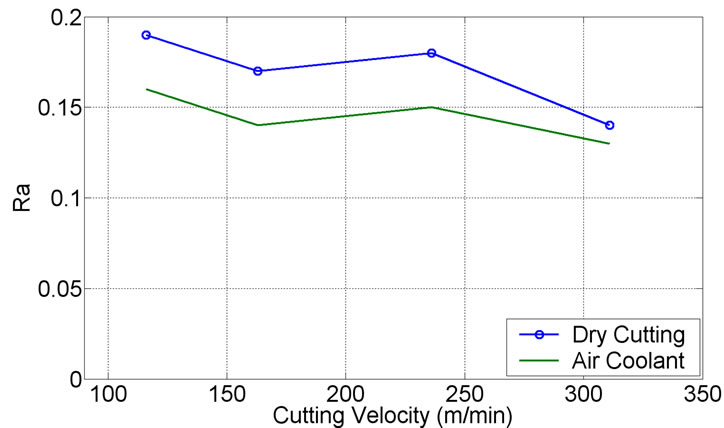
Figure 7. Surface roughness at d = 0.2 mm and ft = 0.17 mm/tooth. Air pressure: 4.5 kg/cm2.
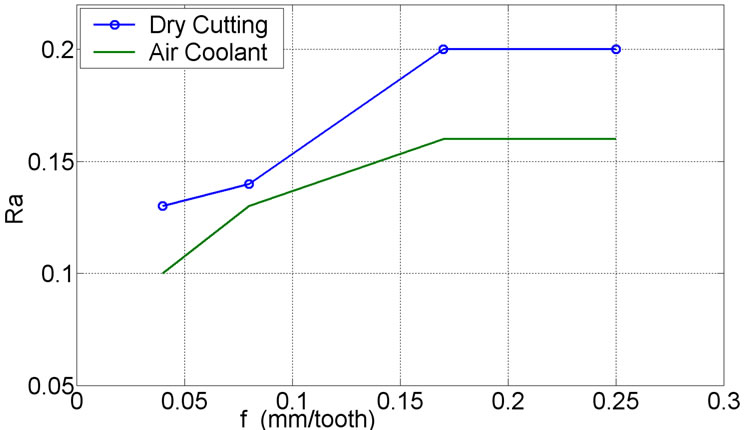
Figure 8. Surface roughness at V = 116 m/min and d = 0.2 mm. Air pressure: 4.5 kg/cm2.
From f = 0.04 mm/tooth to 0.17 mm/tooth, Ra increases rapidly, but from f = 0.17/0.25 mm/tooth, it is nearly unchanged. We use insert TPKN 2204. Insert corner is flat; this will leave feed marks by cutting tool work-piece vibrations.
Surface roughness also depends on the number of teeth in the cutting tool peripheral. Figure 9 shows the surface roughness at a cutting speed of V = 116 m/min, feed-rate f = 0.12 mm/tooth and depth of cut d = 0.2 mm.
Best result can achieve with one insert in the cutting tool. It gradually increases with two teeth and rapidly changes with three teeth. The value of Ra at six inserts is nearly four times larger than at one tooth.
Fewer inserts in the cutting tool will inrease chip clearance. This will make chips easier to move out, transfers cutting heat and decreases frictional heat. It also decreases scratches on the finish surface from the chips. Hence, we obtain a better surface.
In Figure 10, at three and six inserts, airflow has better effect than the others.
At a higher cutting speed and a smaller feed-rate, the air coolant has small effect because at a high cutting speed, a lower percent of cutting heat is transferred to the work-piece. Hence the cooling effect of airflow decreases.
In second experiment, a microscope is used to examine chip shape. Figure 11 is chip shape at difference numbers of inserts in dry cutting at V = 116 m/min, f = 0.06 mm/tooth and d = 0.2 mm. The side in contact with the cutting tool has a continuous edge. While the other side has a jagged edge or saw-tooth formation. At a larger number of inserts in cutting tool, the dimension of saw-tooth is smaller.
The shear angle is calculated by measuring chip thickness tc, and its value is shown in Figure 12. With a larger number of inserts in the cutting tool, the shear angle decreases. Increasing the number of inserts will increase the cutting temperature, increasing the friction between tool and chip and decreasing the shear angle.
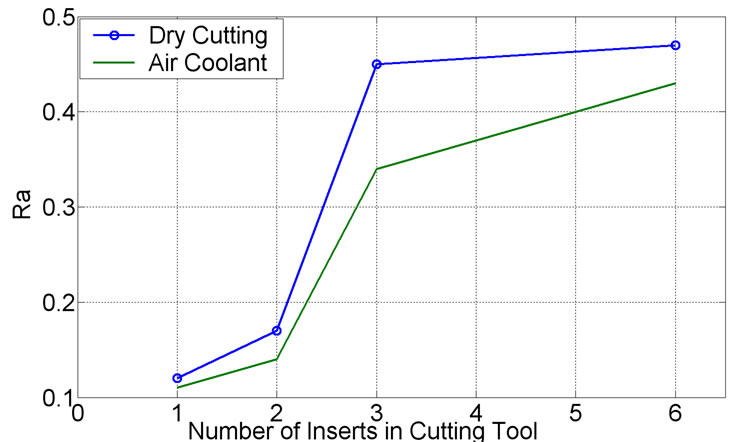
Figure 9. Surface roughness at V = 116 m/min, ft = 0.12 mm/tooth and d = 0.2 mm. Air pressure: 4.5 kg/cm2.
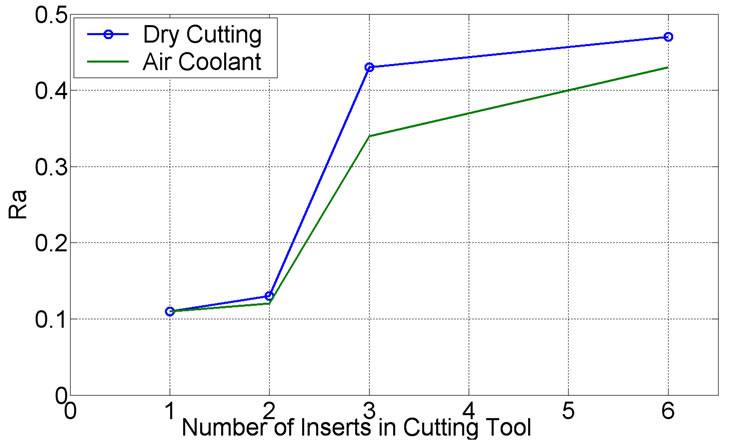
Figure 10. Surface roughness at V = 236 m/min, ft = 0.12 mm/tooth and d = 0.2 mm. Air pressure: 4.5 kg/cm2.

Figure 11. Chip shape in dry cutting at V = 116 m/min, ft = 0.06 mm/tooth and d = 0.2 mm. (a) 1 insert (b) 2 inserts (c) 3 inserts (d) 6 inserts.
Changing feed-rate per tooth at the same cutting velocity will increase the surface roughness because increased cutting forces. Increasing the feed-rate will increase the cutting force amplitude and increase the height between peaks and valleys on the surface roughness profile.
Airflow decreases cutting temperature by convection. Higher feed-rates will generate more cutting heat, this
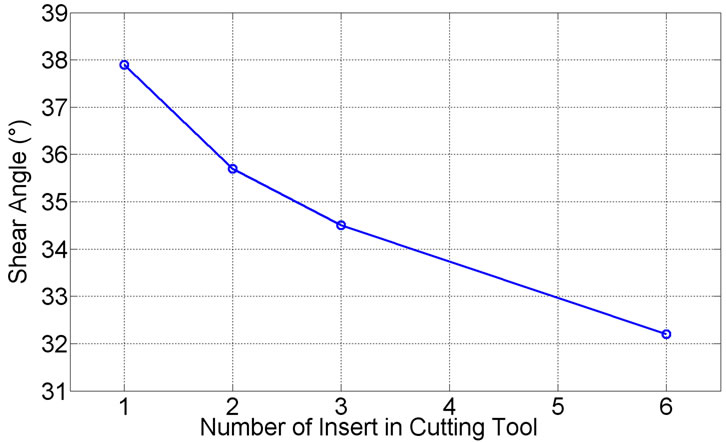
Figure 12. Shear angle in dry cutting at V = 116 m/min, ft = 0.06 mm/tooth and d = 0.2 mm.
will increase the temperature deviation between air flow and the work-piece, so affects of air flow are clearer. However, it is not a significant effect because the cutting temperature is not high.
In the second experiment, the width of the work-piece is 34 mm. The contact angle is 40˚. Changing the number of inserts in the cutting tool will significantly increase the surface roughness. This is because of the increasing frequency of cutting forces. A significant change on clearance angle is the main cause of significantly increased vibrations. As a result, the number of peaks and valleys in a unit length of surface will increase, and so increase the surface roughness.
Two inserts in the cutting tool, increases vibration and lowers the tool-chip friction and changes the surface roughness slowly. Three inserts, time to transfer cutting heat is enough, tool-chip friction increases little. Vibrations play the main role in increasing surface roughness. Six inserts significantly increases both the vibration and tool-chip friction, so the arithmetic mean value increases significantly.
5. Conclusions
Having milled magnesium alloy, we have drawn some conclusions:
1) When the cutting velocity changes from 116 m/min to 311 m/min, the surface roughness is nearly unchanged.
2) Air pressure flow at room temperature has a remarkable effect on the surface roughness with a large number of inserts in the cutting tool.
3) Surface roughness changes significantly with changing of number of inserts in the cutting tool. It is better to use one-third as many as used during conventional cutting.
6. Acknowledgements
This work was supported by the faculty research fund of Sejong University in 2008.
REFERENCES
- D. Eliezer, E. Aghion and F. H. (Sam) Froes, “Advanced Performance Materials,” Magnesium Science, Technology and Applications, Vol. 5, No. 3, 1998, pp. 201-212.
- B. L. Mordike and T. Ebert, “Magnesium: PropertiesApplications-Potential,” Materials Science and Engineering A, Vol. 302, No. 1, 2001, pp. 37-45.
- H. K. Tönshoff and J. Winkler, “The Influence of Tool Coatings in Machining of Magnesium,” Surface and Coatings Technology, Vol. 94-95, No. 10, 1997, pp. 610- 616.
- F. Z. Fang, L. C. Lee and X. D. Liu, “Mean Flank Temperature Measurement in High Speed Dry Cutting of Magnesium Alloy,” Journal of Materials Processing Technology, Vol. 167, No. 1, 2005, pp. 119-123.
- M. M. Advedesian and H. Baker, “Magnesium and Magnesium Alloys – ASM Specially Handbook,” ASM International, Ohio, 1999, pp. 127-129.
- K. U. Kainer, “Magnesium-Alloys and Technology,” WILEY-VCH, Weinheim, 2003, pp. 130-132.
- P. S. Sreejith and B. K. A. Ngoi, “Dry Machining: Machining of the Future,” Journal of Materials Processing Technology, Vol. 101, No. 1-3, 2000, pp. 287-291.
- H.-T. Young, P. Mathew and P. L. B. Oxley, “Predicting Cutting Forces in Face Milling,” International Journal of Machine Tools and Manufacture, Vol. 34, No. 6, 1994, pp. 771-783.
- T. L. Jones, R. D. DeLorme, M. S. Burkins and W. A. Gooch, “Ballistic Evaluation of Magnesium Alloy AZ31B,” U.S. Army Research Laboratory, Project Number 1L162 618AH80, Report Number ARL-TR-4077, 2006, pp. 2-3.
Nomenclature
α rake angle (˚)
d depth of cut (mm)
da distance from nozzle to cutting point (mm)
f feed-rate per minute (mm/min)
ft feed-rate per tooth (mm/tooth)
f’ feed-rate per revolution (mm/rev)
FC orthogonal cutting force in cutting direction
FT normal cutting force in cutting direction
FN, FS normal force and shear force on shear plane
k shear flow stress on shear plane
n spindle speed (rpm)
ni number of insert in cutting tool
N, F normal force and tangent force at tool-chip interface
r chip ratio
rt radius of cutting tool
R resultant force
t, tc real under-formed chip thickness and chip thickness
w, ww width of cut and width of work-piece
 shear angle
β contacting angle
θ angle made by resultant force R with AB
λ mean friction angle at tool-chip interface
φ rotate angle of cutting tool

