Journal of Materials Science and Chemical Engineering
Vol.05 No.04(2017), Article ID:75864,12 pages
10.4236/msce.2017.54004
Characterization of Nickel Alloy 600 with Ultra-Fine Structure Processed by Severe Plastic Deformation Technique (SPD)
Waldemar Alfredo Monteiro, Silvio Luis Ventavele da Silva, Luciana Ventavele da Silva, Arnaldo Homobono Paes de Andrade, Luis Carlos Elias da Silva
Nuclear and Energy Research Institute, IPEN, Cidade Universitária, São Paulo, Brasil

Copyright © 2017 by authors and Scientific Research Publishing Inc.
This work is licensed under the Creative Commons Attribution International License (CC BY 4.0).
http://creativecommons.org/licenses/by/4.0/


Received: February 17, 2017; Accepted: April 27, 2017; Published: April 30, 2017
ABSTRACT
High strength nickel based alloys are used in a multitude of advanced systems where lightweight, high power density mechanical power transmission systems are required. Components such as gears, bearings and shafts could be made significantly smaller and more durable if a major improvement in nickel based alloy mechanical properties could be achieved. An important refinement in grain size (includes nanometric level) is thought to be a promising method for achieving fundamental improvements in mechanical properties. Grain size is known to have a significant effect on the mechanical behavior of materials. One of the most favorable methods of achieving extreme grain refinement is by subjecting the materials to severe plastic deformation (SPD). The principal microstructural variations in superalloys are the precipitation amount and morphology, grain size and the distribution of carbide precipitation that could reduce the mechanical properties of the alloys. This work shows optical and transmission electron microscopy analysis and also hardness data after severe plastic deformation (pure shear stress).
Keywords:
Nickel Based Alloys, Severe Plastic Deformation, Hardness, Microstructure, Microscopy

1. Introduction
Despite the physical and mechanical properties of metals are determined by several factors, the average size of grain of material usually plays a very important role and is often a dominant factor in determining the properties and the final application of metals. It is noteworthy that the increase of mechanical resistance with the grain size reduction has produced increasing interest in the manufacture of materials with extremely small grain size. The grain sizes of commercial alloys are generally manufactured for specific applications, through predetermined thermo-mechanical treatments in which the alloys are subjected to specific regimes of temperature and mechanical tests. However, these processes cannot be used to produce materials with sub-micrometric grain sizes because there is a fixed lower bound, on the order of a few microns, representing essentially the minimum grain size achieved using these procedures.
In practice, conventional methods of forming, such as rolling and extrusion, have restricted capacity to produce materials with ultra-fine grains for two important reasons: first, there is a limitation on the total deformation can be imposed on the material due to the reduction in cross-sectional dimensions of samples; Second, the deformations imposed by conventional methods are unsatisfactory to introduce ultra-fine structure due to low workability of alloys at room temperature and relatively low temperatures [1] . As a consequence of these limitations, alternative processing techniques are necessary for this purpose, based on the SPD application, where extremely high deformations are imposed for manufacture of materials with grain size in the sub-micron range or nanoscale [2] .
The technological application of nickel alloy 600 is associated to the high melting point (1726 K), adequate corrosion resistance, limited dissolution capability, presence of metallic elements that serve to strengthen or improve its properties [3] [4] [5] . This alloy containing between 15% and 30% chromium is essential for corrosion resistance. Other elements are usually present on a smaller level, ranging from 3% to 20%, and are related to the increased resistance to deformation at high temperatures. The nickel alloy 600 is an austenitic alloy containing 76% nickel, 15% chromium, 8% iron and minor additions from other elements. With such high nickel content, this alloy has low carbon solubility, the excessive carbons precipitate as chromium carbides when this alloy is exposed to temperatures between 813 K and 1253 K. These carbides can appear dispersed in dislocation tangles and also in grain boundaries (secondary phases) [5] .
SPD is a simple and viable method to achieve grain refinement of up to 100 nm in metallic materials. However, SPD of any high-strength material, such as nickel alloy 600, by pressing or twisting in high pressure is inherently difficult due to tooling requirements [6] . Among these methods, pressing in SPD is one of the simplest methods of deformation, which under ideal conditions occurs by simple shear. This technique was originally developed by Segal et al. [7] , aiming to introduce severe plastic deformation in materials without changing the cross-section of sample, and it is possible to repeat the process several times to increase the level of imposed deformation [8] [9] [10] . The SPD extrusion principle is illustrated schematically in Figure 1. The mold (die) is constructed with two sequential channels, which intersect at an angle Ф = 120˚ and there is also an additional angle, ψ = 0˚, which defines the arc of curvature of the junction.
Figure 1. Schematic diagram showing the extrusion principle for SPD: two sequential channels, which intersect at an angle Ф = 120˚ and ψ = 0˚, which defines the arc of curvature of the junction (Valiev, 2000).
When the outer angle ψ = 0˚ and the inner angle Ф is arbitrary according to [7] the shear strain value increment at each pass through the channels can be calculated by the equation

Figure 2(a) and Figure 2(b) are the two opened components of the die and figure (c) the closed die with plunger, sample inside the die. The sample test is inserted within the mold channel and pressed with a punch in a specific load.
The repetitive mechanical process allows developing different microstructures by rotating the sample between consecutive passes. Figure 3 shows the four basic processing routes (paths), where sample rotations between consecutive passes are 0˚, to the route; 90˚, to route B, and 180˚, to route c. The route B is still divided into routes BA and BC, with 90˚ rotations in opposite directions along the same lines, or alternating after each pass, respectively. It is noticeable that route B produces the highest level of strength in comparison to routes A and C, as deformation occurs in two orthogonal shear planes and directions. At each even numbered pass, shear bands nearly disappear and only subgrains are present inside the original grains [1] [11] [12] [13] [14] [15] .
2. Materials and Methods
The employed material of this research (Multialloy, São Paulo, Brazil) is a nickel-based superalloy, nickel alloy 600 (samples with length of 1.6 m and diameter of 7 × 10⁻³ m). The chemical composition in percentage by weight is: 73.8% Ni; 16.3% Cr; 8.55% Fe; 0.33% Mn; 0.39% Si; 0.26% Ti; 0.17% Al; 0.02% Cu; 0.03% Co; 0.002% S; 0.007% P; 0.002% B; 0.007% C. Previously to SPD the specimens

Figure 2.The two opened components ((a) and (b)) of the die and (c) the closed die with plunger, sample inside the die.
Figure 3. Assortments for billet rotation between consecutive passes through SPD die [12] .
were machined with dimensions close to the channel of the mold (6 mm × 6 mm × 60 mm), and submitted to a heat treatment at 673 K during 1800 s, followed by cold water quenching, and finally surface-polished using 1200 grit SiC paper.
The samples were processed using a two-part mold (D2 tool steel) with two rectangular channels of equal cross sections intersecting at an angle (Ф) of 120˚ to each other and with external elbow angle (ψ) of 60˚ (Figure 2 and Figure 3). The punch used in pressing operation was also manufactured in D2 tool steel to maintain a small clearance between the sample and the channel. After the extrusion process, the pinhole is removed and the deformed billet is also removed from the second channel. The process can be repeatedly performed in the same tool with various alternatives and thus the intensity of total deformation will be N (number of passes) times a single shear deformation (Figure 1 and Figure 3).
The SPD technique was conducted at room temperature, positioning the array in a universal testing machine INSTRON 4400R operating at a constant speed of 5 mm/min in order to reduce the effects of friction and grip and prevent problems during processing, the channel and the specimens were lubricated with copper grease. During each step of the mechanical processing a few interruptions were necessary for lubrication.
Two routes were carried out via the SPD technique, in this paper is presented according to the results BC route, i.e., each pass the sample is rotated by 90˚ in relation to the previous pass. The specimens were subjected to two, four and six passes using the BC path of deformation, in which the specimen is turned 90° in the same direction in relation to the longitudinal axis after each pass.
Concerning Vickers microhardness tests a Buehler Micromet 2103 was utilized. The measurements were subjected with a load of 5.0 × 10⁻² kg on the surface of the sample (with optical microscope). Each indentation adequately spaced out to avoid interference with each other. The results consist of the average of the values obtained. All of these measurements were performed at ECAP plane perpendicular to the longitudinal axis of the samples over the line passing through the center.
For each condition of deformation processing, hardness tests, optical microscopy (OM), and transmission electron microscopy (TEM, accelerating voltage 200 kV) observations were performed. Thin foils for TEM were prepared from the flow plane using the standard technique of double jet electro polishing. For each specific condition of preparation, an average of six thin foils was observed to take into account statistical effects. EDS by scanning electron microscopy (SEM) was also utilized.
3. Results and Discussion
The mechanical properties values (Vickers hardness) indicated a significant increase of mechanical strength of nickel alloy 600 (Figure 4). Vickers hardness tests carried out in the received material show mean value of (313 ± 4) HV0.05.
Figure 4. Vickers hardness values in nickel alloy 600 (cross-section samples) after 2, 4, and 6 ECAP technique steps.
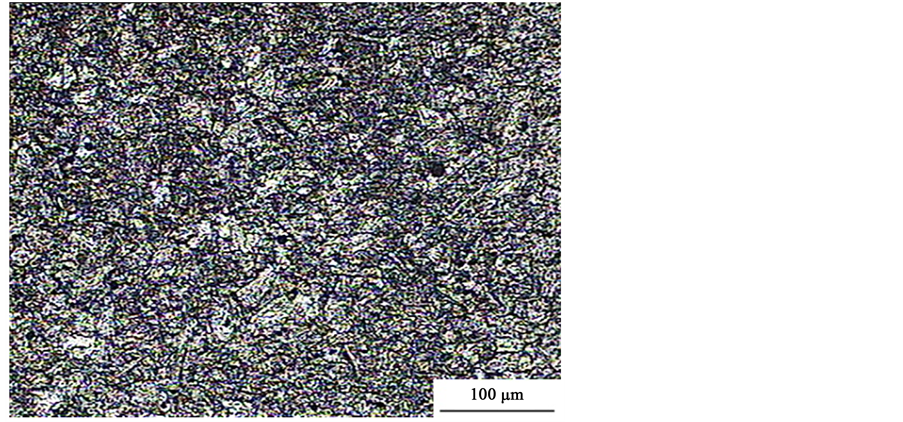
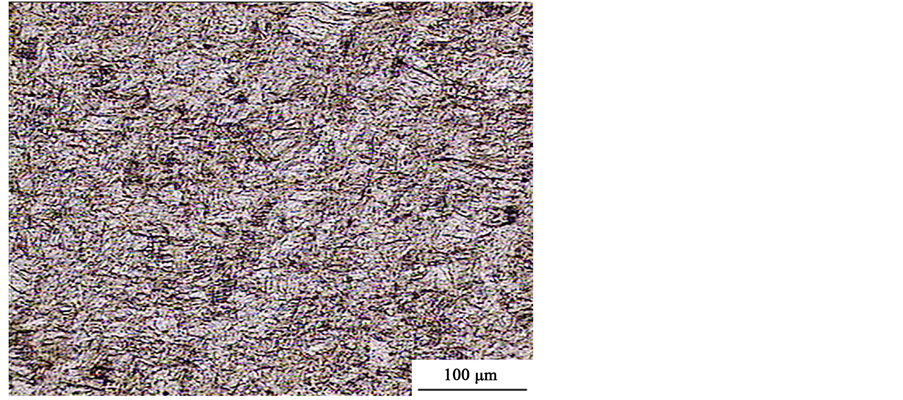
The optical microscopy (OM) observations in the samples of the as received 600 nickel alloy showed grain size variations and carbide and nitride precipitations (Table 1) identified by XRD (Figure 5) and EDS microanalysis (SEM). After heat treatment at 673K during 1800s it is observed grain size variation (grain growth has occurred) and presence of carbide precipitations (Figure 6). After the deformation processes there is a decrease in grain size with increase of applied ECAP passes number (Figure 7). In some situations the particles (carbides) show dimensions compared to the new ECAP induced grain. With the obtained data from the mechanical tests and with the microstructure during observations by OM and TEM indicate that 600 nickel alloy after ECAP technique exhibited higher strength while maintaining enough ductility.
Figure 5. Micrograph by optical microscopy of as received nickel alloy 600 (varying sizes of grains and presence of precipitation).
Figure 6. Micrograph by optical microscopy nickel alloy 600 after heat treatment at 673K after 1800 s: grain size variation and carbide precipitations.
Figure 7. Optical micrograph of the nickel alloy 600 after heat treatment of 673 K during 1800s also after four ECAP passes, presence of elongated grains and precipitates identified by EDS microanalysis-SEM, electron and x-rays diffraction results.
Table 1. Elements compositions obtained by RX diffraction of as received 600 nickel alloy.
The observations carried out by TEM revealed that after a few ECAP steps, the structure of heat treated nickel alloy 600 (673K during 1800s) shows a mixture of grain subboundary and low and high angle boundary grains. Individual linear crystalline defects (dislocations) were induced already in the early stages of extrusion and reordered to form dislocation tangles presented in new grain boundaries and grain subboundaries during the deformation process (Figure 8).
Considering the deformation process condition the heterogeneity in microstructure formation was often observed across the bulk specimen in dependence of the introduced strain. As results of different straining applied the banded elongated subgrain structure is present due to dominant shear strain. With increasing deformation, a part of the dislocations was absorbed by subboundaries and enlarged the disorientation among the subboundaries changing into boundaries of low and high angle. It is also observed a reduction in the number of low angle boundaries and increased the number of high angle boundaries with the
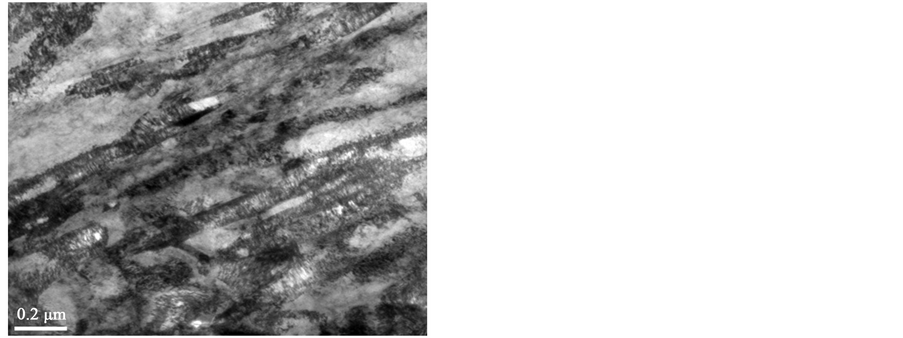
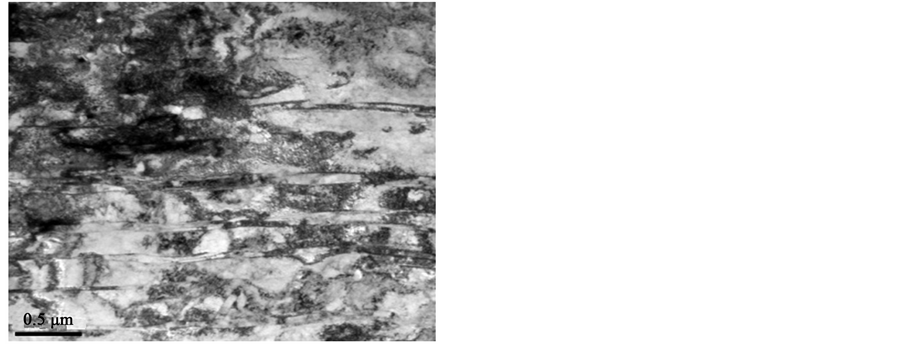
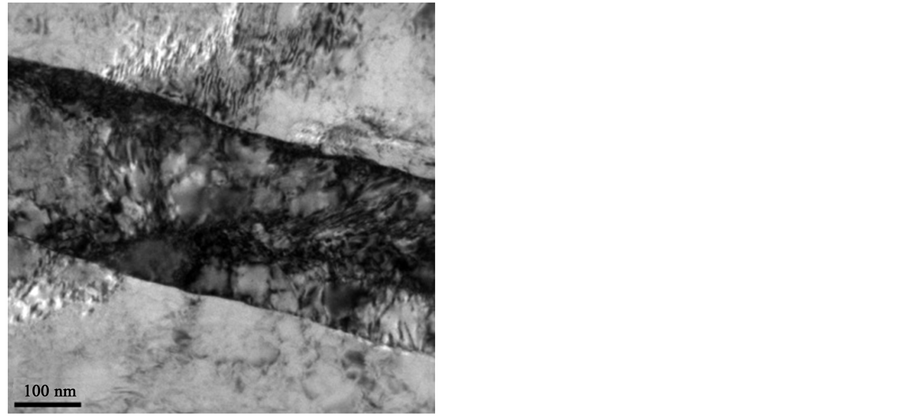
Figure 8. Electron micrographs (TEM) of 600 nickel alloy heat treated at 673K during 1800 s followed by intense deformation?SPD process, route BC, two passes: (a), (b) General aspects of the microstructure, subgrains presence inside elongated grains in the shear process direction despite the variation in the shear process used; presence of dislocation tangles and fine precipitates (c) grains with preferred shear direction, also presence of dislocations.
rise of the number of passes made in nickel alloy 600 and contributes to a substantial number of activated slipping plans of the same family.
The microstructural characterization by TEM shows a possible explanation that parallel arrangement of microtwins formation inside the grains observed in addition to have in several regions intersections between them. There are also presence of some elongated grain and in some places along the boundaries of elongated grains are also observed embryos of new grains (nanograins of 200 nm). The presence of a large number of dislocations takes some difficult to this measure (Figure 9 and Figure 10). The analyzed diffraction patterns indicate polycrystalline material with random grains orientation. Comparing with others articles of this area [16] [17] it seems that these microtwins can act as new grains
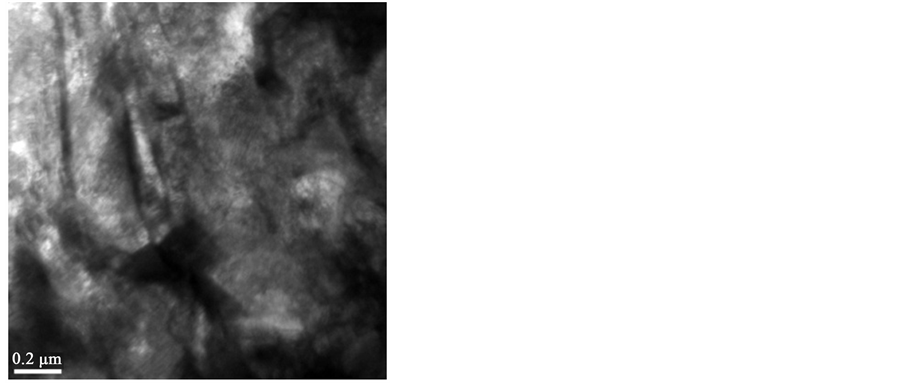

Figure 9. Electron micrograph (TEM) of 600 nickel alloy heat treated in 673K during 1800s followed by the intense deformation processing (SPD). Route BC, four passes. (a) Elongated grains and subgrains with dislocation tangles; (b) Details of the presence of microtwins inside subgrains with preferred shear deformation direction that motivates possible subsequent formation of nanograins in the twin walls during shear rotations by SPD process.
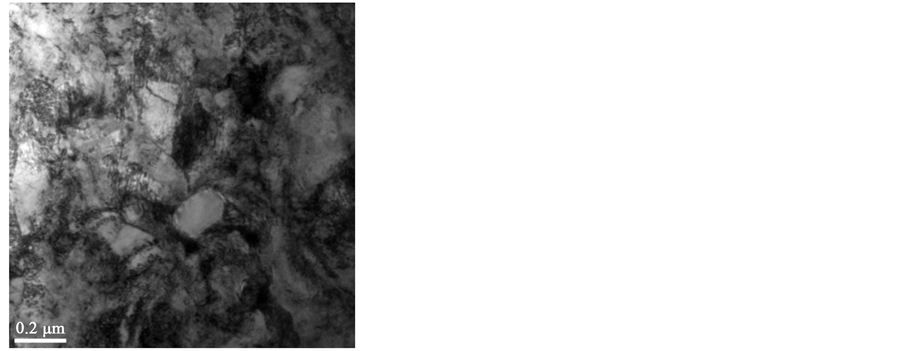
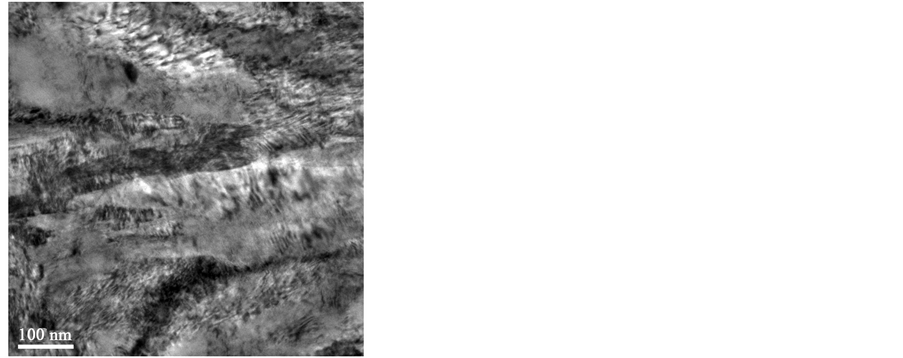
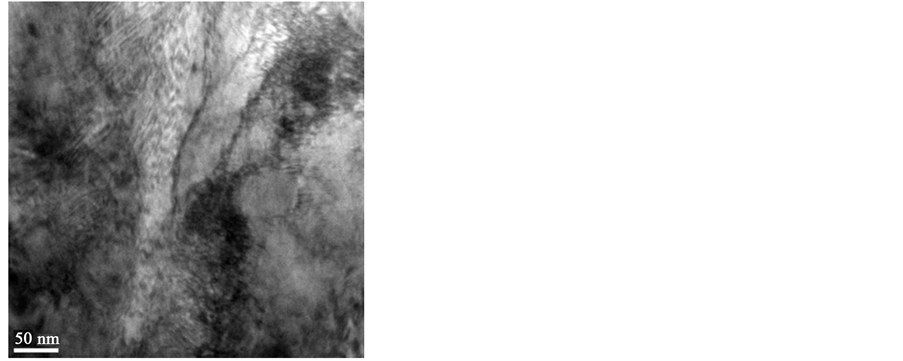
Figure 10. Electron micrograph (TEM) of 600 nickel alloy heat treated at 400˚C during 1800 s followed by the intense deformation process (SPD-BC route after 6 passes). (a) Presence of dislocations tangles inside the grain size some of them reduced probably due to additional energy of successive shear passes occurred during the process; ((b), (c)) subgrains of varying sizes with dislocations, dislocation rings as well thinner precipitates, presence of microtwins inside the subgrains due to shear applied that may indicate possible subsequent formation of nanograins on your walls.
nuclei (supposed nanograins) due to the: (a) generation of a high density of dislocations within the microtwins; (b) subsequent formation of deformation groups of inside the microtwins. Initially, during the SPD process, dislocations can pile-up near the walls of the microtwins giving possibility to produce new grain nuclei and also some atomic planes during rotation process divided the existing microtwins, producing new nano domains with a possible nanograins formation.
4. Conclusion
Regarding the microstructural observation of nickel alloy 600 subjected the PCE procedure (Bc route) it can be concluded that the intense deformation process produces a microstructural variation with respect to the size of the nanograins obtained after PCE process. The multiple deformations of the microtwins accommodating of plastic deformation applied and the presence of second phases cooperates to the nanograins mechanisms creating a large number of dislocations and also the interaction dislocations-precipitates.
Acknowledgements
The authors thank the CNEN by granting master’s degree scholarship (S. L. V. Silva); “SENAI School Frederick Jacob” (sample machining); MSc. M. Castagnet; N. A. M. Ferreira (TEM analyses); M. V. S. Martins (RX diffraction analysis); Mechanical Engineering Department-EPUSP (microhardness measurements); Madam Dr. S. M. C. Fernandes (paper review).
Cite this paper
Monteiro, W.A., da Silva, S.L.V., da Silva, L.V., de Andrade, A.H.P. and da Silva, L.C.E. (2017) Characterization of Nickel Alloy 600 with Ultra-Fine Structure Processed by Severe Plastic Deformation Technique (SPD). Journal of Materials Science and Chemical Engineering, 5, 33-44. https://doi.org/10.4236/msce.2017.54004
References
- 1. Valiev, R.Z. and Langdon, T.G. (2006) Principles of Equal-Channel Angular Pressing as a Processing Tool for Grain Refinement. Progress in Materials Science, 51, 881-981.
- 2. Furukawa, M., Horita, Z., Nemoto, M. and Langdon, T.G. (2002) The Use of Severe Plastic Deformation for Micro-Structural Control. Materials Science and Engineering: A, 324, 82-89.
- 3. Donachie, M.J. (1984) Superalloys Source Book. American Society for Metals, Geauga County.
- 4. Sims, C.T. and Hagel, W.C. (1972) The Superalloys. Willey, New York.
- 5. Calvo, W.A.P and Monteiro, W.A. (1996) Evaluation and Characterization of Nickel EMVAC600 Superalloy after Fusion Welding Processes TIG, Laser and Plasma Arc. Proceedings of 9th Non- Ferrous Metals Seminar, São Paulo, 5-7 November 1996, 135-154. (In Portuguese)
- 6. Nakashima, K., Horita, Z., Nemoto, M. and Langdon, T.G. (1998) Influence of Channel Angle on the Development of Ultrafine Grains in Equal-Channel Angular Pressing. Acta Materialia, 46, 1589-1599.
- 7. Segal, V.M., Reznikov, V.I., Drobyshevskiy, A.E. and Kopylov, V.I. (1981) Plastic Working of Metals by Simple Shear. Russian Metallurgy, 1, 99-105.
- 8. Langdon, T.G., Furukawa, M., Nemoto, M. and Horita, Z. (2000) Using Equal- Channel Angular Pressing for Refining Grain Size. JOM, 52, 30-33.
https://doi.org/10.1007/s11837-000-0128-7 - 9. Bowen, J.R., Gholinia, A., Roberts, S.M. and Prangnell, P.B. (2000) Analysis of the Billet Deformation Behaviour in Equal Channel Angular Extrusion. Materials Science and Engineering: A, 287, 87-99.
- 10. Valiev, R.Z., Islamgaliev, R.K. and Alexandrov, I.V. (2000) Bulk Nanostructured Materials from Severe Plastic Deformation. Progress in Materials Science, 45, 103- 189.
- 11. Ferrasse, S., Segal, V.M., Hartwig, K.T. and Goforth, R.E. (1997) Microstructure and Properties of Copper and Aluminum Alloy 3003 Heavily Worked by Equal Channel Angular Extrusion. Metallurgical and Materials Transactions A, 28, 1047-1057.
https://doi.org/10.1007/s11661-997-0234-z - 12. Iwahashi, Y., Horita, Z., Nemoto, M. and Langdon, T.G. (1998) Influence of Channel Angle on the Development of Ultrafine Grains in Equal-Channel Angular Pressing. Acta Materialia, 46, 1589-1599.
- 13. Iwahashi, Y., Furukawa, M., Horita, Z., Nemoto, M. and Langdon, T.G. (1998) Defect Formation in β-Al2TiO5 and Its Influence on Structure Stability. Metallur- gical and Materials Transactions A, 29, 2245-2249.
- 14. Iwahashi, Y., Horita, Z., Nemoto, M. and Langdon, T.G. (1997) An Investigation of Micro-Structural Evolution during Equal-Channel Angular Pressing. Acta Materialia, 45, 4733-4741.
- 15. Davenport, S.B., Higginson, R.L. and Sellars, C.M. (1999) The Effect of Strain Path on Material Behaviour during Hot Rolling of FCC Metals. Philosophical Transa- ctions of the Royal Society A, 357, 1645.
https://doi.org/10.1098/rsta.1999.0394 - 16. Shankar, M.R., Rao, B.C., Chandrasekhar, S., Compton, W.D. and King, A.H. (2008) Thermally Stable Nanostructured Materials from Severe Plastic Deformation of Precipitation-Treatable Ni-Based Alloys. Scripta Materialia, 58, 675-678.
- 17. Villegas, J.C., Dai, K., Shawa, L.L. and Liaw, P.K. (2005) Nanocrystallization of a Nickel Alloy Subjected to Surface Severe Plastic Deformation. Materials Science and Engineering A, 410-411, 257-260.


