Paper Menu >>
Journal Menu >>
 Engineering, 2013, 5, 856-864 Published Online November 2013 (http://www.scirp.org/journal/eng) http://dx.doi.org/10.4236/eng.2013.511104 Open Access ENG Load-Measuring Pot Bearing with Built-In Load Cell —Part I: Design and Performance Jeong-Rae Cho, Young Jin Kim*, Jong-Won Kwark, Sung Yong Park, Won Jong Chin, Byung-Suk Kim Structural Engineering Research Division, Korea Institute of Construction Technology, Goyang-Si, Korea Email: chojr@kict.re.kr, *yjkim@kict.re.kr, origilon@kict.re.kr, sypark@kict.re.kr, wjchin@kict.re.kr, bskim@kict.re.kr Received September 4, 2013; revised October 4, 2013; accepted October 11, 2013 Copyright © 2013 Jeong-Rae Cho et al. This is an open access article distributed under the Creative Commons Attribution License, which permits unrestricted use, distribution, and reproduction in any medium, provided the original work is properly cited. ABSTRACT This paper presents the underlying principle and the results of various performance evaluations for a load-measuring pot bearing with built-in load cell. The pot bearing composed of a pot made of steel in which an elastomer disk is inserted is a bearing supporting larger loads than the elastomeric bearing and accommodating rotational movement. Owing to a Poisson’s ratio close to 0.5, elastomer withstands hydrostatic pressure when confined in a rigid body. Accounting for this principle, the vertical load applied on the pot bearing can be obtained by converting the pressure acting on the elas- tomer. Therefore, a load-measuring pot bearing is developed in this study by embedding a load cell exhibiting remark- able durability in the base plate of the bearing. The details for the insertion of the load cell in the base plate of the pot were improved through finite element analysis to secure sufficient measurement accuracy. The evaluation of the static performance of the pot bearing applying these improved details verified that the bearing exhibited sufficient accuracy for the intended measurement purpose. The dynamic performance evaluation results indicated that accurate measure- ment of the dynamic load was also achieved without time lag. Keywords: Bridge Bearing; Pot Bearing; Load-Measuring; Load Cell 1. Introduction Bridge bearings are elements transmitting the loads from the superstructure to the substructure and allowing the designer to make the bridge behave as intended by re- straining or enabling movements of the superstructure. Recently, efforts are being undertaken to supplement such basic functions of the bearing with additional meas- uring functions to help the erection and maintenance of the bridge. Especially, the possibility to measure vertical loads will enable to monitor or identify factors that may affect the structural health of the bridge such as differen- tial settlement of the foundations, eventual unbalanced force caused by inexact installation of the superstructure, severe change of the structural system during the service life or overloaded vehicles. Moreover, the bridges of the recently rapidly constructed high-speed railway are fea- tured by the higher importance of the dynamic train loads compared to the permanent loads and the large magnifi- cation of the dynamic response occurring when the trains run at speed close to the resonant speed. Accordingly, the dynamic vertical load measured continuously by the bridge bearing can be exploited to improve the service- ability of the high-speed railway bridge like the riding comfort of the passengers and the stability of the track. The company Maurer [1] commercializes bearings measuring the vertical load by inserting pressure sensors in pot bearings and spherical bearings that have been applied in real bridge sites. Agrawal et al. [2] developed a smart bridge bearing system in which pressure sensor, accelerometer, displacement sensor and thermocouple are applied in an elastomeric bearing. Choo et al. [3] proposed a multi-functional bridge bearing enabling to measure loads and harvest energy using a piezocompo- site electricity generating element (PCGE). Udd et al. [4] and Chang et al. [5] developed load-measuring bearings using FBG sensors. The pot bearing composed of a pot made of steel in which an elastomer disk is inserted is a bearing support- ing larger loads than the elastomeric bearing and ac commodating rotational movement. Owing to a Poisson’s ratio close to 0.5, the elastomer is subjected to hydro- *Corresponding author. 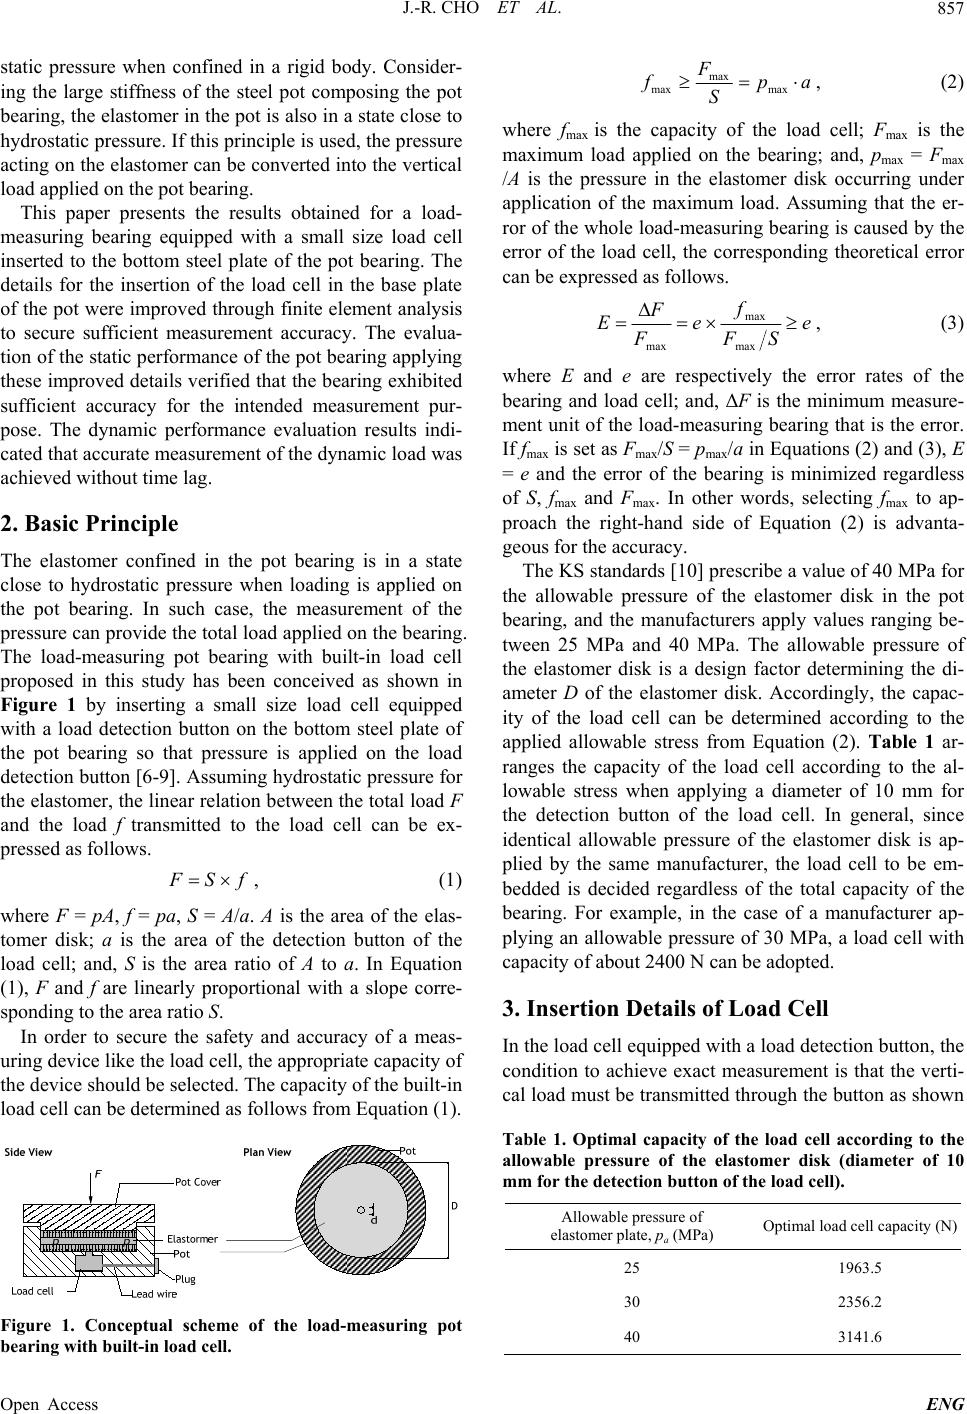 J.-R. CHO ET AL. 857 static pressure when confined in a rigid body. Consider- ing the large stiffness of the steel pot composing the pot bearing, the elastomer in the pot is also in a state close to hydrostatic pressure. If this principle is used, the pressure acting on the elastomer can be converted into the vertical load applied on the pot bearing. This paper presents the results obtained for a load- measuring bearing equipped with a small size load cell inserted to the bottom steel plate of the pot bearing. The details for the insertion of the load cell in the base plate of the pot were improved through finite element analysis to secure sufficient measurement accuracy. The evalua- tion of the static performance of the pot bearing applying these improved details verified that the bearing exhibited sufficient accuracy for the intended measurement pur- pose. The dynamic performance evaluation results indi- cated that accurate measurement of the dynamic load was achieved without time lag. 2. Basic Principle The elastomer confined in the pot bearing is in a state close to hydrostatic pressure when loading is applied on the pot bearing. In such case, the measurement of the pressure can provide the total load applied on the bearing. The load-measuring pot bearing with built-in load cell proposed in this study has been conceived as shown in Figure 1 by inserting a small size load cell equipped with a load detection button on the bottom steel plate of the pot bearing so that pressure is applied on the load detection button [6-9]. Assuming hydrostatic pressure for the elastomer, the linear relation between the total load F and the load f transmitted to the load cell can be ex- pressed as follows. fSF , (1) where F = pA, f = pa, S = A/a. A is the area of the elas- tomer disk; a is the area of the detection button of the load cell; and, S is the area ratio of A to a. In Equation (1), F and f are linearly proportional with a slope corre- sponding to the area ratio S. In order to secure the safety and accuracy of a meas- uring device like the load cell, the appropriate capacity of the device should be selected. The capacity of the built-in load cell can be determined as follows from Equation (1). Figure 1. Conceptual scheme of the load-measuring pot bearing with built-in load cell. ap S F f max max max , (2) where fmax is the capacity of the load cell; Fmax is the maximum load applied on the bearing; and, pmax = Fmax /A is the pressure in the elastomer disk occurring under application of the maximum load. Assuming that the er- ror of the whole load-measuring bearing is caused by the error of the load cell, the corresponding theoretical error can be expressed as follows. e SF f e F F E max max max , (3) where E and e are respectively the error rates of the bearing and load cell; and, ΔF is the minimum measure- ment unit of the load-measuring bearing that is the error. If fmax is set as Fmax/S = pmax /a in Equations (2) and (3), E = e and the error of the bearing is minimized regardless of S, fmax and Fmax. In other words, selecting fmax to ap- proach the right-hand side of Equation (2) is advanta- geous for the accuracy. The KS standards [10] prescribe a value of 40 MPa for the allowable pressure of the elastomer disk in the pot bearing, and the manufacturers apply values ranging be- tween 25 MPa and 40 MPa. The allowable pressure of the elastomer disk is a design factor determining the di- ameter D of the elastomer disk. Accordingly, the capac- ity of the load cell can be determined according to the applied allowable stress from Equation (2). Table 1 ar- ranges the capacity of the load cell according to the al- lowable stress when applying a diameter of 10 mm for the detection button of the load cell. In general, since identical allowable pressure of the elastomer disk is ap- plied by the same manufacturer, the load cell to be em- bedded is decided regardless of the total capacity of the bearing. For example, in the case of a manufacturer ap- plying an allowable pressure of 30 MPa, a load cell with capacity of about 2400 N can be adopted. 3. Insertion Details of Load Cell In the load cell equipped with a load detection button, the condition to achieve exact measurement is that the verti- cal load must be transmitted through the button as shown Table 1. Optimal capacity of the load cell according to the allowable pressure of the elastomer disk (diameter of 10 mm for the detection button of the load cell). Allowable pressure of elastomer plate, pa (MPa) Optimal load cell capacity (N) 25 1963.5 30 2356.2 40 3141.6 Open Access ENG  J.-R. CHO ET AL. 858 in Figure 2(a). Therefore, the details shown in Figure 2(b) shall be realized to satisfy such load condition when the load cell is inserted in the base plate of the pot bear- ing. In Figure 2, “a” as the dimension determined by experience for securing the contact between the elas- tomer disk and the detection button of the load cell is set to 0 - 0.5 mm. The dimensions “b”, “c” and “d” are de- termined to prevent the transmission of the load caused by the contact of the base plate of the pot bearing with the detection button or the top of the load cell due to de- formations induced by the pressure of the elastomer disk. The specimens in Chapter 4 are fabricated with b = 17 mm, c = 3 mm and d = 0.01 mm determined by finite element analysis to satisfy these requirements. Figure 3 illustrates the finite element analysis for the bearing with capacity of 1 MN. Figure 4 presents a commercialized load cell with capacity of 5 kN in which the load detec- tion button was specially fabricated. 4. Program of Performance Test A total of five prototypes composed of pot bearings with (a) (b) Figure 2. Details of the button-type small size load cell: (a) load conditions of the load cell; (b) details of the load cell inserted in the pot bearing. Figure 3. Finite element analysis of pot bearing. Figure 4. Small size precise load cell with capacity of 5 kN. capacity of 1, 2 and 18 MN and inserted with one or three load cells were subjected to various performance tests (Table 2). The dimensions of the pot bearings adopted in this study are indicated in Figure 5. These pot bearings are subjected to a pressure of about 30 MPa under maximum service load. This means that the optimal load cell should have capacity of approxi- mately 2500 N (Table 1). The load cell with the capacity of 5 kN, however, was selected among the commercial- ized load cell with the closest capacity. The error rate of this load cell is 0.15%. The insertion details of the load cell in base plate are described in Chapter 3. Static loading test, dynamic loading test and perma- nent load measurement test were conducted. These tests were executed by applying the load vertically to the pot bearings. The actuator shown in Figure 6 was adopted to apply the load on the pot bearings with capacity of 1 MN and 2 MN, whereas the UTM (Universal Testing Ma- chine) shown in Figure 7 was used to load the pot bear- ing with capacity of 18 MN. Static loading test was car- ried out on the 5 prototypes to derive the conversion ormula of the load measured by the inserted load cells f Open Access ENG  J.-R. CHO ET AL. Open Access ENG 859 (a) (b) 30 30 52 360 (c) 30 30 52 52 52 36 36 36 36 360 (d) (e) Figure 5. Dimensions of the pot bearings and dismantlement of the prototypes: (a) 1MN-L1; (b) 1MN-L3; (c) 2MN-L1; (d) MN-L3; (e) 18MN-L1. 2 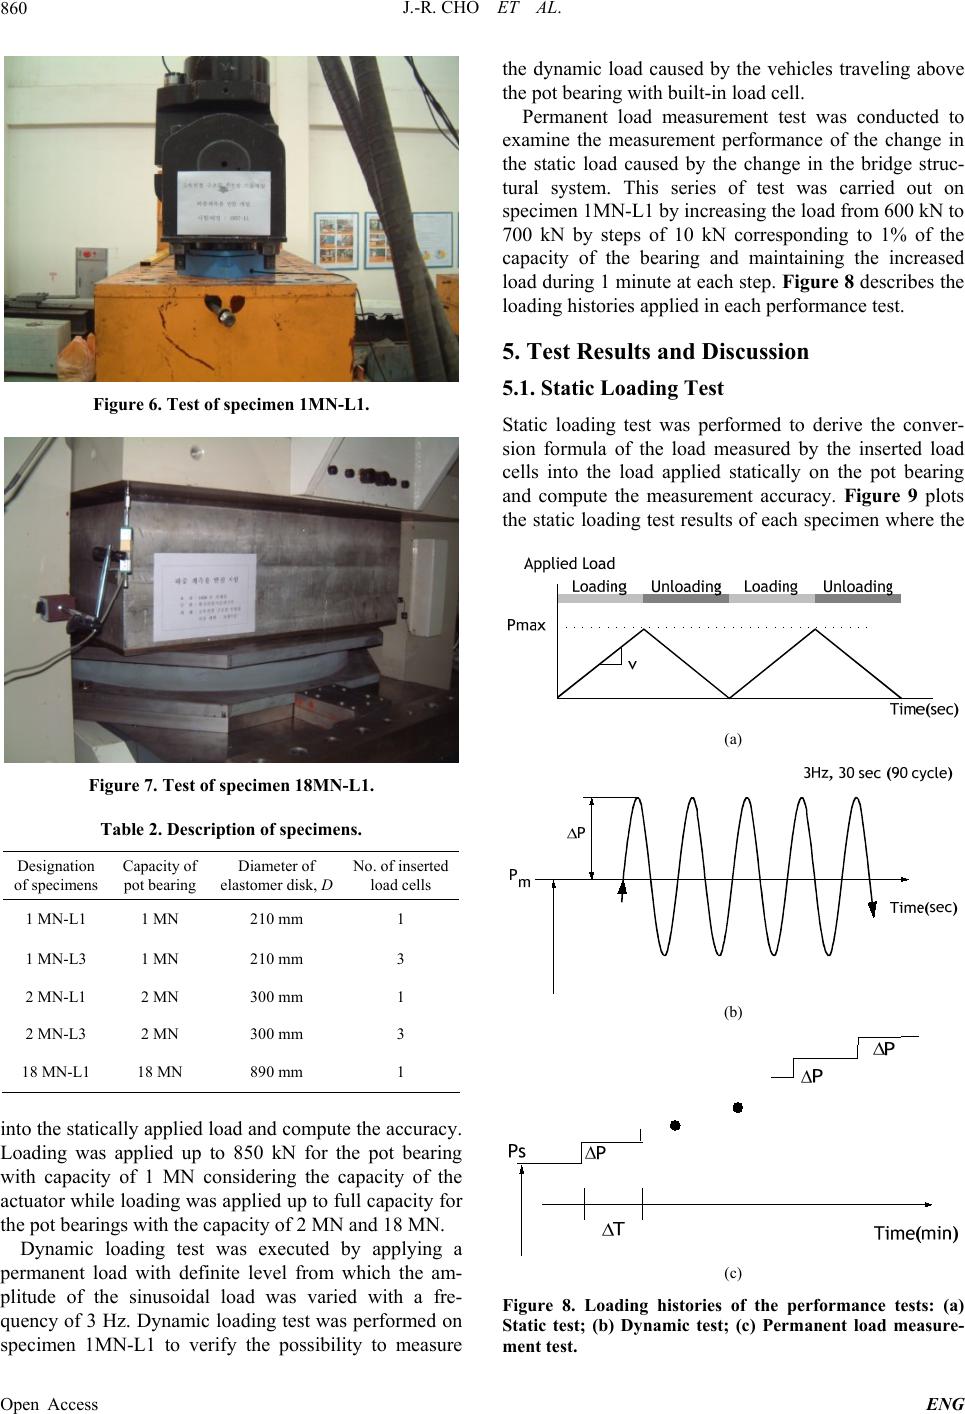 J.-R. CHO ET AL. 860 Figure 6. Test of specimen 1MN-L1. Figure 7. Test of specimen 18MN-L1. Table 2. Description of speci me ns. Designation of specimens Capacity of pot bearing Diameter of elastomer disk, D No. of inserted load cells 1 MN-L1 1 MN 210 mm 1 1 MN-L3 1 MN 210 mm 3 2 MN-L1 2 MN 300 mm 1 2 MN-L3 2 MN 300 mm 3 18 MN-L1 18 MN 890 mm 1 into the statically applied load and compute the accuracy. Loading was applied up to 850 kN for the pot bearing with capacity of 1 MN considering the capacity of the actuator while loading was applied up to full capacity for the pot bearings with the capacity of 2 MN and 18 MN. Dynamic loading test was executed by applying a permanent load with definite level from which the am- plitude of the sinusoidal load was varied with a fre- quency of 3 Hz. Dynamic loading test was performed on specimen 1MN-L1 to verify the possibility to measure the dynamic load caused by the vehicles traveling above the pot bearing with built-in load cell. Permanent load measurement test was conducted to examine the measurement performance of the change in the static load caused by the change in the bridge struc- tural system. This series of test was carried out on specimen 1MN-L1 by increasing the load from 600 kN to 700 kN by steps of 10 kN corresponding to 1% of the capacity of the bearing and maintaining the increased load during 1 minute at each step. Figure 8 describes the loading histories applied in each performance test. 5. Test Results and Discussion 5.1. Static Loading Test Static loading test was performed to derive the conver- sion formula of the load measured by the inserted load cells into the load applied statically on the pot bearing and compute the measurement accuracy. Figure 9 plots the static loading test results of each specimen where the (a) (b) (c) Figure 8. Loading histories of the performance tests: (a) Static test; (b) Dynamic test; (c) Permanent load measure- ent test. m Open Access ENG 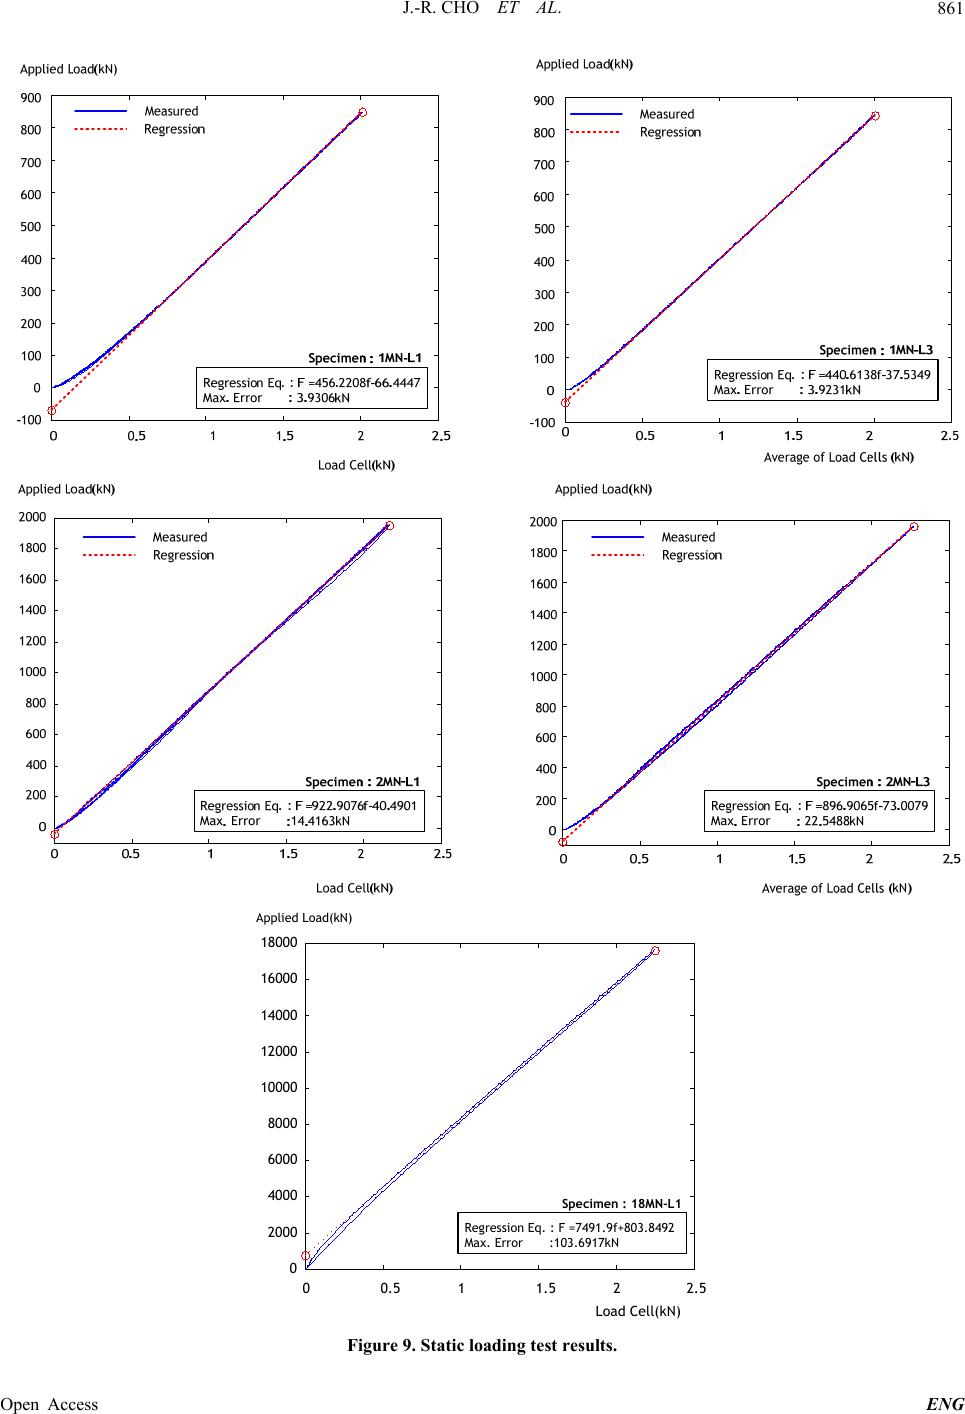 J.-R. CHO ET AL. 861 00.5 11.5 22.5 0 2000 4000 6000 8000 10000 12000 14000 16000 18000 Applied Load(kN) Load Cell(kN) Regression Eq. : F =7491.9f+803.8492 Max. Error :103.6917kN Specimen : 18MN-L1 Figure 9. Static loading test results. Open Access ENG 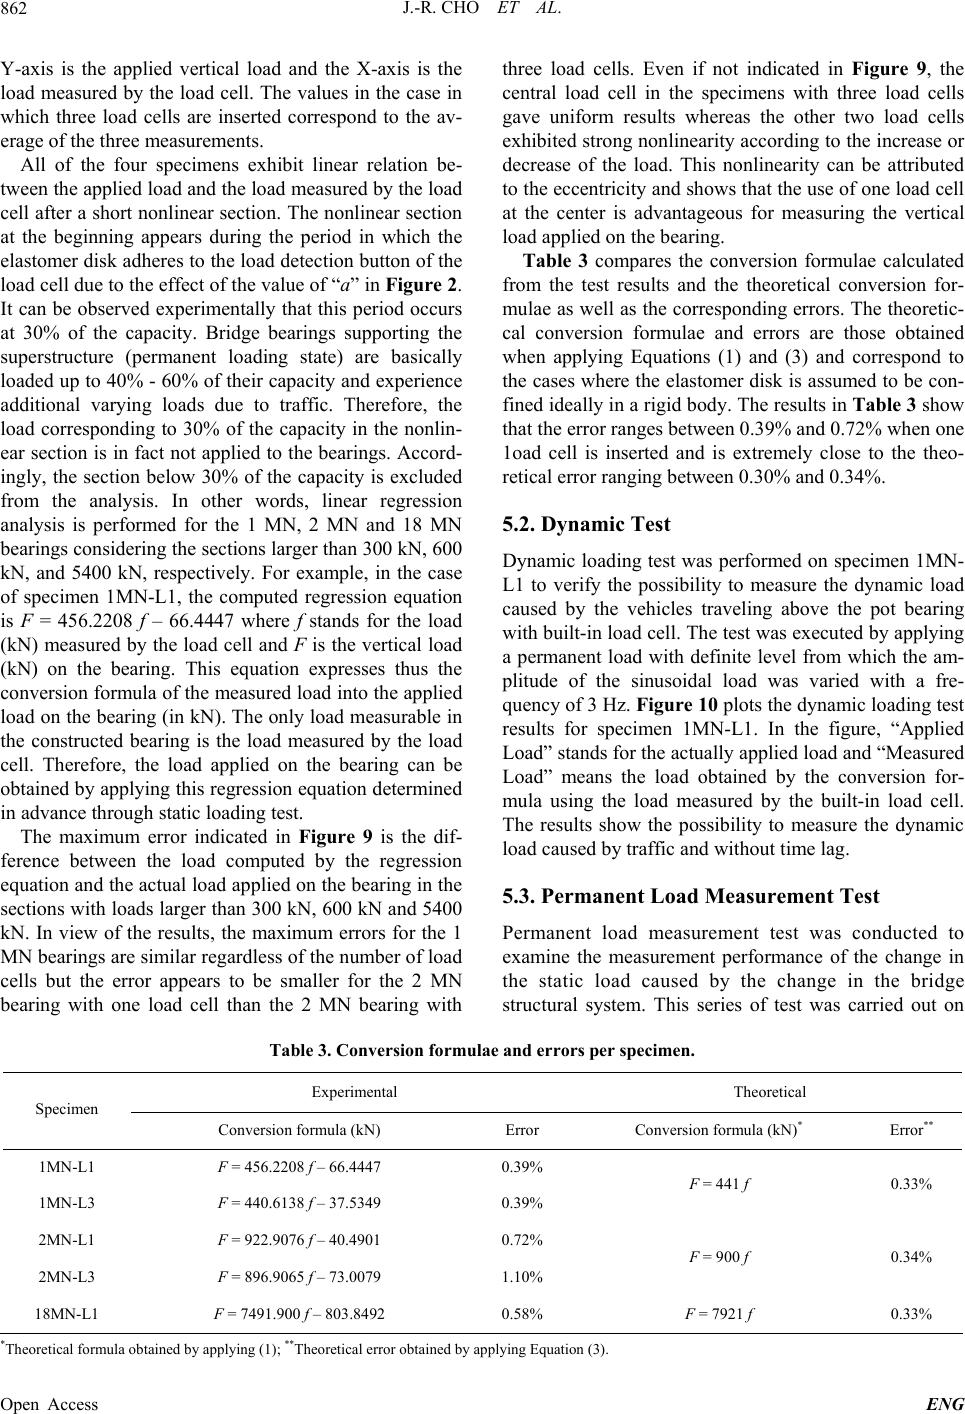 J.-R. CHO ET AL. 862 Y-axis is the applied vertical load and the X-axis is the load measured by the load cell. The values in the case in which three load cells are inserted correspond to the av- erage of the three measurements. All of the four specimens exhibit linear relation be- tween the applied load and the load measured by the load cell after a short nonlinear section. The nonlinear section at the beginning appears during the period in which the elastomer disk adheres to the load detection button of the load cell due to the effect of the value of “a” in Figure 2. It can be observed experimentally that this period occurs at 30% of the capacity. Bridge bearings supporting the superstructure (permanent loading state) are basically loaded up to 40% - 60% of their capacity and experience additional varying loads due to traffic. Therefore, the load corresponding to 30% of the capacity in the nonlin- ear section is in fact not applied to the bearings. Accord- ingly, the section below 30% of the capacity is excluded three load cells. Even if not indicated in Figure 9, the central load cell in the specimens with three load cells gave uniform results whereas the other two load cells exhibited strong nonlinearity according to the increase or decrease of the load. This nonlinearity can be attributed to the eccentricity and shows that the use of one load cell at the center is advantageous for measuring the vertical load applied on the bearing. Table 3 compares the conversion formulae calculated from the test results and the theoretical conversion for- mulae as well as the corresponding errors. The theoretic- cal conversion formulae and errors are those obtained when applying Equations (1) and (3) and correspond to the cases where the elastomer disk is assumed to be con- fined ideally in a rigid body. The results in Table 3 show that the error ranges between 0.39% and 0.72% when one 1oad cell is inserted and is extremely close to the theo- ng between 0.30% and 0.34%. with built-in load cell. The test was executed by applying a permanent load with definite level from which the am- plitude of the sinusoidal load was varied with a fre- quency of 3 Hz. Figure 10 plots the dynamic loading test results for specimen 1MN-L1. In the figure, “Applied Load” stands for the actually applied load and “Measured Load” means the load obtained by the conversion for- mula using the load measured by the built-in load cell. The results show the possibility to measure the dynamic load caused by traffic and without time lag. 5.3. Permanent Load Measurement Test Permanent load measurement test was conducted to examine the measurement performance of the change in the static load caused by the change in the bridge structural system. This series of test was carried out on lae and errors per specimen. Theoretical ear regression retical error rangi from the analysis. In other words, lin analysis is performed for the 1 MN, 2 MN and 18 MN bearings considering the sections larger than 300 kN, 600 kN, and 5400 kN, respectively. For example, in the case of specimen 1MN-L1, the computed regression equation is F = 456.2208 f – 66.4447 where f stands for the load (kN) measured by the load cell and F is the vertical load (kN) on the bearing. This equation expresses thus the conversion formula of the measured load into the applied load on the bearing (in kN). The only load measurable in the constructed bearing is the load measured by the load cell. Therefore, the load applied on the bearing can be obtained by applying this regression equation determined in advance through static loading test. The maximum error indicated in Figure 9 is the dif- ference between the load computed by the regression equation and the actual load applied on the bearing in the sections with loads larger than 300 kN, 600 kN and 5400 kN. In view of the results, the maximum errors for the 1 MN bearings are similar regardless of the number of load cells but the error appears to be smaller for the 2 MN bearing with one load cell than the 2 MN bearing with Table 3. Conversion formu Experimental 5.2. Dynamic Test Dynamic loading test was performed on specimen 1MN- L1 to verify the possibility to measure the dynamic load caused by the vehicles traveling above the pot bearing Specimen Conversion formula (kN) Error Conversion formula (kN)* Error** 1MN-L1 F = 456.2208 f – 66.4447 0.39% 1MN-L3 F = 440.6138 f – 37.5349 2MN-L1 F = 922.9076 f – 40.4901 0.39% F = 441 f 0.33% 0.72% 1.10% F = 900 f 0.34% 0.58% F = 7921 f 0.33% 2MN-L3 F = 896.9065 f – 73.0079 18MN-L1 F = 7491.900 f – 803.8492 *Theoretical formula obtained by applying (1); **Theoretical error obtained by applying Equation (3). Open Access ENG 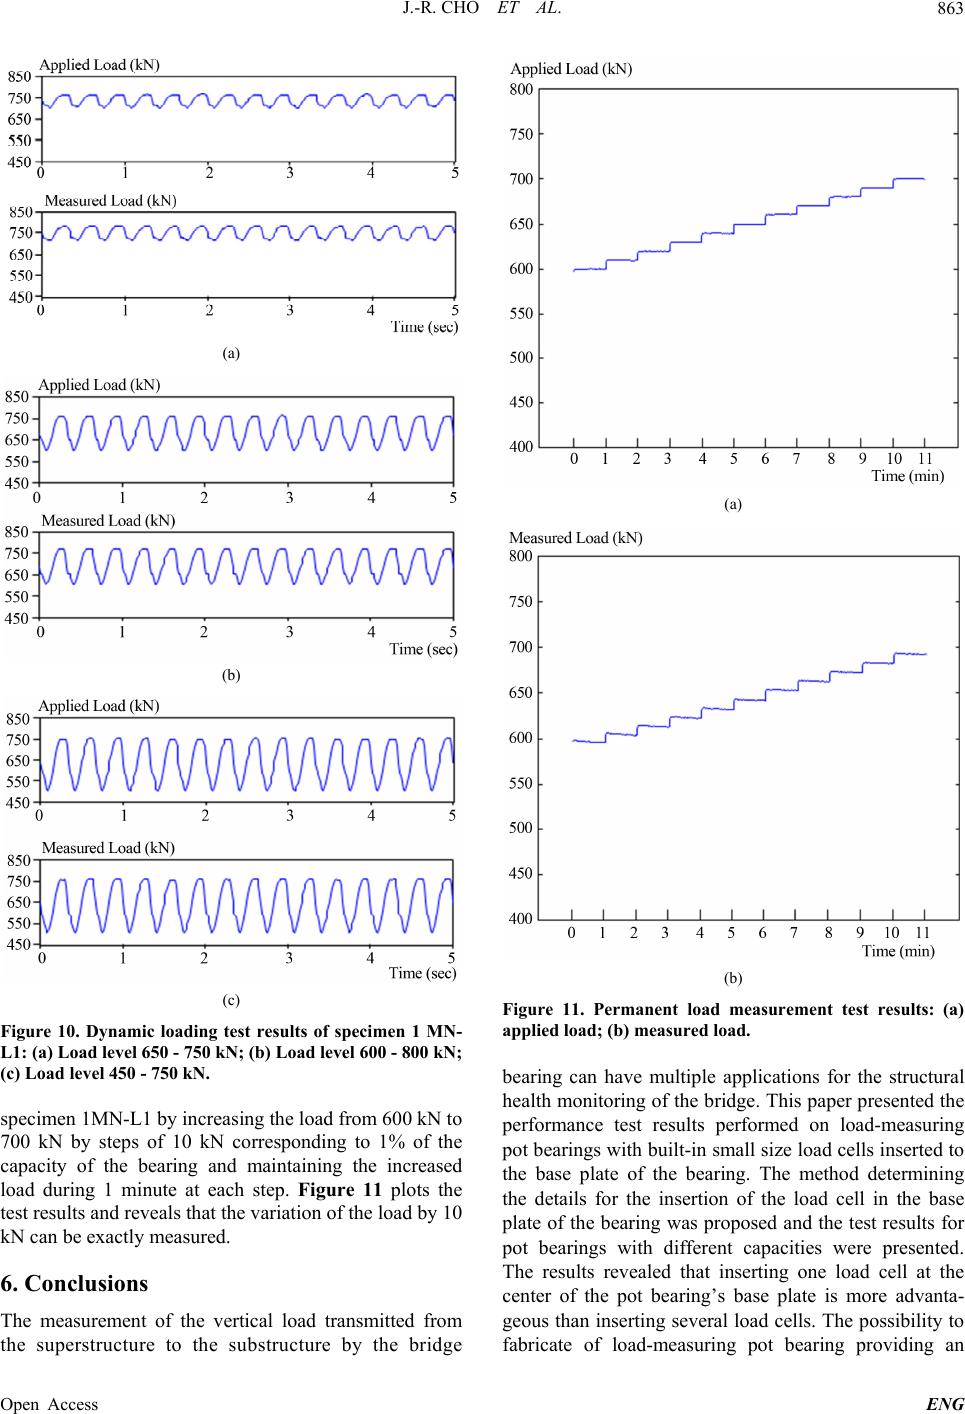 J.-R. CHO ET AL. 863 (a) (b) (c) Figure 10. Dynamic loading test results of specimen 1 MN- L1: (a) Load level 650 - 750 kN; (b) Load level 600 - 800 kN; (c) Load level 450 - 750 kN. specimen 1MN-L1 by increasing the load from 600 kN to 700 kN by steps of 10 kN corresponding to 1% of th capacity of the bearing amaintaining the increased load during 1 minute at each step. Figure 11 plots the test results and reveals that the variation of the load by 10 kN can be exactly measured. 6. Conclusions The measurement of the vertical load transmitted from the superstructure to the substructure by the bridge e nd (a) (b) Figure 11. Permanent load measurement test results: (a) applied load; (b) measured load. bearing can have multiple applications for the structural health monitoring of the bridge. This paper presented the performance test results performed on load-measuring pot bearings with built-in small size load cells inserted to the base plate of the beari The method determining the details for the insertion of the load cell in the base plate of the bearing was proposed and the test results for pot bearings with different capacities were presented. The results revealed that inserting one load cell at the center of the pot bearing’s base plate is more advanta- geous than inserting several load cells. The possibility to fabricate of load-measuring pot bearing providing an ng. Open Access ENG  J.-R. CHO ET AL. 864 error close to the theoretical error corresponding to the ideal case where the elastomer disk is confined in a rigid body was verified experimentally. Moreover, measure- ment of dynamic loading due to traffic was seen to be possible without time lag. The accuracy of the load-measuring pot bearing with built-in load cell appeared to be extremely sensitive to the details of the load cell inserted in the base plate of the bearing and the selection of the appropriate load cell. Besides, the effect of the temperature occurring in actual bridge sites and the problem of durability caused by the traffic loads should be investigated additionally for fur- ther field application of theposed load-measuring pot NCES Bearings with Load Measuring Capabil- /www.maurer-soehne.com Study,” City University of New York, New York, 2005. [3] J. F. Choo, D. H. Ha, N. S. Goo and W. S. Jang, “Pre- liminary Tests for a Multi-Functional Bridge Bearing with Built-in Piezoelectric Material,” Advanced Science Letters, Vol. 19, No. 1, 2013, pp. 37-41. http://dx.doi.org/10.1166/asl.2013.4714 [4] E. Udd, W. L. Schulz, J. M. Seim, K. Corona-Bittick, J. Dorr, K. T. Slattery, H. M. Laylor and G. E. McGill, “Fi- ber Optic Smart Bearing Load Structure,” In: S. B. Chase, Ed., Nondestructive Evaluation of Bridges and Highways III, 1999, pp. 40-48. http://dx.doi.org/10.1117/12.339933 [5] S. J. Chang, N. S. Kim and J. H. Baek, “Development of Smart Seismic Device Using FBG Sensor for Measuring Vertical Load,” Transactions of the Korean Society for Noise and Vibration Engineering, Vol. 22, No. 11, 2012, pp. 1089-1098, in Korean. http://dx.doi.org/10.5050/KSNVE.2012.22.11.1089 pro bearing. 7. Acknowledgements This research was supported by a grant from a Strategic Research Project (Development of smart prestressing system for prestressed concrete bridges) funded by the Korea Institute of Construction Technology. REFERE [1] Maurer, “Bridge ity,” 2013. http:/ [2] A. K. Agrawal, K. Subramaniam and Y. Pan, “Develop- ment of Smart Bridge Bearings System: A Feasibility [6] J.-R. Cho, Y. J. Kim, S. Y. Park, B.-S. Kim and J. I. Lee, “Development of High Performance Bearing for Bridge I: Load Measurable Bearing,” Proceedings of the 2002 Conference of the Korean Society of Civil Engineers, 2002, pp. 221-224, in Korean. [7] Korea Institute of Construction Technology, “R&D on the Safety of High-Speeilway Structures,” R&D Re- the Safety of High-Speed Railway Structures,” R&D Re- d Ra port, 2001, in Korean. [8] Korea Institute of Construction Technology, “R&D on port, 2002, in Korean. [9] Korea Institute of Construction Technology, “Develop- ment of Stabilization Techniques for Track Construction System of the High-speed Railway,” R&D Report, 2003, in Korean. [10] Korean Standards Association, KS F 4424, “Pot Bearings for Bridges,” 1996, in Korean. Open Access ENG |

