Wireless Engineering and Technology
Vol.4 No.3(2013), Article ID:34180,6 pages DOI:10.4236/wet.2013.43021
Embedded System Implementation of Airborne Communication Terminals
![]()
1Department of Communication Engineering, Hefei University of Technology, Hefei, China; 2Department of Computer Science and Technology, Hefei Normal University, Hefei, China.
Email: wanglei5150@sina.com, zzding@hfut.edu.cn, chenghesheng@gmail.com
Copyright © 2013 Lei Wang et al. This is an open access article distributed under the Creative Commons Attribution License, which permits unrestricted use, distribution, and reproduction in any medium, provided the original work is properly cited.
Received April 23rd, 2013; revised June 9th, 2013; accepted June 21st, 2013
Keywords: Airborne Communication Terminal; Ad Hoc Network; Embedded System; Touch-Screen
ABSTRACT
Airborne communication terminal is a key unit in Ad hoc network of aircrafts. This paper mainly focuses on its implementation by embedded system, which is based on Samsung S3C2410 chip. System architecture, Linux tailoring and touch-screen driver design are discussed in detail. Considering the requirements of stability and efficiency of the operating system, dynamic driver-loading method was employed firstly and only the necessary library files were transplanted to assist and test. The drivers finally were directly put into kernel configuration and then an integrated kernel was transplanted. Regarding to the problem of positioning issues on touch-screen, which is implemented in this system, an accurate positioning method is also presented.
1. Introduction
Air Ad hoc network is a popular trend of the new wireless transmission technology due to that it provides data transport for IP with low latency transport, self network building up without a base station node. It also has the characteristics such as high speed and reliable data transmission link in the case of high-speed mobility. Ad hoc technology has wide application fields, such as disaster emergency, mobile office, personal area network, military wireless communication (e.g. TTNT network of the United States Air Force) etc. [1]. Currently, the latest research covers various topics like: designing a new routing protocol to follow the dynamic changes in the network topology, media access control (MAC) protocol to solve hidden and exposed terminal problems, Ad Hoc networks interconnected cellular network, Ad Hoc network multicast/multicast protocol, control of the power (energy saving), security issues and experiments and application network etc. In this paper, it designs the peerto-peer mobile communication terminal with a friendly visualization and man-machine interface by use of the Ad hoc network technology.
Airborne communication terminal is mainly used in the data transmission between two aircraft in flight. Considering the factors such as pressure, temperature, atmospheric density, the terminal transmission needs to be real-time, minimum error and stable. The proposed design meets all the requirements.
With the rapid growth of information and electronic products, touch-screen as a new man-machine interface has been widely applied. The widely used interface for terminal control is the keyboard system with imperfect features and unstable program. Based on Samsung’s S3C 2410X 16/32-bit RISC microprocessor, this paper introduces the embedded touch-screen technology into this area. Compared with the traditional button and mouse, touch-screen device is more intelligent, visual, and convenient.
This article firstly introduces the hardware design of the embedded system, and then explains the working principle of four-wire resistive touch-screen and equivalent circuit. Furthermore, the airborne communication terminal runs in Auto X/Y Position Conversion Mode and Waiting for Interrupt Mode. Embedded Linux system transplantation is introduced by dynamic or static loading driver method. The fourth part shows the development of touch-screen driver, while the realization of the coordinate positioning is summarized in the last section.
2. Hardware System Design
In this paper, adopting Samsung’s S3C2410X (16/32-bit RISC architecture, main frequency of 203 MHZ) as the microprocessor, the system of airborne communication terminal is comprised of touch-screen, host, control system, RF processing system and antenna. Here the control system is actually a Linux operating system which guarantees the normal work of the host, touch-screen is used as a control display, and the data is finally processed by the RF system will be sent through antenna. The overall system block diagram is shown as Figure 1.
This type of processor supports touch-screen interface, four external transistors, and an external voltage source. Besides, the ten-bit CMOS ADC of the S3C2410X is a recycling type of equipment with eight-channel analog inputs. In the process of sampling, the software will reset the special register, and the touch-screen controller will automatically control the touch-screen interface to open, or each MOS to close. At the end, it orderly completes the X coordinate and the Y coordinate collection. Figure 2 shows the functional block diagram of the touch-screen module circuit.
AIN-7 is used for X coordinate input, and AIN-5 is used for Y coordinate input. Four control signals are connected with four external transistors to master touchscreen pads (XP, XM, YP, YM), that just decide four kinds of touch-screen interface modes: Normal Conversion Mode, Separate X/Y Position Conversion Mode, Auto X/Y Position Conversion Mode, Waiting for Interrupt Mode [2]. In this experiment, the last two of them are used, and the specific conditions are as shown in Table 1.
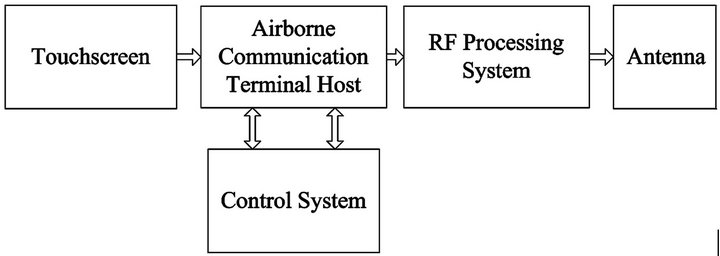
Figure 1. The overall system design.

Figure 2. ADC and touch-screen interface functional block diagram.

Table 1. Working modes of touch-screen.
3. Processing of Linux Kernel
Linux device driver is part of the kernel. A driver module can be compiled and loaded into the kernel in two ways, and they are dynamic loading of modules and direct kernel configuration options. Loading driver module dynamically is relatively simple and firstly introduced: the source file of driver must be compiled into object file through cross-compiler. Then, with the command “insmod, lsmod, and rmmod”, the driver module can be loaded into the kernel flexibly [3].
What we need is just a complete kernel. The second way uses direct kernel configuration options, putting driver into kernel statically. Similar to this approach and the specific steps are as follows.
3.1. Kernel Configuration
Generally speaking, the second way can control the size of the kernel and has an advantage of convenient debugging, what we need is a stable, complete kernel. Meantime, the kernel of 2.6.32 version has no configuration options of S3C2410X touch-screen [4]. Thus, this article introduces the method of operation in detail:
1) Choose a place for driver code, put the file S3C2410- ts.c into the directory drivers/touchscreen.cd drivers mkdir touchscreen
2) Add the file Kconfig in/drivers/touchscreen, and the editorial content is as follows:menuconfig INPUT_TOUCHSCREEN
bool “Touchscreens”
if INPUT_TOUCHSCREEN config TOUCHSCREEN_S3C2410 tristate “Samsung S3C2410 touchscreen input driver”
---help--If you want TOUCHSCREEN support, you should say Y here. If unsure, say N.
To compile this driver as a module, choose M here.
endif
3) Add the file drivers/touchscreen/Makefile, the main content is as follows:obj-$ (CONFIG_TOUCHSCREEN_S3C2410) += S3C2410-ts.o
4) Amend the file drivers/Makefile, add:obj-$ (CONFIG_TOUCHSCREEN_S3C2410) + =
touchscreen/
5) Amend the file drivers/Kconfig, add:source “drivers/touchscreen/Kconfig”
6) At last, add the following content in the file arch/ arm/Kconfig:source “drivers/touchscreen/Kconfig”
By the researches mentioned before, the option of “Samsung S3C2410 touchscreen input driver” will appear in the kernel configuration (Figure 3).
The next work is to compile the kernel:
#make clean, clean some obsolete data to guarantee a pure kernel.
#make dep, establish file dependencies.
#make zImage, this step will generate a kernel named “zImage” in arch/arm/boot directory.
At this moment, the object file “zImage” can be transplanted into the embedded system. In terms of practicality, vivi is the suitable transfer tool which is often used in this experiment.
3.2. Transplantation & Downloading
In order to make the Linux kernel run on the host properly, the cross compiling environment shall be firstly established. Before starting the system, the focus of the work is to put the pre-compiled kernel into a suitable position. Downloading various parts of Linux to the target board, it must take the following sequence: Boot Loader, Kernel, and Root File System [5].
1) Boot Loader: As mentioned earlier, vivi as a kind of Boot Loader is chosen for the suitable transplanted tool. Boot Loader is the first piece of code executed by the embedded system which undertakes the tasks of loading the operating system image into the memory, initializing the hardware devices, and building the map, etc. 2) Kernel: Kernel works in the bottom of operating system which controls all the resources of the host. Currently, there are two types of kernels in market,
Figure 3. Kernel configuration.
In the process of download, the instructions we used in vivi environment are as follows:
bon part 0 192K 1M/* memory partition*/
load flash vivi x load flash kernel x load flash root x/* load three parts into board in xmodem*/
After the system powers or resets, CPU will read the files in accordance with the pre-set order as shown in Figure 4.
4. Touch-Screen Driver Implementation
At present, the most popular touch-screen is four-wire resistive touch-screen. It is comprised of several layers, two of which are separated by plenty of small dielectric particles are uniform, transparent, conductive and faceto-face ITO film. People called them X electrode and Y electrode, in other words, the upper line and the lower line. When user touches the surface of the screen, the two layers will meet together, and be connected at that point, finally generate a closed circuit. Meantime, through the lower line, the device controller applies a voltage to the X axis. Then the probe in the upper line detects the voltage of the X position, and it can be used to calculate the X coordinate of this contact point [6]. Similarly, to get Y coordinate, controller changes the direction of applied voltage. By now, the position of contact point is clear. The equivalent circuit diagram is as shown in Figure 5.
However, when there is no pressure on the surface of touch-screen, the whole circuit is open.
The touch-screen driver is actually a middle layer between the hardware and application. Linux system supports three types of hardware devices driver: character, block, and network, and what we research is character device-touch-screen. The character device driver is the most basic, also the most common driver of embedded
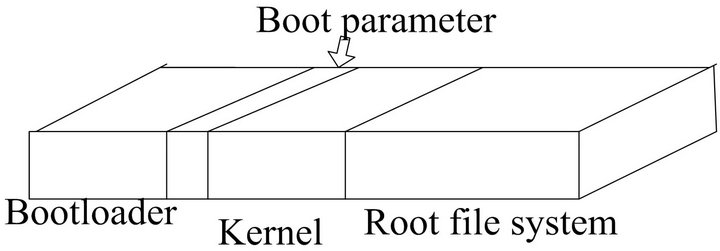
Figure 4. System file location.

Figure 5. The equivalent-circuit diagram of touch-screen.
Linux. It is very powerful, and can describe almost all the equipment except for the device which can mount file system. In addition, the character device does not pass through the system cache, which can access through read (), write (), open (), close () and so on. It reads and writes in byte, and only executes sequential access.
Figure 6 is the flowchart of driver interface, and it describes the overall framework of the device drivers [7].
Next, specific analysis of the touch-screen driver of airborne communication terminal comes from four aspects: data structure of the driver, hardware initialization, interrupt processing and data acquisition process.
4.1. Analysis of the Data Structure
Members of the structure in the touch-screen device contain a buffer, spinlock, wait queue and the pointer fasync_struct.
typedef struct
{
unsigned int penStatus; /*3 states: up, down, sample*/
TS_RET buf[MAX_TS_BUF]; /*Avoid overrun*/
unsigned int head, tail; /* Point to buffer */
wait_queue_head_t wq; /*Achieve the asynchronous event notification mechanism in kernel*/
spinlock_t lock; /*An exclusive equipment to replace the process switching*/
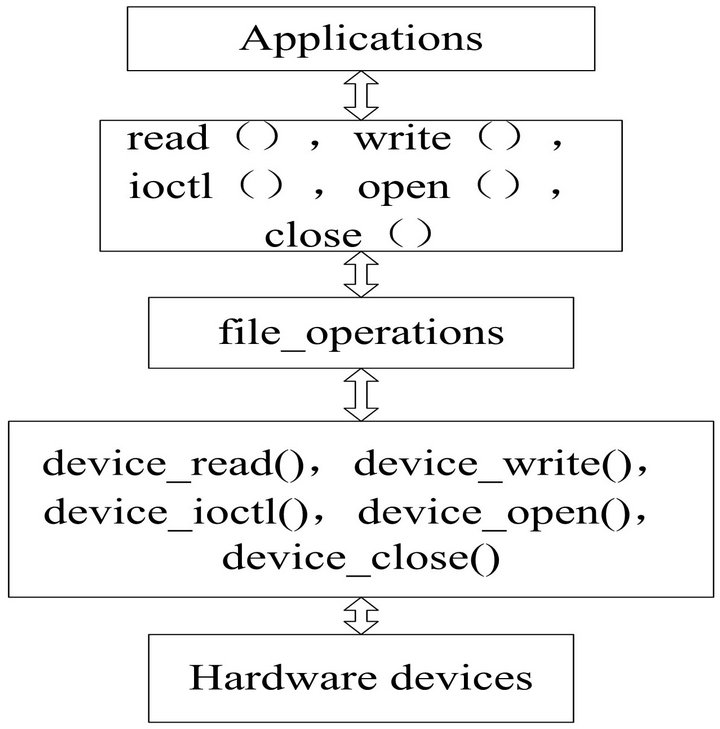
Figure 6. The flowchart of driver interface.
#ifdef USE_ASYNC struct fasync_struct *aq; /*Asynchronous operation mode */
#endif struct cdev *cdev;
}TS_DEV;
Besides, in the system’s core, the access of I/O device is performed through a specific entry point. This special set of the entry point is just provided by the structure file_operations of the device driver. The structure file_operations as an important data structure actually in charge of the connection between the syscall and driver. The system reads the corresponding function pointer in the structure file_operations, and gives the control to the device operation function to complete the open, release, read, write and control functions of the device driver [8].
static struct file_operations S3C2410_fops =
{
owner: THIS_MODULEopen: S3C2410_ts_open,
read: S3C2410_ts_readrelease: S3C2410_ts_release# ifdef USE_ASYNC fasync: S3C2410_ts_fasync#endif poll: S3C2410_ts_poll}
4.2. Hardware Initialization
Hardware initialization function static int _init S3C2410 _ts_init(void) mainly completes the application of device number, add cdev, request interrupt, set up the touchscreen control pins(YPON, YMON, XPON, XMON), etc. Besides, variable ret can’t be ignored, which is defined as follows:
ret = request_irq(IRQ_ADC_DONE, S3C2410_isr_ adc, SA_INTERRUPT, DEVICE_NAME, S3C2410_isr_ adc); /* register ADC interrupt */
ret = request_irq(IRQ_TC, S3C2410_isr_tc, SA_INTER-RUPT, DEVICE_NAME, S3C2410_isr_tc); /* register touch-screen interrupt */
ret = register_chrdev(0, DEVICE_NAME, &S3C2410_ fops); /* register the character device*/
In a word, the variable ret plays a key role in the program register. With these settings, the device driver file has been initialized.
4.3. Interrupt Processing
When the touch-screen is pressed down, the kernel will respond to the interrupt and enter into the interrupt processing mode. Interrupt is effective for the setting of falling edge. To make sure the touch-screen is continuously pressed and the system won’t be triggered constantly, the coming interrupt will be masked.
There are two types of interrupts in touch-screen driver: contact-point (INT-TC), position conversion interrupt (INT-ADC). When the first interrupt has happened, if the previous state is PEN_UP, it will start the X/Y Position Conversion. What’ more, lift interrupt which is put into INT-TC interrupt processing will call tsEvent() function to complete waiting line and releasing signal. When the interrupt of X/Y position conversion occurs, the program firstly gets the spinlock of the touch-screen device, then, reads the X/Y coordinate and puts them into the buffer, at last, releases that lock. The process is as shown in Figure 7.
4.4. Data Acquisition Process
The data acquisition depends on two functions: S3C2410 _get_XY(), start_ts_adc(). The calls of these two functions come from position conversion interrupt handler and timer interrupt handler in turn.
After the interrupt of X/Y position conversion occurs, the system calls the function S3C2410_get_XY() to read the coordinates of X, Y, and puts them into the buffer. The contact-point values are obtained through two conversion data registers: ADCDAT0 and ADCDAT1, as follows:
 (1)
(1)
In the process of acquiring data, there is a vital function tsEvent_raw(). When the touch-screen’s state is PEN_DOWN, the system calls tsEvent_raw() to complete these works: filling the buffer, awaking the wait queue, and releasing the asynchronous notification signal, otherwise, clearing the head of the buffer. Besides, timer interrupt handler calls the start_ts_adc() to convert the
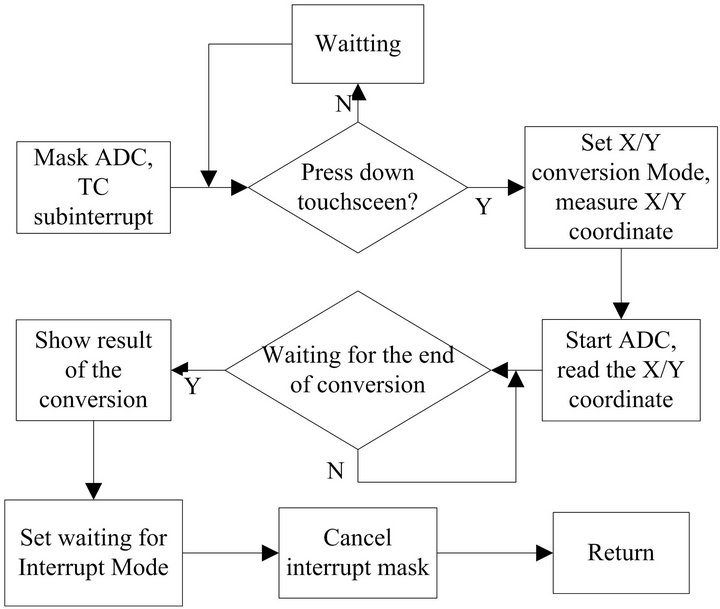
Figure 7. The process of interrupt.
5. Realization of Coordinate Positioning
The coordinates of the touch-screen can apply a variety of different calculation methods, such as multiple-point mean value method, secondary square of processing method and so on. This article uses the first method for the good performance of the touch-screen selected. There are two steps that users must convert the touch-screen data into touch coordinates: calibration, conversion. The terminal is designed to provide 3.5 inches Samsung TFT screen. At the beginning, it needs to obtain two maxima and two minima from the four vertices of the touchscreen, then determine the X, Y directions, and assume that the value range of x and y coordinates are [Xmin, Xmax], [Ymin, Ymax]. According to the Figure 8, the X, Y directions can be fixed by the following Table 2.
When the system is in hibernation, Q1, Q3, and Q4 are in the OFF state, Q2 works. If the touch-screen is pressed down, firstly, Q1 and Q4 of MOS transistor comes into operation,3.3V power supply will be added in the circuit which consists of X+ and X−. Meanwhile, closing Q2 and Q3 of MOS transistor, cutting the Y+ and Y−, then starting A/D conversion channel 1 (AIN1) of the processsor, the system will output component voltage by the touch between the circuit resistance and the touch-screen. Finally, with the A/D converter, the voltage becomes a

Figure 8. The connection interface of touch-screen and the processor.

Table 2. The determination of the X, Y directions.
digital value, and the X-axis coordinate can be calculated. It shall also get the Y-axis coordinate. After the system obtains the coordinate value, it closes the Q1, Q3 and Q4, returns to the original state and waits for the next touch. The conversion values X, Y of coordinates can be expressed as:
 (2)
(2)
In order to eliminate the conversion error as much as possible, this article makes use of multiple-point mean value method as follows, in the Formula (3):
 (3)
(3)
This system has been tested in the development environment with good results. With the touch-screen driver, the author compiles and transplants test procedures. When the touch-screen is pressed down, the coordinate values will be output to the terminal as Figure 9. What’s more, this paper also transplants tslib and Qt4.6.3, and realizes the main interface design of airborne communication terminal. Figure 9 also shows the result of this test. The touch-screen can be sensitive in the detection of the touch, and can send and receive data in real-time.
6. Conclusion
It is a point-to-point wireless communication system by using Samsung ARM9 core chip S3C2410 as a development platform. Main work includes the transplantation of Linux embedded system, design and implementation of the touch-screen driver, transplantation of a simple graphical interface based on QTE and point-to-point communication. What’s more, procedures on the utilization of interrupt and multiple sampling average methods are to achieve precise coordinates positioning. Experimental results show that the touch-screen can work in airborne communication terminal with stable driver and conven-
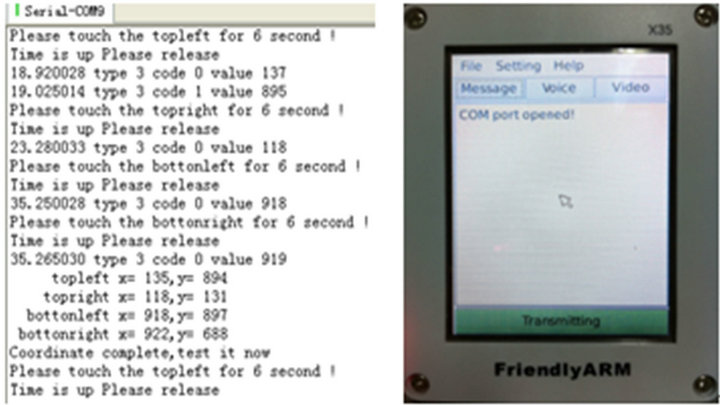
Figure 9. Result of test.
ient operation, and its future application is promising.
REFERENCES
- B. N. Xu and S. Hischke, “The Role of Ad Hoc Networking in Future Wireless Communications,” Proceedings of ICCT, Beijing, 9-11 April 2003, pp. 1353-1358.
- Y. F. Li, “ARM Embedded Linux Device Driver Development,” China Electric Power Press, Beijing, 2008, pp. 52-57.
- J. Corbet and Rubini, “Linux Equipment Driver,” 3rd Edition, China Electric Power Press, Beijing, 2006.
- Z. R. Lin, “Embedded Linux Application Development Detailed Explanation,” Mechanical Industry Press, 2005.
- Y. P. Sun, P. Peng and Y. Zhang, “Linux Transplantation Based on the Processor S3C2440,” Electronic Measurement & Instruments (ICEMI), 2009, pp. 306-309.
- G. J. Feng, “The Design of Embedded Linux Driver,” Tsinghua University Press, Beijing, 2008, pp. 196-207.
- H. J. Guo, Z. Wang and X. H. Wang, “Transplant of Linux and Embedded System of Boot Loader and LED Driver,” International Conference on Machine Vision and Human-Machine Interface, Kaifen, 24-25 April, 2010.
- B. H. Song, “In-Depth Understanding of Linux Device Driver,” People’s Posts and Telecommunications Press, Beijing, 2008.

