Paper Menu >>
Journal Menu >>
 Journal of Minerals & Materials Characterization & Engineering, Vol. 10, No.11, pp.1077-1086, 2011 jmmce.org Printed in the USA. All rights reserved 1077 Effect of Heat Treatment on Microstructure and Mechanical Properties of NF6357A Cast Alloy for Wear Resistance Application J. O. Agunsoye 1 , V. S. Aigbodion 2 * and O. S. Sanni 1 1 Department of Metallurgical and Materials Engineering, University of Lagos Akoka, Yaba, Lagos, Nigeria 2 Department of Metallurgical and Materials Engineering, Ahmadu Bello University, Zaria, Nigeria *Corresponding Author: aigbodionv@yahoo.com ABSTRACT The solidification structure of the as-cast consists of the matrix structure that is predominantly austenite and precipitated chromium carbide along the grain boundary. Under these circumstances and where the level of impact is relatively modest, such alloys in as-cast condition will perform. However, at higher levels of impact energy, a point is reached where excessive stress are built up within the component and eventually the materials strength is exceeded and the outcome is complete failure in a characteristic stress fracture mode. If this is to be prevented, it is therefore imperative that the casting be subjected to appropriate heat treatment, to obtain a structure which consist of Cr 7 C 3 carbide and martensite at a hardness range of 650-750HB. The microstructure of NF6357A cast chromium steel containing 2.59% C- 0.7%Si-0.91%Mn- 18.54%Cr-0.019%P-0.01%S- balance–Fe after appropriate heat treatment such as quenching and tempering process have been characterised by means of optical microscope, micro hardness tester, optical emission spectrometer and charpy testing machine. The results show that oil quenched samples were found to retained microstructural consistency for casting thicker than 120mm section. For economic argument, air quenched castings of less than 120mm thickness is not only cheaper alternative, but it is also environment friendly. The fracture toughness was found to be fairly consistent between 2.4-2.6%C range. However, at higher carbon level, the fracture process is dominated by the presence of segregated carbide network which act as a weak link in the microstructure. This weak link encourages dislocation pile-up and impaired material toughness. Keywords: Heat treatment, quenching, composition, microstructure and Impact energy  1078 J. O. Agunsoye, V. S. Aigbodion and O. S. Sanni Vol.10, No.11 1. INTRODUCTION The use of hard metal component in cement milling is now well accepted principle. The potential savings brought about by much improved wear resistance over conventional steel parts are realised in applications all over the world. The internal component of a ball mill is subjected to impact wear and properties required of such parts are maximum wear resistance at a level of toughness adequate to withstand the impact force involved. An assurance of freedom from premature failure is vital since this can be costly not only on replacement and repairs but also in lost production during unscheduled shut downs [1-2]. Wear rate is, in general terms a function of hardness and is a key factor in the economic working of cement plant. Thus it is a compromise between these conflicting properties namely, hardness and toughness which is required in castings suitable for use in cement mills. In this type of wear process classified as high stress abrasion family of alloys generally known as the high chromium irons form the basis of hard metal casting suitable for ball milling application [2]. High chromium white cast irons are multi component alloys that contain iron, carbon and chromium as major elements, and molybdemium, nickel, silicon and manganese either as alloying element or impurities introduced during the foundry process [3-4]. For high chromium cast iron with a Cr concentration of some 18-20 wt% (hypo-eutectic composition), solidification starts with the nucleation of dendritic primary austenite (γ), followed by the formation of γ +M 7 C 3 eutectic. The growth mechanism of M 7 C 3 carbide and its morphology have been well documented by several researchers [5, 6]. In application which involves metal to metal contact, a considerable degree of work hardening can occur. This can results in surface deformation even on a very local scale. In high chromium alloys in which the matrix is completely austenitic under these circumstances and where the level of impact is relatively modest, such alloys in as-cast condition will perform very well. It must be stressed that performance under these circumstance relies upon the work hardening feature and operational circumstances must be amenable to service deformation. This approach can only be taken when the impact forces involved are relatively modest. At higher levels of impact stress, a point is reached where excessive stress are built up within the component and eventually the materials strength is exceeded and the outcome is complete failure in a characteristic stress fracture mode [3]. It is therefore imperative, that where higher impact loading is encountered, it is important that a completely stable metallurgical structure is utilised. This is normally obtained by suitable heat treatment to a tempered martensitic structure containing a mixed microstructure with a minimum of residual austenite which is known to be responsible for spalling [1]. The influence of retained austenite cannot be stressed too highly, as in many respect the retention of this phase within the microstructure can be far worst. Specific alloy composition for grinding rolls and end-wall liner-plates is generally selected depending on application demands and other service requirements [3]. The use of hard components in cement milling is now a well accepted  Vol.10, No.11 Effect of Heat Treatment on Microstructure and Mechanical Properties 1079 principle and the potential savings brought about by much improved wear resistance over conventional steel parts are realised in application all over the world. The internal components of most ball mill are subjected to impact wear and the properties required of such parts are maximum wear resistance at a level of toughness adequate to withstand the impact forces involved [3-4]. The casting conditions, and the evolved microstructure after heat treatment greatly affect the wear performance of high chromium white cast iron. Quenching, seeding and micro-alloying can, to a limited extent, increase the wear resistance, but this is best achieved by heat treatment in the solid state. The methods for producing high chrome iron casting include double pour, continuous pour and centrifugal castings [1, 3]. In this study, lip pour was employed to produce grinding roll from NF6357A-high chrome Iron alloy for crushing of solid mineral and grinding operations in a ball mill for cement production. The casting conditions, and the evolved microstructure after heat treatment greatly affect the wear performance of high chromium white cast iron. Quenching, seeding and micro-alloying can, to a limited extent, increase the wear resistance, but this is best achieved by heat treatment in the solid state. The methods for producing high chrome iron casting include double pour, continuous pour and centrifugal castings [1, 3]. In this study, lip pour was employed to produce grinding roll from NF6357A- high chrome Iron alloy for crushing of solid mineral and grinding operations in a ball mill for cement production. 2.1 Materials and Method High chromium alloy steel with a composition in weight percentage of 2.59C-0.7Si-0.91Mn- 18.54Cr-0.002P-0.001S-Balance Fe was investigated. To investigate the relationship between microstructure, casting section, fracture toughness and different quench media, cylindrical patterns of diameters: 50, 75, 100, 120, 140 and 150 mm were prepared in a silica based sand moulds and poured using the charge make up in Table 1. The concept behind the shape is to facilitates the investigation into the sensitive of different casting section thickness to microstructural evolution as it affect the properties such as fracture toughness and, phase homogenization. These cylindrical bars of length 305mm each were manufactured in Nigerian Foundries Limited, Lagos, Nigeria. The synthesis of the alloy was carried out in a medium frequency neutral refractory lined, electric Induction furnace. The charge calculation for the synthesis of the chromium alloy steel was done by simple stoichiometric method. Steel scrap of 0.072C-0.07Si-0.08Mn-Balance Fe and foundry return (0.88C-0.27Si-0.31Mn-6.04Cr-0.0012P-0.002S –balance Fe) were melted. Different diameters of cast cylindrical bars are subjected to heat treatment (annealing, hardening and tempering) and immediately quenched in soluble oil and forced –air respectively. The oil-quenched samples 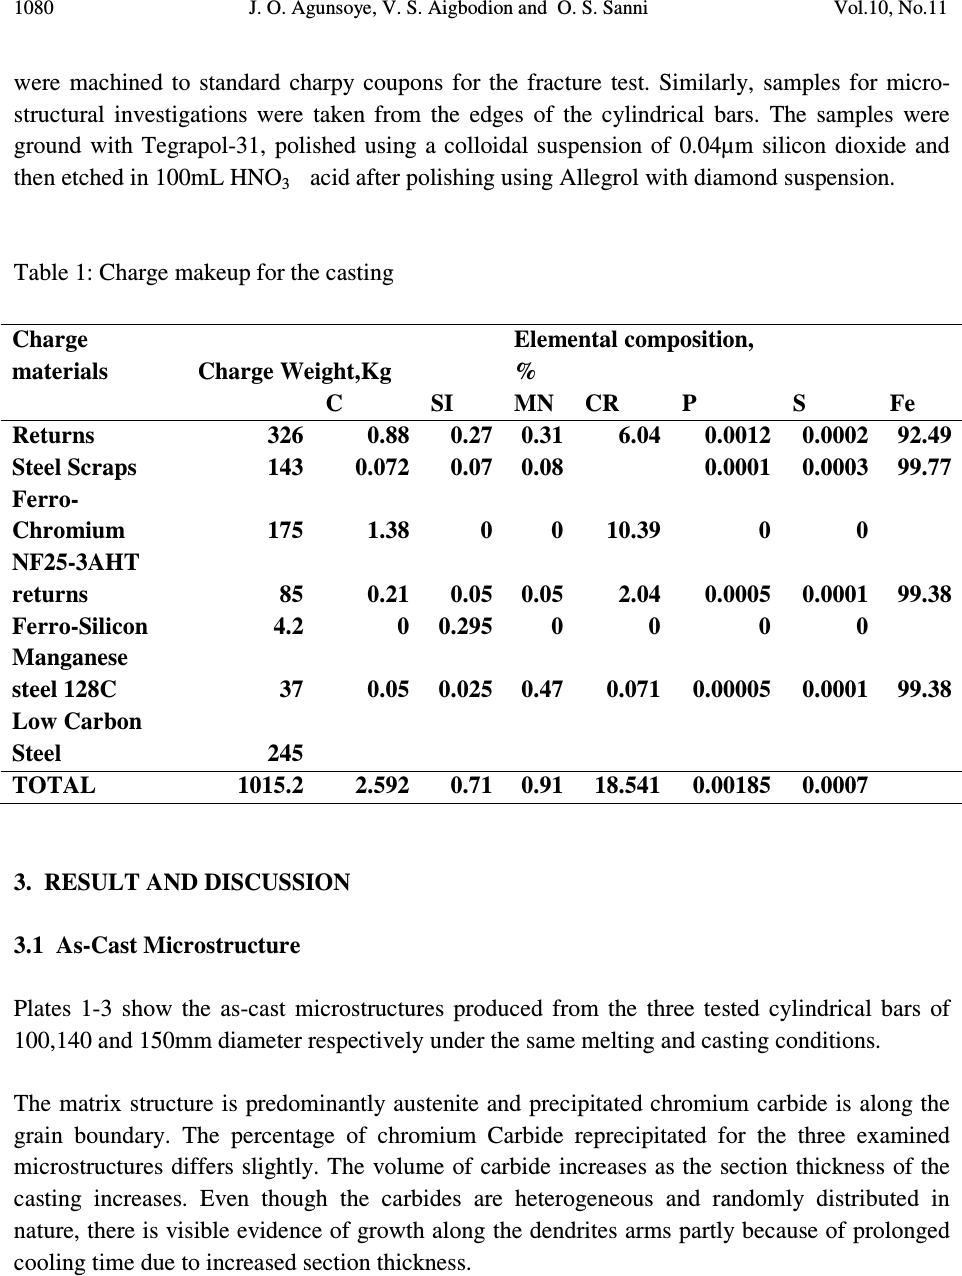 1080 J. O. Agunsoye, V. S. Aigbodion and O. S. Sanni Vol.10, No.11 were machined to standard charpy coupons for the fracture test. Similarly, samples for micro- structural investigations were taken from the edges of the cylindrical bars. The samples were ground with Tegrapol-31, polished using a colloidal suspension of 0.04µm silicon dioxide and then etched in 100mL HNO 3 acid after polishing using Allegrol with diamond suspension. Table 1: Charge makeup for the casting 3. RESULT AND DISCUSSION 3.1 As-Cast Microstructure Plates 1-3 show the as-cast microstructures produced from the three tested cylindrical bars of 100,140 and 150mm diameter respectively under the same melting and casting conditions. The matrix structure is predominantly austenite and precipitated chromium carbide is along the grain boundary. The percentage of chromium Carbide reprecipitated for the three examined microstructures differs slightly. The volume of carbide increases as the section thickness of the casting increases. Even though the carbides are heterogeneous and randomly distributed in nature, there is visible evidence of growth along the dendrites arms partly because of prolonged cooling time due to increased section thickness. Charge materials Charge Weight,Kg Elemental composition, % C SI MN CR P S Fe Returns 326 0.88 0.27 0.31 6.04 0.0012 0.0002 92.49 Steel Scraps 143 0.072 0.07 0.08 0.0001 0.0003 99.77 Ferro- Chromium 175 1.38 0 0 10.39 0 0 NF25-3AHT returns 85 0.21 0.05 0.05 2.04 0.0005 0.0001 99.38 Ferro-Silicon 4.2 0 0.295 0 0 0 0 Manganese steel 128C 37 0.05 0.025 0.47 0.071 0.00005 0.0001 99.38 Low Carbon Steel 245 TOTAL 1015.2 2.592 0.71 0.91 18.541 0.00185 0.0007  Vol.10, No.11 Effect of Heat Treatment on Microstructure and Mechanical Properties 1081 In this form the material is suitable for service in wear resisting application due to the inherent capabilities of austenite to transform to martensite and to increase in hardness in the working environment. An increase of 450-500HB in as-cast condition to 550-650HB is quite possible. Experience, however has shown that in arduous applications where mill operational conditions are ignored, the unstable austenite and its work hardened product-martensite can cause spalling, flaking and possible breakage. The aim of prior heat treatment will be to produce a controlled martensitic transformation that will give a stable material with the desired hardness, capable of performing efficiently in a pre-determined environment 3.2 Annealing Microstructure The typical grinding roll casting and end-wall liner plates for cement grinding and milling are castings with intricate cores and sharp corners. The anneal heat treatment temperature is necessary to reduce induced stress by reducing the stress intensity factor and modify the as-cast microstructures in Plates 1,2 and 3 to produce iron rich, finely dispersed, chromium carbide in an essentially ferritic matrix. This treatment is accompanied by reduction in hardness (50HB) across the casting entire section. Plates 4-6 show the microstructure of the three cylindrical bars.  1082 J. O. Agunsoye, V. S. Aigbodion and O. S. Sanni Vol.10, No.11 3.3 Hardening Microstructure To attain the maximum hardness level necessary for ultimate wear resistance, the three annealed cylindrical bars are hardened at 950 and 1000ºC respectively. It was observed that the batch heat treated at 1000ºC produced the highest hardness level with a consistently uniform microstructure along it entire section. The microstructure of the three heat treated cylindrical bars are shown in Plates 7- 9 for the same bars. It can be seen from the microstructures that the presence of martensite reduces slightly as the casting section thickness increase from Ø100mm to Ø150mm diameter. The formation of martensite on air cooling is sensitive to casting section thickness, i.e the smaller the section thickness, the faster the cooling rate. This revelation has a serious ramification on the microstructural change for casting with abrupt and sudden section changes. Care must be taken to avoid the likelihood of multiple properties with a given casting if pre-mature failure is to be prevented. Furthermore, the microstructures precipitated further growth of chromium carbides within the annealed structure to a point, on air blast quenching, the matrix consist of Cr 7 C 3 carbide and martensite. The hardening between 950 and 1000ºC produced a remarkable difference in hardness under the same holding time. Figure 1 show the hardenability band that is use by quality controlled personnel in the foundry to predict the level hardenability of NF6357A specification for lower and upper limits of the examined composition in Table 1. 3.4 Fracture Toughness Test The development of fracture mechanics has resulted in the quantitative treatment of fracture in terms a material property and the resistance of the material to rapid propagation of crack. The relationship between toughness and carbon content of as-cast austenitic materials can be considered in three distinct parts. Toughness is markedly dependent on carbon up to the point at which the carbide network becomes continuous, and within the region the fracture process is controlled by the matrix. At higher carbon contents the facture process is dominated by the  Vol.10, No.11 Effect of Heat Treatment on Microstructure and Mechanical Properties 1083 presence of the segregated carbide network which act as weak link in the microstructure. The addition of further weakners in the form of excess carbides has little effect on the toughness up to the point at which primary carbides are formed, when a marked reduction is observed. There is a need for foundry to narrow the composition of carbon within 2.4 to 2 .6% for NF6357A, so as to guarantee consistency and stability in the fracture toughness of 150mm section thickness at 1000ºC hardenining temperature as indicated in Figure 2. It is obvious that high toughness favour the eutectic composition of 2.4 % carbon. Figure 1. Hardenability Band for hardened NF6357A Alloy. Figure 2. Effect of composition on fracture toughness 685 690 695 700 705 710 050100 150 200 250 300 Hardness in, HB Distance along bar length in mm 0 5 10 15 20 25 30 35 40 2.25 2.3 2.35 2.4 2.45 2.5 2.552.6 2.65 2.7 Energy in,joules Carbon, %  1084 J. O. Agunsoye, V. S. Aigbodion and O. S. Sanni Vol.10, No.11 3.5 Effect of Quench Media on Section Thickness From Figure 3, it can be seen that there is a strong correlation of 0.88 in the hardness values obtained for different section thickness of casting irrespective of the quenched media(oil or Forced –Air), however, as the section thickness increases beyond 120mm, the hardness value drop suddenly, for sample (forced –air cooled), followed by oil quenched sample. This implies that for section casting less than 120mm,oil and forced air quenched produces nearly the same sample hardness characteristics, therefore for economic argument, it is profitable to air quenched all castings with less than 120mm inscribed sphere for this particular specification. However, for casting thicker than120mm, oil quenched will be preferred. Figure 3. Hardness profile of NF6357A under different quenched media 3.6 Tempering The tempering process is the area of heat treatment which is the most important in determining the final level of retained austenite. The preferred tempering temperature was obtained from the combination of hardness testing and metallography. The result in Figure 4 , agree with Zhang et al [1] finding that tempering of chromium iron below 400ºC does not affect the amount of retained austenite and its mechanical properties and that the amount of retained austenite is drastically reduced when tempering above 400ºC. 694 696 698 700 702 704 706 020406080100 120 140 160 Hardness , HB Casting section thickness in mm Oil quenchedForced -air quenched 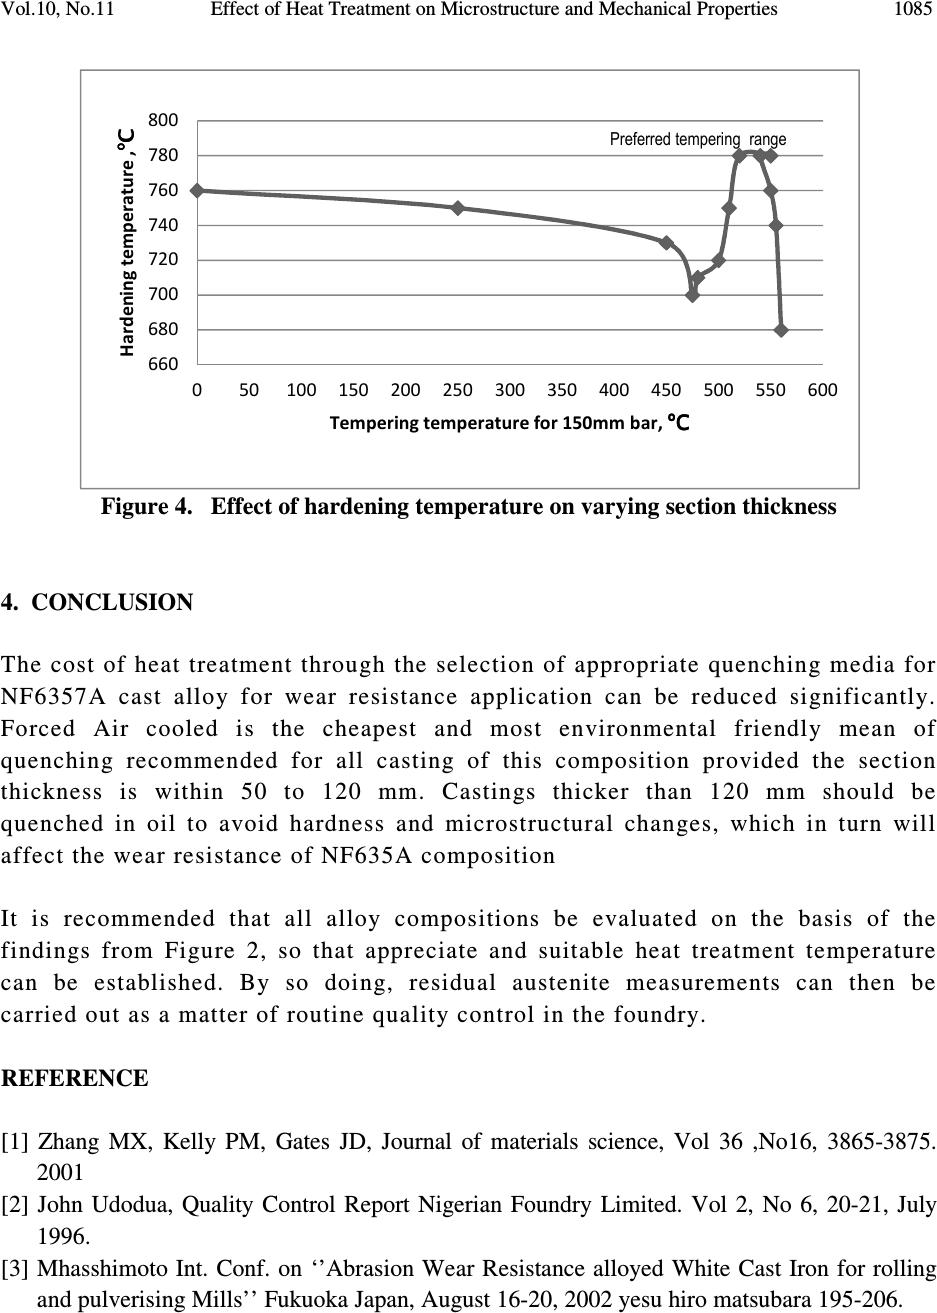 Vol.10, No.11 Effect of Heat Treatment on Microstructure and Mechanical Properties 1085 Figure 4. Effect of hardening temperature on varying section thickness 4. CONCLUSION The cost of heat treatment through the selection of appropriate quenching media for NF6357A cast alloy for wear resistance application can be reduced significantly. Forced Air cooled is the cheapest and most environmental friendly mean of quenching recommended for all casting of this composition provided the section thickness is within 50 to 120 mm. Castings thicker than 120 mm should be quenched in oil to avoid hardness and microstructural changes, which in turn will affect the wear resistance of NF635A composition It is recommended that all alloy compositions be evaluated on the basis of the findings from Figure 2, so that appreciate and suitable heat treatment temperature can be established. By so doing, residual austenite measurements can then be carried out as a matter of routine quality control in the foundry. REFERENCE [1] Zhang MX, Kelly PM, Gates JD, Journal of materials science, Vol 36 ,No16, 3865-3875. 2001 [2] John Udodua, Quality Control Report Nigerian Foundry Limited. Vol 2, No 6, 20-21, July 1996. [3] Mhasshimoto Int. Conf. on ‘’Abrasion Wear Resistance alloyed White Cast Iron for rolling and pulverising Mills’’ Fukuoka Japan, August 16-20, 2002 yesu hiro matsubara 195-206. 660 680 700 720 740 760 780 800 050100 150 200 250 300 350 400 450 500 550 600 Hardening temperature ,ºC ºC ºC ºC Tempering temperature for 150mm bar, ºC ºCºC ºC Preferred tempering range  1086 J. O. Agunsoye, V. S. Aigbodion and O. S. Sanni Vol.10, No.11 [4] A. Sinatra: Int Conf on ‘’Abrasion Wear Resistance alloyed White Cast Iron for rolling and pulverising Mills’’ Fukuoka Japan, August 16-20, 2002 yesuhiro matsubara 23-31. [5] G. Laird: AFS Trans, 1991, 99. 339-357 [6] Kogi Y. Matsubara and K .Matsuda: AFS Trans 1981, 89, 197-294 |

