Paper Menu >>
Journal Menu >>
 Journal of Minerals & Mateials Characterization & Engineering, Vol. 10, No.6, pp.507-515, 2011 jmmce.org Printed in the USA. All rights reserved 507 A Comparative Study on the Milling Speed for the Synthesis of Nano- Structured Al 6063 Alloy Powder by Mechanical Alloying Hafeez Ahamed and V. Senthil Kumar* Department of Production Engineering, National Institute of Technology, Thiruchirappalli- 620015, India. *Corresponding Author: vskumar@nitt.edu ABSTRACT The present article reports on characterization studies performed on amorphized nano- structured Al 6063 alloy powder synthesized by mechanical alloying (MA). The as-milled powder was characterized by X-ray diffraction (XRD) for investigating the development of crystallite nature and determining the different phases of the materials present, scanning electron microscope (SEM) was used for in depth morphological study and High Resolution-transmission electron microscope (HR-TEM) was employed to ensure the development of a nano-structured nature of the Al 6063 matrix. In the present work alloyed powder was milled for 20 h and 40 h at 300 rpm; and 20 h at 700 rpm in a hardened stainless steel medium. Using Williamson-Hall equation; crystallite size, lattice strain and lattice parameter of Al 6063 nanostructure alloy powder was estimated with broadening of XRD peaks. XRD results showed that the crystallite size of Al 6063 alloy powder reached 32 and 53 nm after 20 h at 700 rpm and 40 h at 300 rpm respectively. Keywords: Nano-structured; Al 6063; Synthesis. 1. INTRODUCTION Nano-structured metals and alloys, with average and range of grain sizes typically smaller than 100 nm, have been the subject of considerable research in recent years. Such interest has been spurred by progress in the processing of materials and by advances in characterization techniques for complete understanding of the structural and physical properties of the recent advanced metallic nano-materials [1].In metallurgical research, X-ray diffraction, scanning electron  508 Hafeez Ahamed and V. Senthil Kumar Vol.10, No.6 microscopy (SEM) and high resolution transmission electron microscopy (HR-TEM) are the powerful tools needed for complete understanding of the grain refinement of metallic nano- materials obtained by mechanical alloying (MA) [2].Recent experiments have concluded that the crystallite size and the lattice strain in nano-structured samples contributes significantly with modified mechanical, physical, and electronic properties [3]. In high-energy ball milling [HEBM], plastic deformation, cold-welding and fracture are predominant factors, in which the deformation leads to a change in particle shape, cold-welding leads to an increase in particle size and fracture leads to decrease in particle size resulting in the formation of fine dispersed alloying particles in the grain-refined soft matrix [4]. As a result of HEBM, morphological and structural changes like decrease in the crystallite size, decrease in the lattice parameter and the gradual increase in the lattice strain occurs in severely deformed powder[5,6]. The lattice strain in the face centered cubic materials subjected to HEBM was found to increase continuously with decreasing crystallite size and reaches a maximum value at the smallest crystallite size [7]. Crystallite size and the lattice strain of face centered cubic nano- structured materials obtained through HEBM can be conveniently determined by Williamson- Hall analysis [8]. In the present paper nano-structured aluminium 6063 (Al 6063) alloy powder was prepared by MA. The effect of vial speed with milling time on powder structure was investigated. Hence, an attempt has been made for evaluating the crystallite size, lattice strain and lattice parameter of mechanically alloyed powders by Williamson-Hall analysis and confirmed through HRTEM. 2. EXPERIMENTAL DETAILS 2.1 Materials The chemical composition of elemental powders and its size used in this study to make Al 6063 alloy powder in a planetary ball mill supplied by the Kemphasol Ltd., Mumbai, India are shown in Table 1. 2.2 Processing The MA was executed in a two station planetary ball mill (supplied by Insmart systems Ltd., Hyderabad, India) with the following parameters: i. ball-to-powder weight ratio: 10:1; ball diameter: 16 mm; ball and vial material: hardened stainless steel; speed: 300 rpm. The composite powder was milled up to 40 h to reach steady state condition. 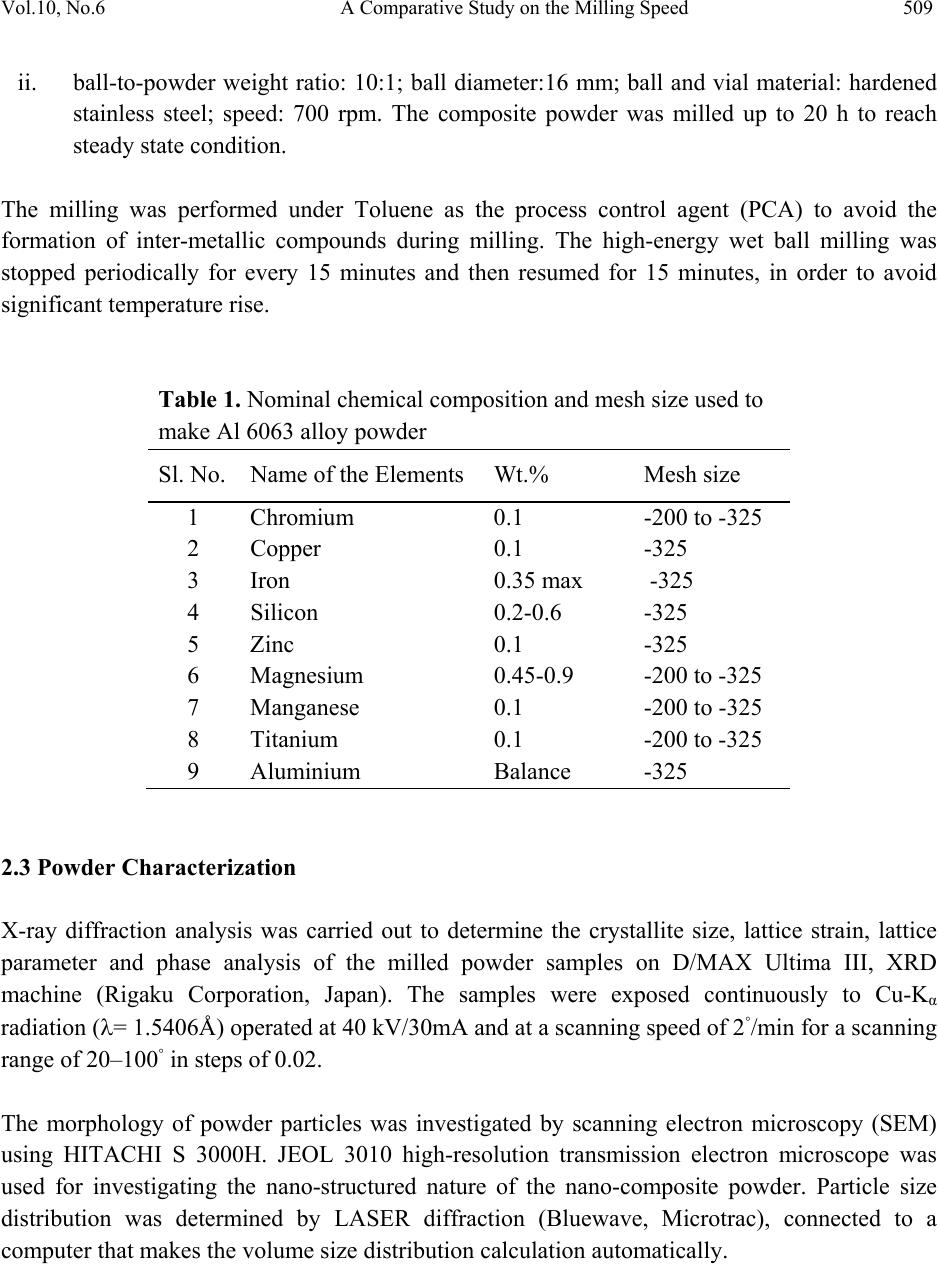 Vol.10, No.6 A Comparative Study on the Milling Speed 509 ii. ball-to-powder weight ratio: 10:1; ball diameter:16 mm; ball and vial material: hardened stainless steel; speed: 700 rpm. The composite powder was milled up to 20 h to reach steady state condition. The milling was performed under Toluene as the process control agent (PCA) to avoid the formation of inter-metallic compounds during milling. The high-energy wet ball milling was stopped periodically for every 15 minutes and then resumed for 15 minutes, in order to avoid significant temperature rise. Table 1. Nominal chemical composition and mesh size used to make Al 6063 alloy powder Sl. No. Name of the Elements Wt.% Mesh size 1 Chromium 0.1 -200 to -325 2 Copper 0.1 -325 3 Iron 0.35 max -325 4 Silicon 0.2-0.6 -325 5 Zinc 0.1 -325 6 Magnesium 0.45-0.9 -200 to -325 7 Manganese 0.1 -200 to -325 8 Titanium 0.1 -200 to -325 9 Aluminium Balance -325 2.3 Powder Characterization X-ray diffraction analysis was carried out to determine the crystallite size, lattice strain, lattice parameter and phase analysis of the milled powder samples on D/MAX Ultima III, XRD machine (Rigaku Corporation, Japan). The samples were exposed continuously to Cu-Kα radiation (= 1.5406Å) operated at 40 kV/30mA and at a scanning speed of 2◦/min for a scanning range of 20–100◦ in steps of 0.02. The morphology of powder particles was investigated by scanning electron microscopy (SEM) using HITACHI S 3000H. JEOL 3010 high-resolution transmission electron microscope was used for investigating the nano-structured nature of the nano-composite powder. Particle size distribution was determined by LASER diffraction (Bluewave, Microtrac), connected to a computer that makes the volume size distribution calculation automatically. 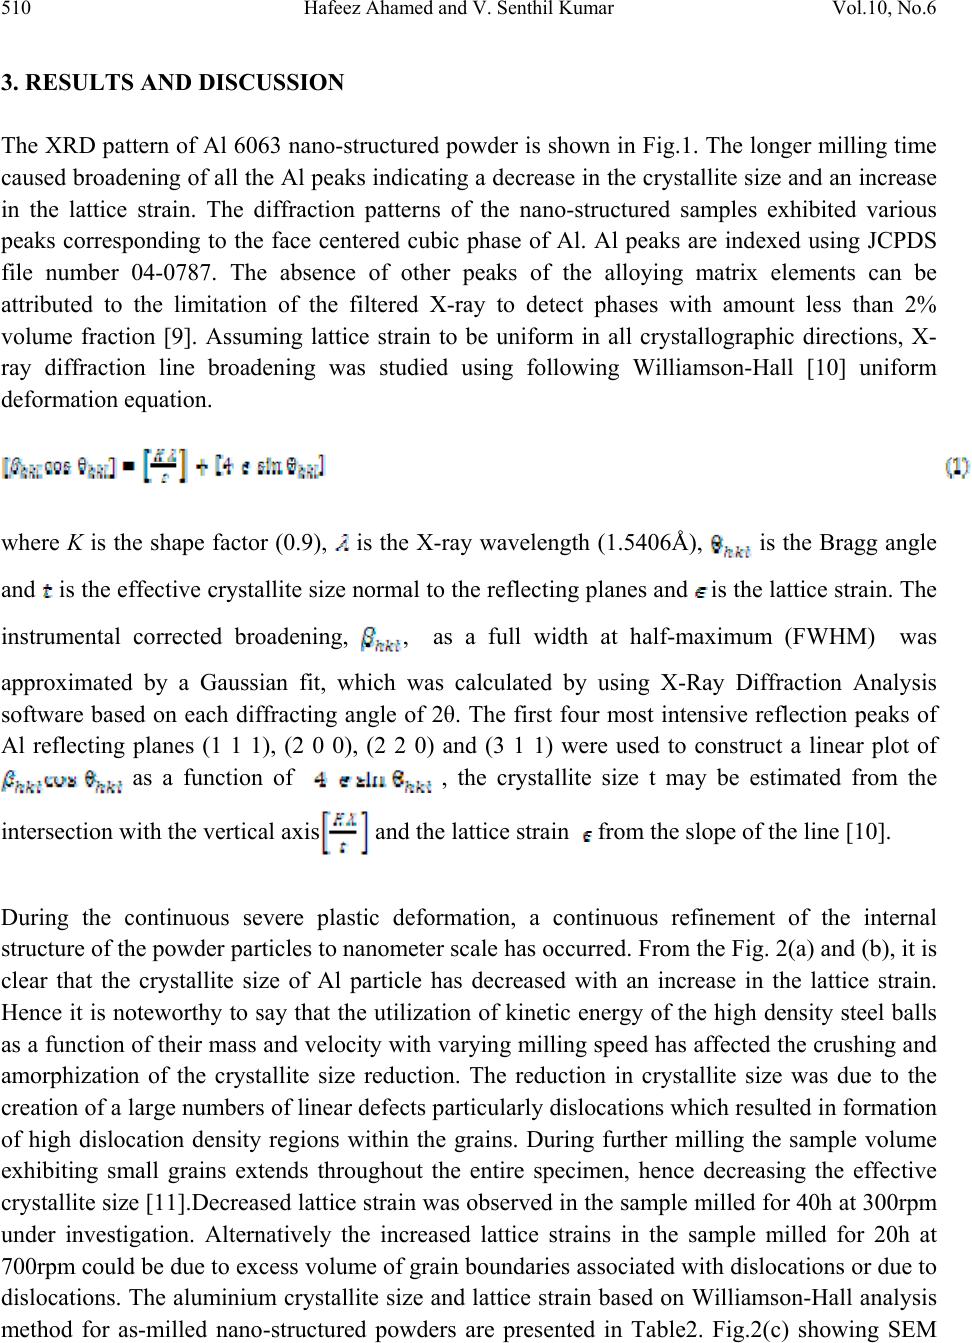 510 Hafeez Ahamed and V. Senthil Kumar Vol.10, No.6 3. RESULTS AND DISCUSSION The XRD pattern of Al 6063 nano-structured powder is shown in Fig.1. The longer milling time caused broadening of all the Al peaks indicating a decrease in the crystallite size and an increase in the lattice strain. The diffraction patterns of the nano-structured samples exhibited various peaks corresponding to the face centered cubic phase of Al. Al peaks are indexed using JCPDS file number 04-0787. The absence of other peaks of the alloying matrix elements can be attributed to the limitation of the filtered X-ray to detect phases with amount less than 2% volume fraction [9]. Assuming lattice strain to be uniform in all crystallographic directions, X- ray diffraction line broadening was studied using following Williamson-Hall [10] uniform deformation equation. where K is the shape factor (0.9), is the X-ray wavelength (1.5406Å), is the Bragg angle and is the effective crystallite size normal to the reflecting planes and is the lattice strain. The instrumental corrected broadening, , as a full width at half-maximum (FWHM) was approximated by a Gaussian fit, which was calculated by using X-Ray Diffraction Analysis software based on each diffracting angle of 2θ. The first four most intensive reflection peaks of Al reflecting planes (1 1 1), (2 0 0), (2 2 0) and (3 1 1) were used to construct a linear plot of as a function of , the crystallite size t may be estimated from the intersection with the vertical axis and the lattice strain from the slope of the line [10]. During the continuous severe plastic deformation, a continuous refinement of the internal structure of the powder particles to nanometer scale has occurred. From the Fig. 2(a) and (b), it is clear that the crystallite size of Al particle has decreased with an increase in the lattice strain. Hence it is noteworthy to say that the utilization of kinetic energy of the high density steel balls as a function of their mass and velocity with varying milling speed has affected the crushing and amorphization of the crystallite size reduction. The reduction in crystallite size was due to the creation of a large numbers of linear defects particularly dislocations which resulted in formation of high dislocation density regions within the grains. During further milling the sample volume exhibiting small grains extends throughout the entire specimen, hence decreasing the effective crystallite size [11].Decreased lattice strain was observed in the sample milled for 40h at 300rpm under investigation. Alternatively the increased lattice strains in the sample milled for 20h at 700rpm could be due to excess volume of grain boundaries associated with dislocations or due to dislocations. The aluminium crystallite size and lattice strain based on Williamson-Hall analysis method for as-milled nano-structured powders are presented in Table2. Fig.2(c) showing SEM 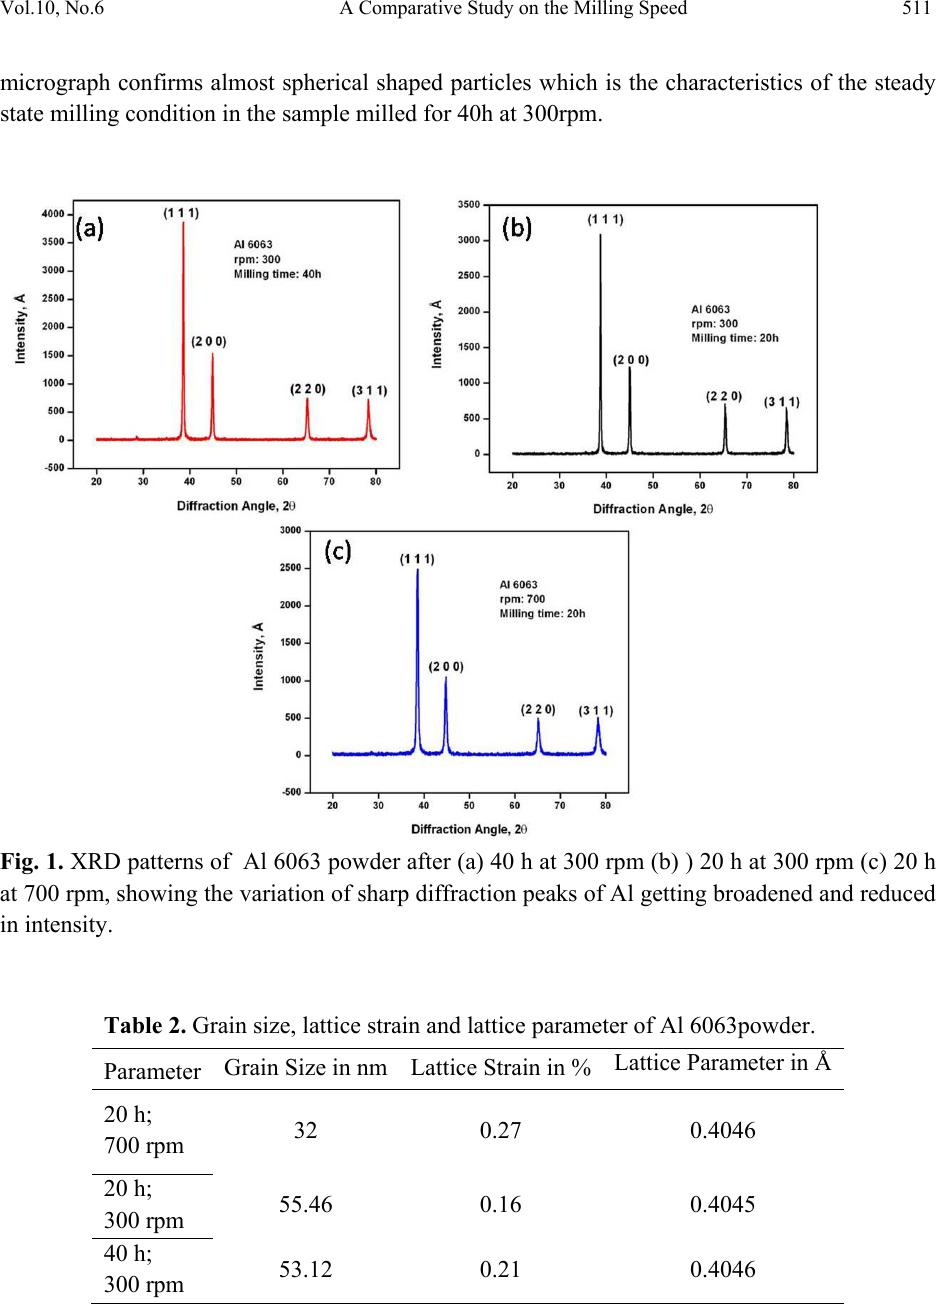 Vol.10, No.6 A Comparative Study on the Milling Speed 511 micrograph confirms almost spherical shaped particles which is the characteristics of the steady state milling condition in the sample milled for 40h at 300rpm. Fig. 1. XRD patterns of Al 6063 powder after (a) 40 h at 300 rpm (b) ) 20 h at 300 rpm (c) 20 h at 700 rpm, showing the variation of sharp diffraction peaks of Al getting broadened and reduced in intensity. Table 2. Grain size, lattice strain and lattice parameter of Al 6063powder. Parameter Grain Size in nm Lattice Strain in % Lattice Parameter in Å 20 h; 700 rpm 32 0.27 0.4046 20 h; 300 rpm 55.46 0.16 0.4045 40 h; 300 rpm 53.12 0.21 0.4046 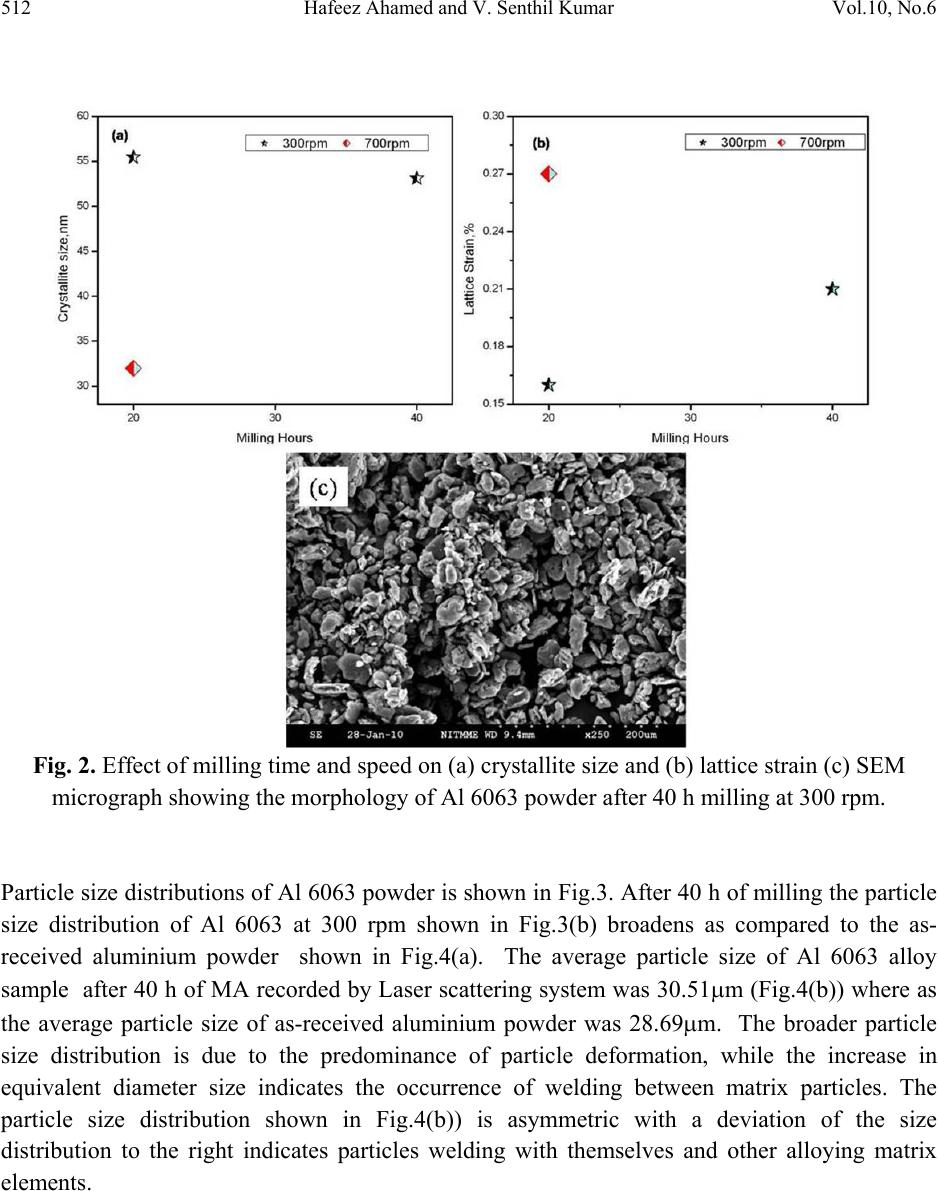 512 Hafeez Ahamed and V. Senthil Kumar Vol.10, No.6 Fig. 2. Effect of milling time and speed on (a) crystallite size and (b) lattice strain (c) SEM micrograph showing the morphology of Al 6063 powder after 40 h milling at 300 rpm. Particle size distributions of Al 6063 powder is shown in Fig.3. After 40 h of milling the particle size distribution of Al 6063 at 300 rpm shown in Fig.3(b) broadens as compared to the as- received aluminium powder shown in Fig.4(a). The average particle size of Al 6063 alloy sample after 40 h of MA recorded by Laser scattering system was 30.51m (Fig.4(b)) where as the average particle size of as-received aluminium powder was 28.69m. The broader particle size distribution is due to the predominance of particle deformation, while the increase in equivalent diameter size indicates the occurrence of welding between matrix particles. The particle size distribution shown in Fig.4(b)) is asymmetric with a deviation of the size distribution to the right indicates particles welding with themselves and other alloying matrix elements. 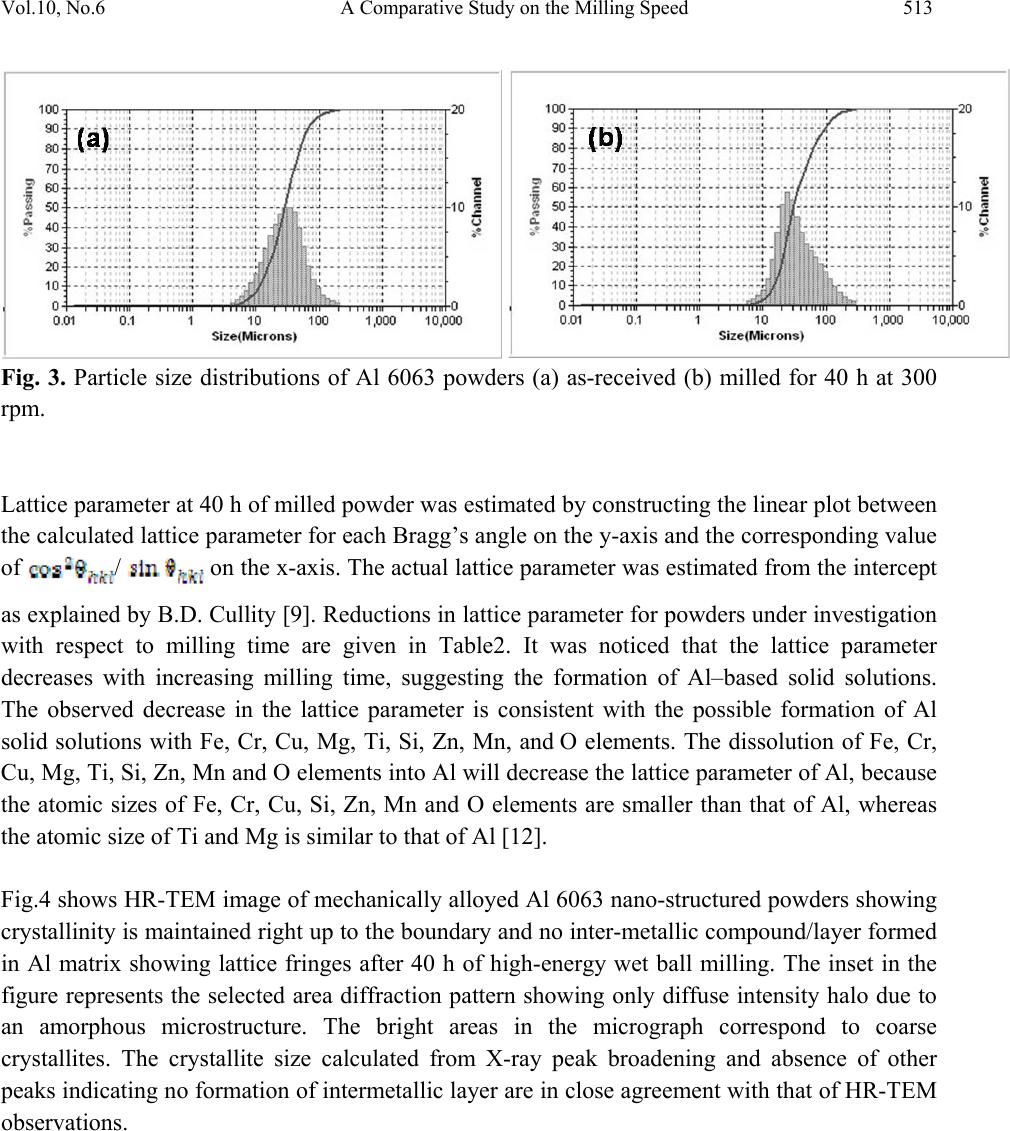 Vol.10, No.6 A Comparative Study on the Milling Speed 513 Fig. 3. Particle size distributions of Al 6063 powders (a) as-received (b) milled for 40 h at 300 rpm. Lattice parameter at 40 h of milled powder was estimated by constructing the linear plot between the calculated lattice parameter for each Bragg’s angle on the y-axis and the corresponding value of / on the x-axis. The actual lattice parameter was estimated from the intercept as explained by B.D. Cullity [9]. Reductions in lattice parameter for powders under investigation with respect to milling time are given in Table2. It was noticed that the lattice parameter decreases with increasing milling time, suggesting the formation of Al–based solid solutions. The observed decrease in the lattice parameter is consistent with the possible formation of Al solid solutions with Fe, Cr, Cu, Mg, Ti, Si, Zn, Mn, and O elements. The dissolution of Fe, Cr, Cu, Mg, Ti, Si, Zn, Mn and O elements into Al will decrease the lattice parameter of Al, because the atomic sizes of Fe, Cr, Cu, Si, Zn, Mn and O elements are smaller than that of Al, whereas the atomic size of Ti and Mg is similar to that of Al [12]. Fig.4 shows HR-TEM image of mechanically alloyed Al 6063 nano-structured powders showing crystallinity is maintained right up to the boundary and no inter-metallic compound/layer formed in Al matrix showing lattice fringes after 40 h of high-energy wet ball milling. The inset in the figure represents the selected area diffraction pattern showing only diffuse intensity halo due to an amorphous microstructure. The bright areas in the micrograph correspond to coarse crystallites. The crystallite size calculated from X-ray peak broadening and absence of other peaks indicating no formation of intermetallic layer are in close agreement with that of HR-TEM observations. 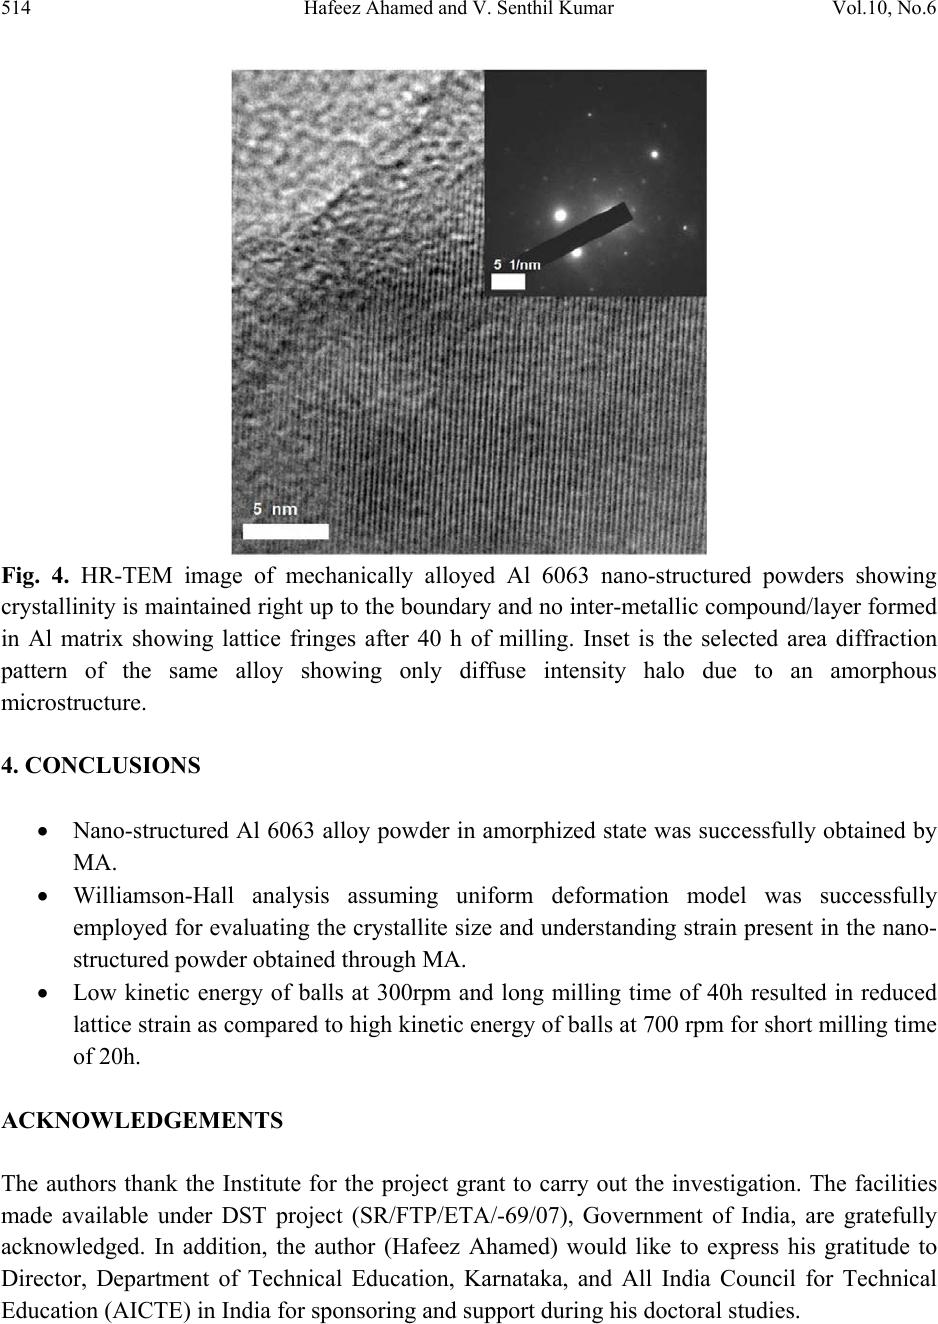 514 Hafeez Ahamed and V. Senthil Kumar Vol.10, No.6 Fig. 4. HR-TEM image of mechanically alloyed Al 6063 nano-structured powders showing crystallinity is maintained right up to the boundary and no inter-metallic compound/layer formed in Al matrix showing lattice fringes after 40 h of milling. Inset is the selected area diffraction pattern of the same alloy showing only diffuse intensity halo due to an amorphous microstructure. 4. CONCLUSIONS Nano-structured Al 6063 alloy powder in amorphized state was successfully obtained by MA. Williamson-Hall analysis assuming uniform deformation model was successfully employed for evaluating the crystallite size and understanding strain present in the nano- structured powder obtained through MA. Low kinetic energy of balls at 300rpm and long milling time of 40h resulted in reduced lattice strain as compared to high kinetic energy of balls at 700 rpm for short milling time of 20h. ACKNOWLEDGEMENTS The authors thank the Institute for the project grant to carry out the investigation. The facilities made available under DST project (SR/FTP/ETA/-69/07), Government of India, are gratefully acknowledged. In addition, the author (Hafeez Ahamed) would like to express his gratitude to Director, Department of Technical Education, Karnataka, and All India Council for Technical Education (AICTE) in India for sponsoring and support during his doctoral studies.  Vol.10, No.6 A Comparative Study on the Milling Speed 515 REFERENCES [1] K. S. Kumar, H. Van Swygenhoven, S. Suresh, Mechanical behavior of nanocrystalline metals and alloys, Acta Mater 2003, 5743–5774. [2] K. Ramakanth. Basics of X-ray Diffraction and its Application, New Delhi, I. K. International Publishing House; 2007. [3] V. Viswanathan, T. Laha, K. Balani, A. Agarwal, S. Seal, Challenges and advances in nanocomposite processing techniques, Mater Sci Eng R 2006, 121–285. [4] C. Suryanarayana, Mechanical alloying and milling, Prog Mater Sci 2001, 1-184. [5] Viseslava Rajkovic, Dusan Bozic, Milan T. Jovanovic, Characterization of prealloyed copper powders treated in high energy ball mill, Mater Charact 2006, 94–99. [6] Maryam Azabou, Mohamed Khitouni, Abdelwaheb Kolsi, Characterization of nanocrystalline Al-based alloy produced by mechanical milling followed by cold-pressing consolidation, Mater Charact 2009, 499 - 505. [7] C. C. Koch. Synthesis of nanostructured materials by Mechanical milling: problems and opportunities, Nano Structured Materials, Nanostruct Mater 1997, 13-22. [8] V. Biju, Neena Sugathan, V. Vrinda, S. L. Salini. J Mater Sci 2008, 1175-1179. [9] B. D. Cullity. Elements of X-ray diffraction, third ed., London, Prentice Hall; 2001. [10] K. Williamson, W. H. Hall, X-ray line broadening from filed aluminium and wolfrom, Acta Metall. 1953, 22–31. [11] H. J. Fecht, Nanostructure formation by Mechanical attrition, Nanostruct Mater 1995, 33- 42. [12] P. Haasen, Physical Metallurgy, 3rd Ed., Cambridge University Press Cambridge, Great Britain, 1996. |

