Journal of Information Security
Vol.5 No.3(2014), Article
ID:47558,8
pages
DOI:10.4236/jis.2014.53009
Smartphone Forensic Analysis: A Case Study for Obtaining Root Access of an Android Samsung S3 Device and Analyse the Image without an Expensive Commercial Tool
Muhammad Faheem1, N.-A. Le-Khac2, Tahar Kechadi1
1University College Dublin, Dublin, Ireland
2Department of Computer Science, Abdul Wali Khan University Mardan, Mardan, Pakistan
Email: faheemkhalil@gmail.com
Copyright © 2014 by authors and Scientific Research Publishing Inc.
This work is licensed under the Creative Commons Attribution International License (CC BY).
http://creativecommons.org/licenses/by/4.0/


Received 30 April 2014; revised 25 May 2014; accepted 20 June 2014
ABSTRACT
Smartphone is a very useful and compact device that fits in person’s pocket, but at the same time it can be used as a tool for criminal activities. In this day and age, people increasingly rely on smart phones rather than desktop computers or laptops to exchange messages, share videos and audio messages. A smartphone is almost equivalent in its application to a PC, hence there are security risks associated with its use such as carrying out a digital crime or becoming a victim of one. Criminals can use smartphones for a number of activities. Namely, committing a fraud over e-mail, harassment via text messages, drug trafficking, child pornography, communications related to narcotics, etc. It is a great challenge for forensic experts to extract data from a smartphone for forensic purposes that can be used as evidence in the court of law. In this case study, I show how to obtain the root access of Samsung S3 phone, how to create DD image and then how to examine DD image via commercial tool like UFED physical analyzer trial version which doesn’t support Android devices? I will extract the messages for Viber on trial version of UFED Physical analyzer.
Keywords:Viber, Root, Android Forensic

1. Introduction
According to NIST, the current definition of digital forensics is the scientific procedures used to recognize and classify, collect, evaluate and analyse the data while maintaining the level of integrity of the information throughout the forensics process.
Figure 1 below is showing different fields of the Digital Forensics.
Computer forensics is the process of obtaining, identifying, extracting, analysing, and documenting of computer evidence stored as data/digital/magnetically encoded information for use as evidence in civil, administrative and criminal cases [1] .
Database forensics is the study of database and their metadata. Database forensics use database contents and log files in order to retrieve the relevant information.
Network forensics is an analysis of network traffic. Network forensics allows us to make forensic determinations based on the observed traffic of the network [2] .
Mobile forensics is a branch of digital forensics relating to recovery of digital evidence or data from a mobile device under forensically sound conditions [3] .
According to NIST, the mobile forensics is a process of preservation, acquisition, examination and analysis, followed by reporting [4] .
1.1. Android Smartphone Growth
In this digital age, smartphones are integral part of our communication as they become more similar in use to desktop computers. We no longer make only phone calls, and send and receive text messages, but also use them for social networking, online banking, buying and selling goods online, watching news and movies, playing games, etc. Nowadays more commercial and non-commercial businesses deploy their custom-made applications for smartphones, which allow employees and customers to download usable data on smartphones.
There are many kinds of smartphone operating systems available on the market, i.e. Android, IOS and RIM. Google’s Android operating system is one of the most popular OS for smartphones, television, gaming devices and notebooks. In the first quarter of 2013, smart mobile phone shipment exceeded 300 million and Android accounted for 64% of total sales of all smartphones [5] .
Figure 2 underneath is presenting a range of top selling smartphone brands in the first quarter of 2013.
Figure 3 is the projected sales growth for most common used OS according to Gartner.
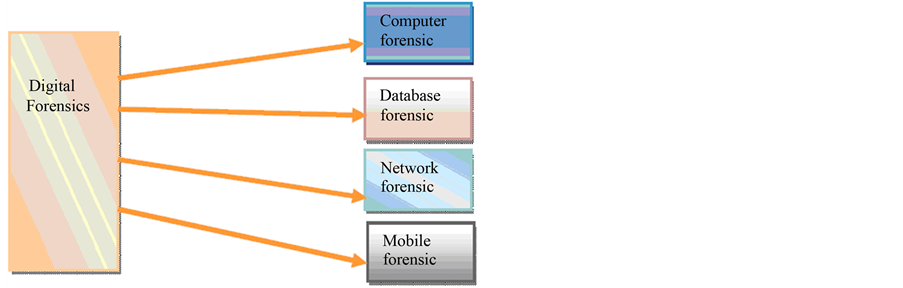
Figure 1. Digital forensics fields.
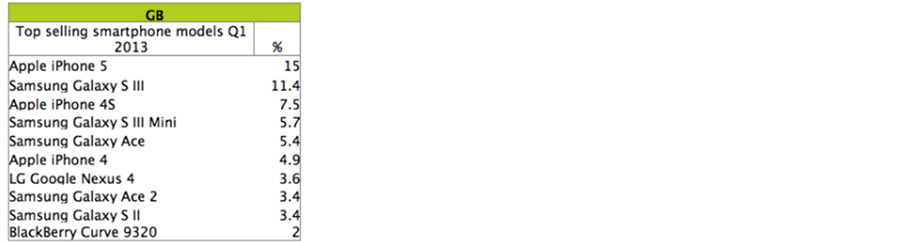
Figure 2. Top selling models.

Figure 3. Sales growth graph.
1.2. Android OS Architecture
Android is an open source platform for smartphones. The term “Android” is a Greek word which means “human being”. Android is a software stack for mobile devices that includes an operating system, middleware and key applications [6] .
In order to compete with Apple iOS system, Google acquired company called Android which developed an operating system with a consideration for the device for which it was created. This operating system provides users with visibility into how applications work, allows control over those applications and provides security against any malware attack.
In order to perform forensic analysis of Android system it is important to understand Android’s architecture and its core components. The basic Android architecture is Linux Kernel, and it is composed of five main components. These are presented in Figure 4 [7] .
2. Related Work
The most relevant research that was close to my case studies was done by “Forensic Analysis of Instant Messenger Applications on Android Devices” Mahajan, Aditya, M. S. Dahiya, and H. P. Sanghvi (2013).
In this research, they use the commercial UFED Physical Analyzer which cost around eight thousand Eurosto acquire data from mobile phone. With the commercial UFED physical Analyzer data extraction was done logically. After data extraction it was possible to get artifacts and timestamp of Viber. In this research, if the investigators want to examine the deleted data they won’t be able to do analysis because data acquisition was done logically it didn’t create bit by bit copy of the phone internal memory.
In my case I should be able to examine deleted data if use commercial forensics tools.
3. Case Study
In Previous cases, they fail to explain how we can obtain forensically sound image without access to commercial tool. In this case study, I have task to obtain image of suspected Android devices which is Samsung S3 phone and Viber was used as mean of communication between suspects. Below is the specification of the mobile phone:
Ÿ CPU: Quad-core 1.4 GHz Cortex-A9
Ÿ Memory 16 GB
Ÿ Android OS 4.1.2
Ÿ Model No GT-19300 My first task is to obtained root access of this mobile phone so I can create image which I can examine then using UFED Physical Analyzer.
1) 3.1. A Root Access
2) First I need to install Android Development Tool (ADT) which is part of Android Software Development Kit (SDK) on my windows machine from http://developer.android.com/sdk/index.html, which is zipped file. Next I extract the file on C drive (copy all the files from folder “Platform Tools” into folder “Tools”).
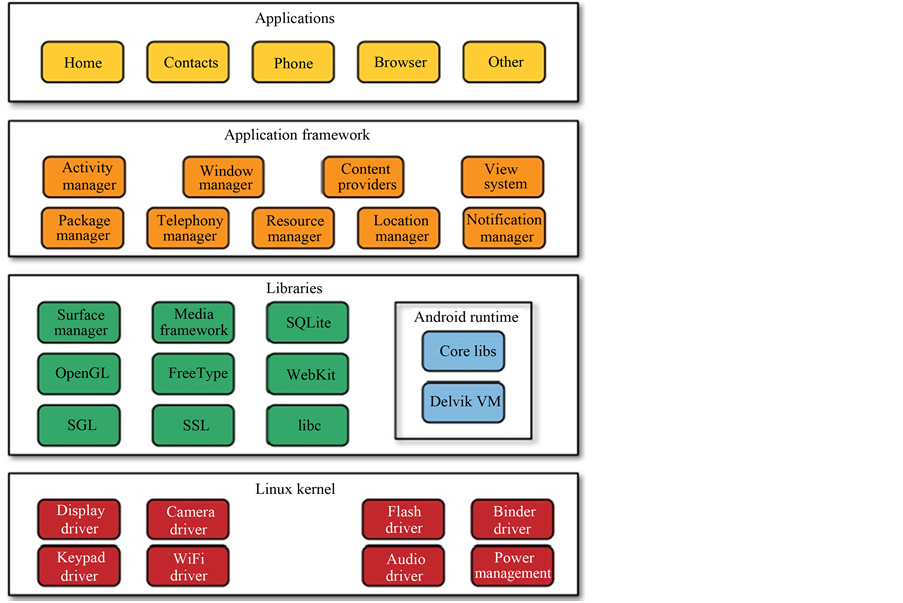
Figure 4. Android OS architecture.
3) To gain access to the root directory I need to enable USB debugging on the phone, which is achieved by selecting Settings and then Developer options. From the latter Debugging has to be clicked and then check box USB debugging has to be selected. Once a warning message appears, Ok has to be clicked.
4) The next step is a command prompt command which ensures that ADB is working properly. To execute this command a phone must be connected via USB cable to the laptop computer as shown in Figure 5.
5) I have installed SRSRoot from http://www.srsroot.com/ on my machine in order to gain the root access. Next I used a set of commands:
$ adb push /SRSRoot /data/local/tmp
$ adb shell
$ ls to see the list of directory
$ chmod 777
$. /
Then su And now
# adb shell (now the $ is replaced by # indicating that you are root) as show in Figure 6.
6) After gaining the root permission, I am able to create image of an Android device.
3.2. Creating DD Image of Memory
The Android file system is divided into number of partitions. Without a traditional hard drive, it uses Memory Technology Devices (MTD) to make connections between Linux Kernel and flash drive. The most common partitions in the Android system are boot, cache, data, and recovery.
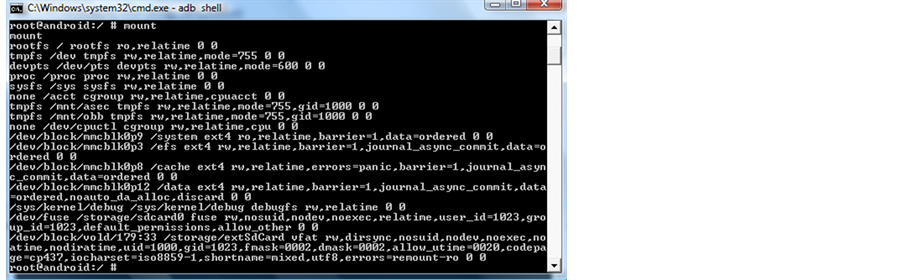
After gaining the root access to the file system of the Android Samsung Galaxy S3 phone, I used a DF command shown in Figure 7 followed by a mount command Figure 8 to display the partitions. Next I inserted a fresh formatted external 30 GB SD card into the phone.
Figure 7 underneath presents the outputs from these two commands (Figure 8).

Figure 5. Above shows that device is connected to the ADB.


Figure 6. Showing root access successfully obtained.
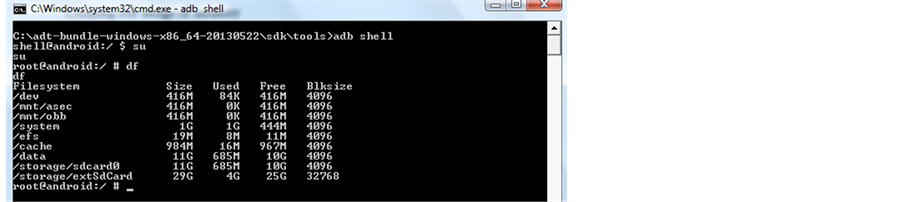
Figure 7. Output of DF command.
 (a)
(a)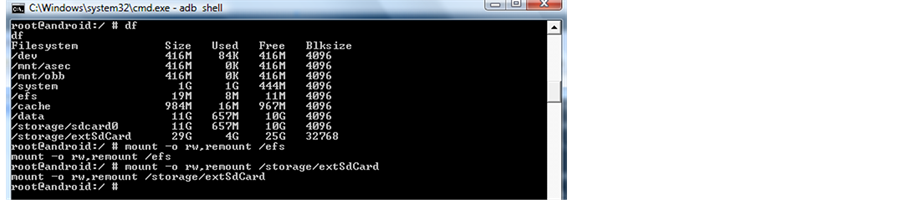 (b)
(b)
Figure 8. (a) Output of mount command; (b) Command for obtaining read write access.
rootfs-Kernel mounts the Root File System at Startup devpts-simulated terminal sessions Proc-information about Kernel, processes and configuration tmpfs-most important—this is RAM (stored on a different chip)
cramfs-compressed ROM file system Next I will be creating a DD image of the partitions:
Ÿ Data
Ÿ System
Ÿ Cache
Ÿ EFS—contains sensitive information like Mac address, IMEI, product code, wireless Before DD command I make it sure to give read/write permission to each partition which is as follows:
mount-0 rw, remount /xxxxx where xxxxx = partition name
Example of DD commands
DD if = /dev/block/mmcblk0p12/data of = /storage/extSdCard/data.dd DD if = /dev/block/mmcblk0p8/cache of = /storage/extSdCard/cache.dd DD if = /dev/block/mmcblk0p3/efs of = /storage/extSdCard/efs.dd DD if = /dev/block/mmcblk0p09/system of = /storage/extSdCard/system.dd Efs image Figure 9.
Data image Figure 10.
The DD command was executed successfully and output was saved onto the external SD drive, and then I used the command below to move the output from SD card to the host machine.
ADB pull/sdcard/xxxxx/pathto download Where xxxxx = image and pathto download is where I want to save it on host machine.
4. UFED Physical Analyzer Examination
I need to install trial version of UFED Physical Analyzer which is free to use for maximum one month, but it doesn’t support any Android phones. But I have obtained the image of the phone and I can use UFEF Physical Analyzer I open a blank project and add source file as my DD image. The UFED Physical Analyzer does recognize this image I can do analysis on this image. My aim in this case study is to find Arifact connected to any viber communication below is screen dump I obtained Figure 11.
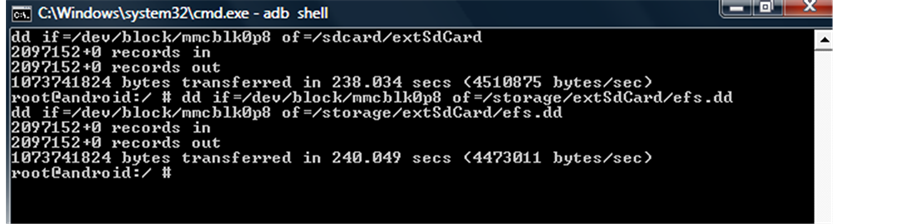
Figure 9. EFS image.
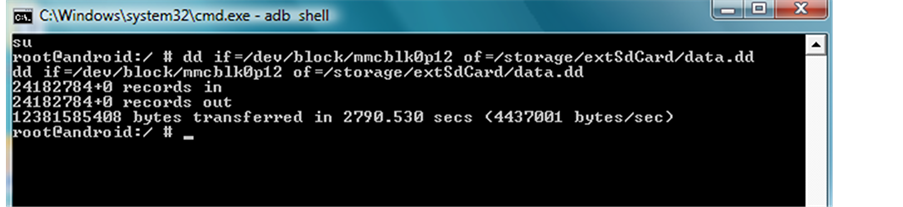
Figure 10. Data image.
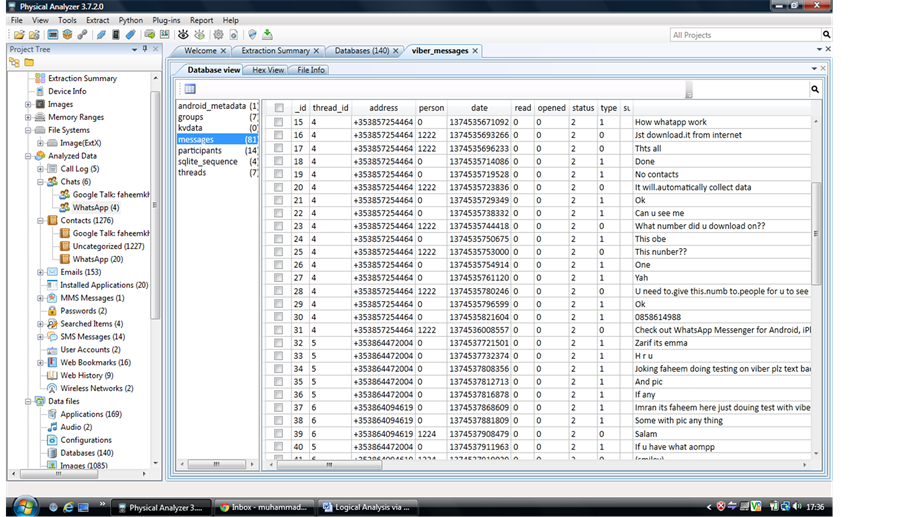
Figure 11. UFED Physical Analyzer screen dump.
Below is table for all Viber related artifacts.
I found most of the Viberarifacts in /data/data/com.viber.voip/ directory, while Viber messages with time stamps in the folder /data/data/com.viber.voip/databases/viber_messages.
SIM number with which the Viber account was activated and the time stamps are in the folder called
/data/data/com.viber.voip/files/preference/activiated_sim_serial.
The country code which Viber is registered with is in
/data/data/com.viber.voip/files/preference/reg_viber_country_code.
First SMS sent via Viber is to be found at
/data/data/com.viber.voip/files/preference/viber_first_sms.
The Viber activation code with time stamps is in the folder
/data/data/com.android.providers.telephony/databases.
Pictures sent via Viber are in the folder /data/data/com.android.providers.telephony/app_aparts.
5. Conclusion and Future Work
The Android forensics is a relatively new and constantly evolving discipline as a result of new models of the Android phone coming to the market. Some research shows that the Android phone will exceed iPhone sales within next few years.
The above results show we still can work around and do forensic analysis even without full licence copy of the forensic tools. The results obtained in this cases studies are exactly the same or similar if we use expensive commercial tools. In this research, I was particularly focused on how to gain the root access and acquire data from the Samsung Galaxy S3 phone followed by the forensic analysis of data using UFED Physical Analyzer.
This is by no means a conclusive project. In my future research, I would like to further investigate more tools and different application if I am able to fully explore all artifacts using trial version of forensic tools.
References
- Vacca, J.R. (2002) Computer Forensics. Charles River Media, Hingham.
- Cohen, M.I. and PyFlag (2008) PyFlag—An Advanced Network Forensic Framework Communication of the ACM. Digital Investigation, 5, S112-S120.
- http://www.webopedia.com/TERM/M/mobile_phone_forensics.html
- Jansen, W.A. (2007) Guideline on Cell Phone Forensics.
- Palo Alto 31st of January 2011. http://www.kantarworldpanel.com/
- Available from http://developer.android.com/about/index.html
- Available from http://www.android-app-market.com/android-architecture.html