Materials Sciences and Applications
Vol. 3 No. 9 (2012) , Article ID: 22918 , 5 pages DOI:10.4236/msa.2012.39093
Ion and Gas Nitriding Applied to Steel Tool for Hot Work X38CrMoV5 Nitriding Type: Impact on the Wear Resistance
![]()
Research Unit, Materials Engineering, National Engineering School of Tunis, Tunis, Tunisia.
Email: souad.benslima@enit.rnu.tn
Received June 5th, 2012; revised July 9th, 2012; accepted August 10th, 2012
Keywords: Steel Tool; Heat Treatment; Nitriding; Microhardness; Fragility
ABSTRACT
The present work is to characterize both processes of thermochemical treatments: plasma nitriding and gas. The tests were carried out in collaboration with the Franco-Tunisian heat treatment (F3T) applied to a widely used steel in industrial production as a tool for hot work on X38CrMoV5 (AISI H13). The material underwent a first cycle of hardening heat treatment at 1030˚C followed by two successive incomes at 550˚C and 590˚C. After nitriding (ion and gas), the quantification of wear was performed in the laboratory of tribology at SUPMECA (St. Ouen). After defining the test conditions on the alternative tribometer ensuring on one hand a quantitatively sufficient wear and avoiding on the other hand, the phenomenon of jamming. The conditions chosen are: 58.8 N load, frequency 0.5 Hz, friction coefficient μ = 0.5. The wear tracks were scanned using the profilometer Talysurf 5 M type, which allowed us to assess the volume used and the wear rate. Moreover, these tracks were characterized by metallography. What emerges from this work is that the control parameters of ion nitriding ensures a better depth of treatment for the same holding time with a total absence of the white layer known for chipping and fragility.
1. Introduction
Steel tools for hot working X38CrMoV5 types are generally used for steels operating at high temperatures and especially those subject to a high mechanical stress and/ or thermal prints such as die casting, stamping tools.
Nitriding is a process applied in order to produce surface steel layet layer of high hardness, to increase their serviceability to the phenomena of wear, fatigue and corrosion.
The objective of nitriding is to harden superficially. The carbides formed by the alloying elements ensure a high wear resistance of these steels. The wear of steel tools of are generally abrasive surfaces subject to wear and must have a satisfactory hardness.
2. Material and Heat Treatment
2.1. Characterization of the Delivery Conditions
The steel studied is the type of industrial manufacturing X38CrMoV5 (AISI H13), its nominal composition is given in Table 1. A delivery material conditions consist of ferrite and undissolved carbides (Figure 1). Carbides were identified by X-ray diffraction as MC and M3C M7C3 (Figure 2).
2.2. Heat Treatment
The thermochemical treatments are applied treatments which are preceded by austenitizing and tempering applied in industrial conditions, they were made by the partner company: the Franco Tunisian heat treatment (F3T) and summarized in the following diagram (Figure 3).
The choice of austenitizing temperature to 1030˚C, followed by inchrounous ensures income secondary harden-

Table1.Chemical composition of the steel studied.
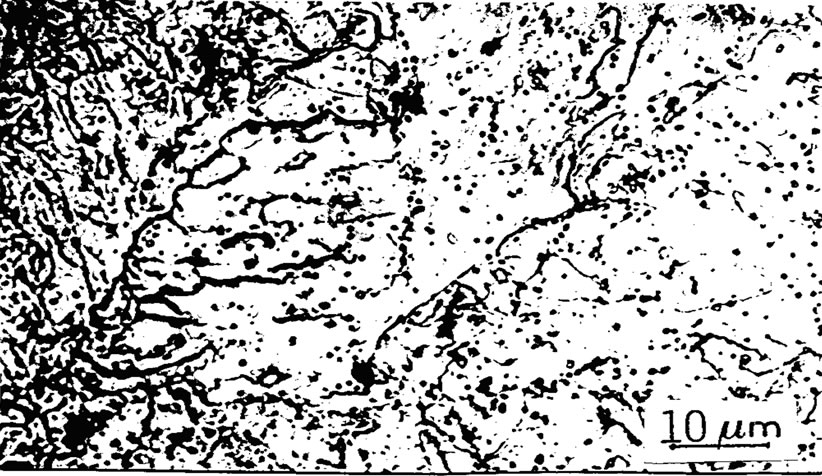
Figure 1. Microstructure of the state receiving ferrite and carbides villela reagent.
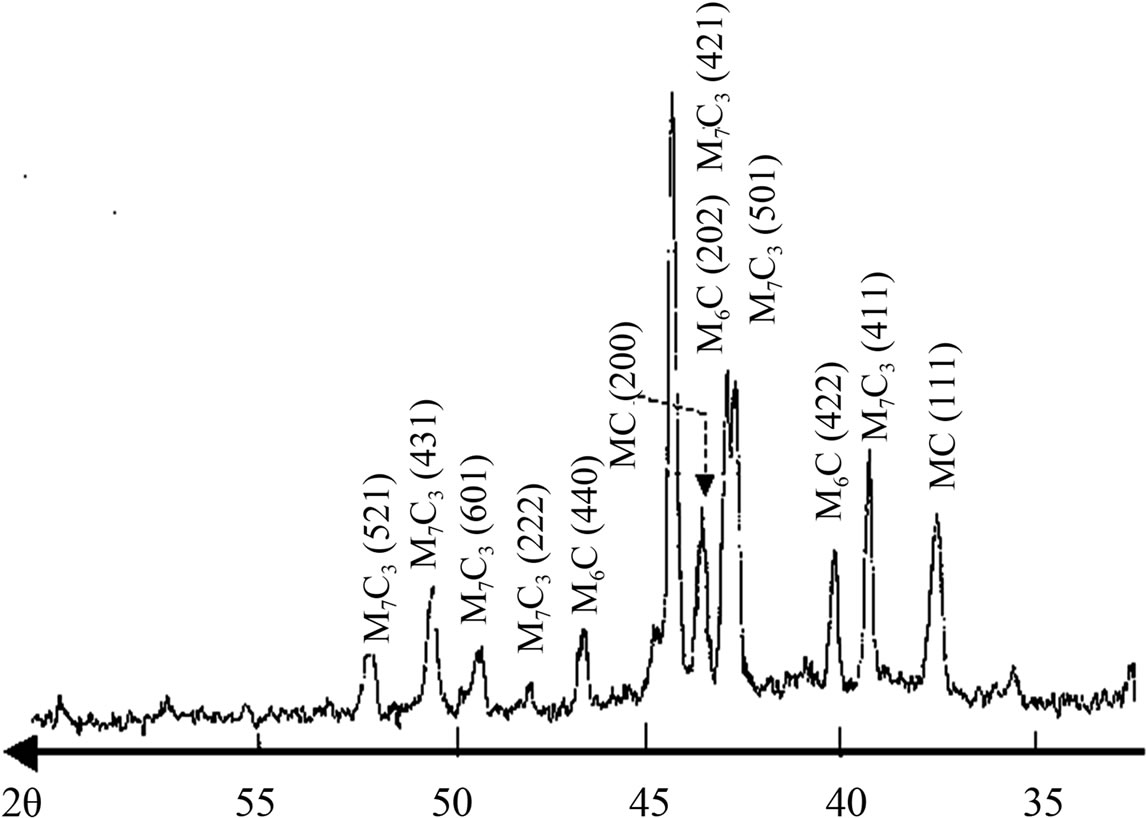
Figure 2. Spectrum of RX carbides of the delivery conditions.
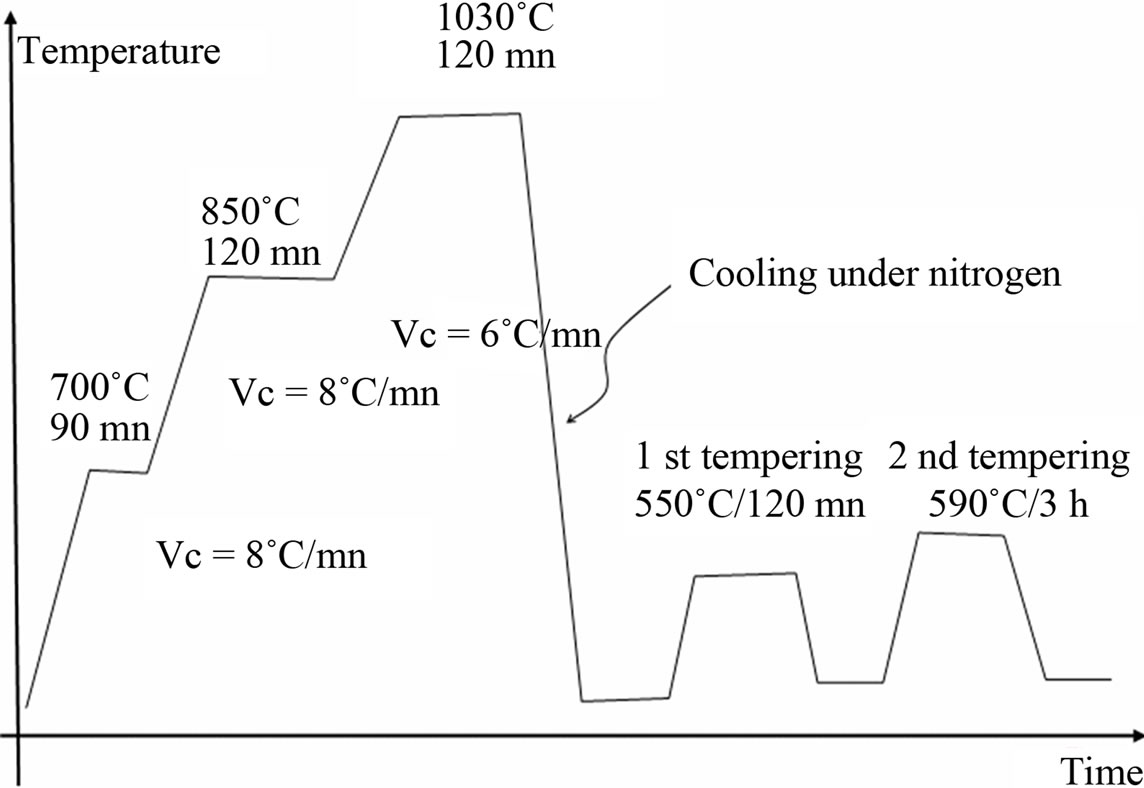
Figure 3. Heat treatment cycle quenching and tempering.
ing ensures that retrieves a hardness value as important as that allowed by the quenching, eliminating internal stresses and microstructural factors responsible for brittleness after quenching [1,2].
3. Nitriding Treatments
The material was then subjected to thermo-chemical treatments of nitriding. We give the sequences of gas nitriding treatment and ionic (Figures 4 and 5).
3.1. The Gas Nitriding
In contact with the steel NH3 molecule underwent a catalytic cracking process, a portion of the nascent nitrogen diffused to the surface of the steel. In anhydrous ammoniac gas was injected into a furnace with sealed metal having a perfect mixing of the atmosphere and a high accuracy of temperature.
3.2. The Ion Nitriding
The ion nitriding furnace is assimilated to a discharge tube in which the cathode serves as a support for the work
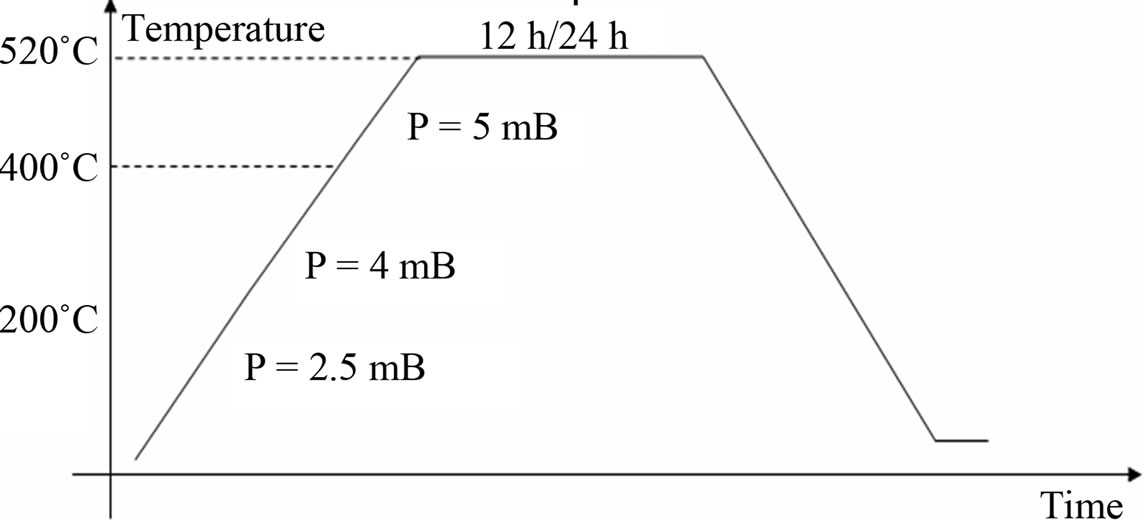
Figure 4. Treatment cycle gas nitriding.
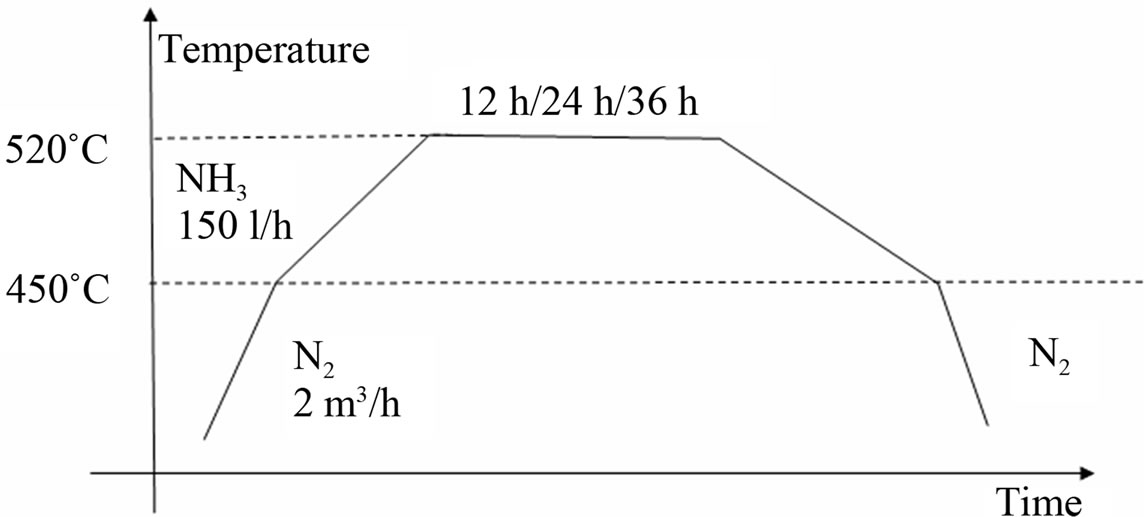
Figure 5. Treatment cycle ion nitriding.
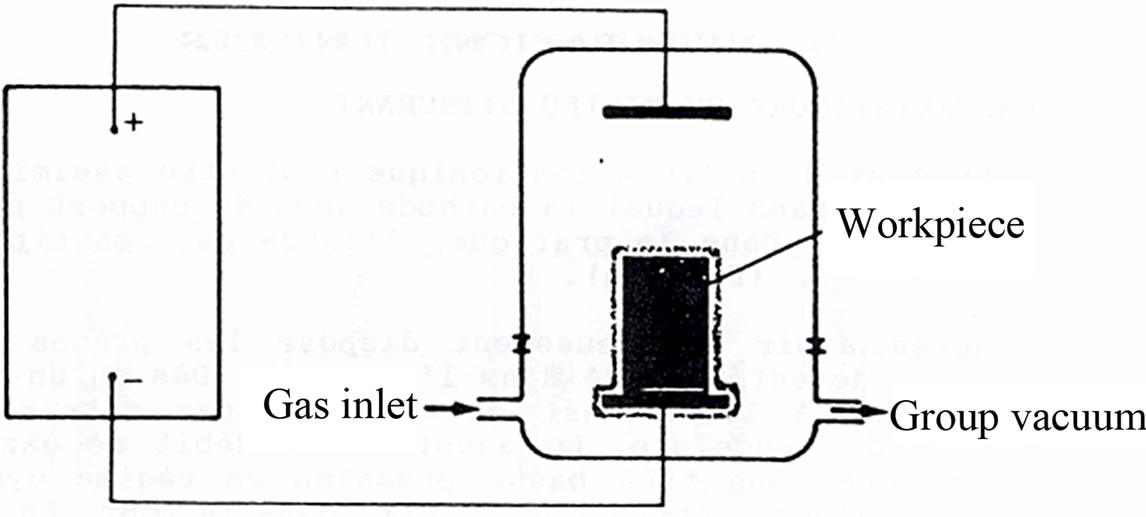
Figure 6. Basic mechanism of plasma nitriding.
pieces, the anode is constituted by the walls of the furnace. Under the effect of electric field, nitrogen molecules were dissociated into N+ ions causing a triple action: heating dissipation, media blasting and diffusion of nitrogen atoms [3,4] (Figure 6).
4. Testing Wear
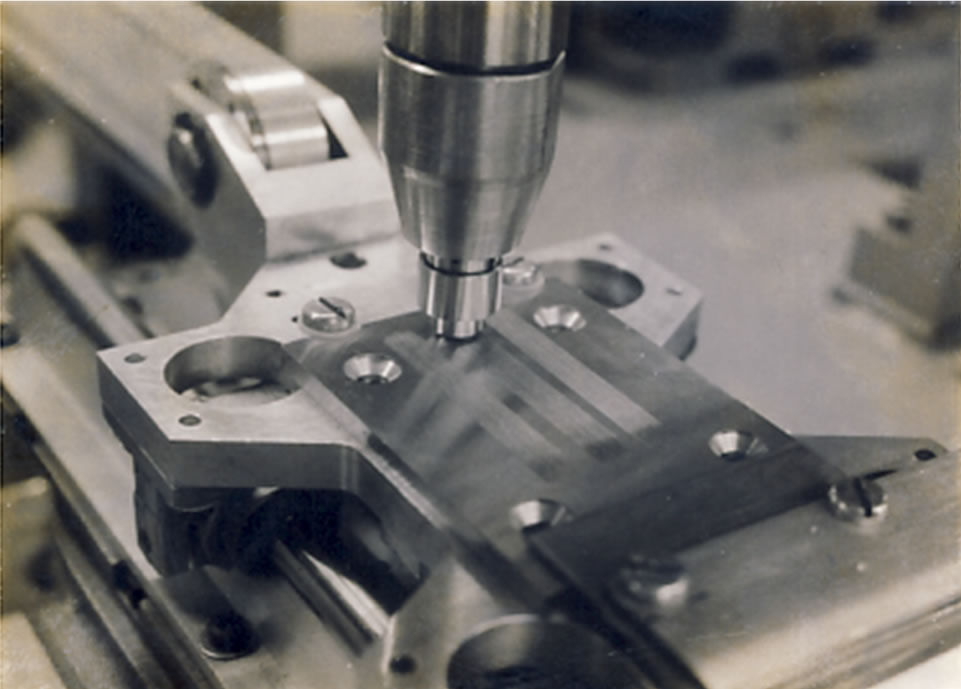
The quantification of wear was performed in the laboratory of tribology at SUPMECA (St. Ouen). After defining the test conditions on the alternative tribometer (Figure 7) ensuring on one hand a avoiding quantitatively sufficient wear and on the other, the phenomenon of jamming. The conditions chosen are: 58.8 N load, frequency 0.5 Hz, friction coefficient μ = 0.5.
Moreover, these tracks were characterized by metallography.
5. Counting and Analysis of Results
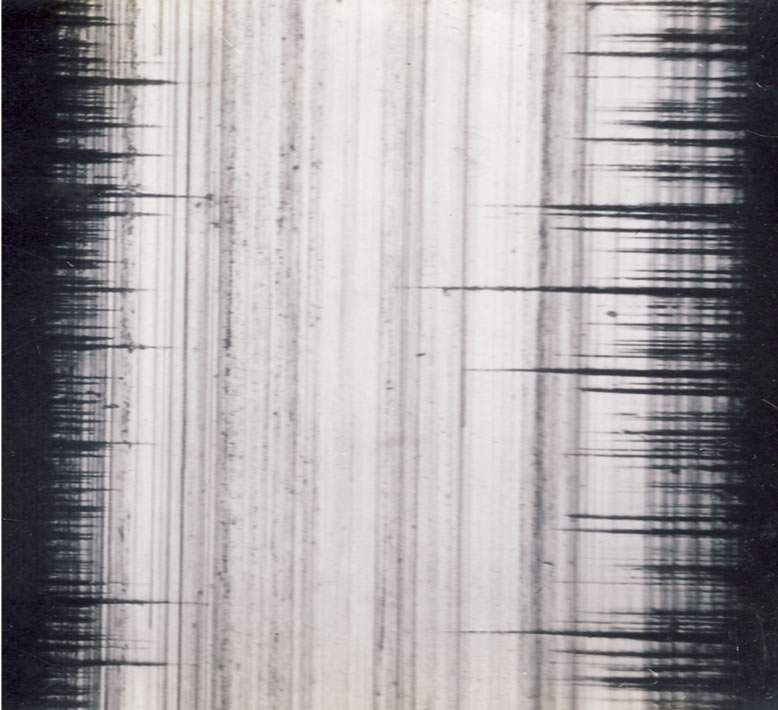
Figure 8 shows a regressive loosening of the surface from the quenched and tempered surface to the state of nitride gas and nitrided gas nitrided ionically;
In the non-nitrided steel, there was a plastic deformation of the surface wear of an abrasive type.
Moreover, there was a cracking phenomenon at the edge increasingly accentuated by going to the hardened material nitride material ionically via gafeous nitriding (see reference), these cracks are attributed to a fatigue phenomenon.
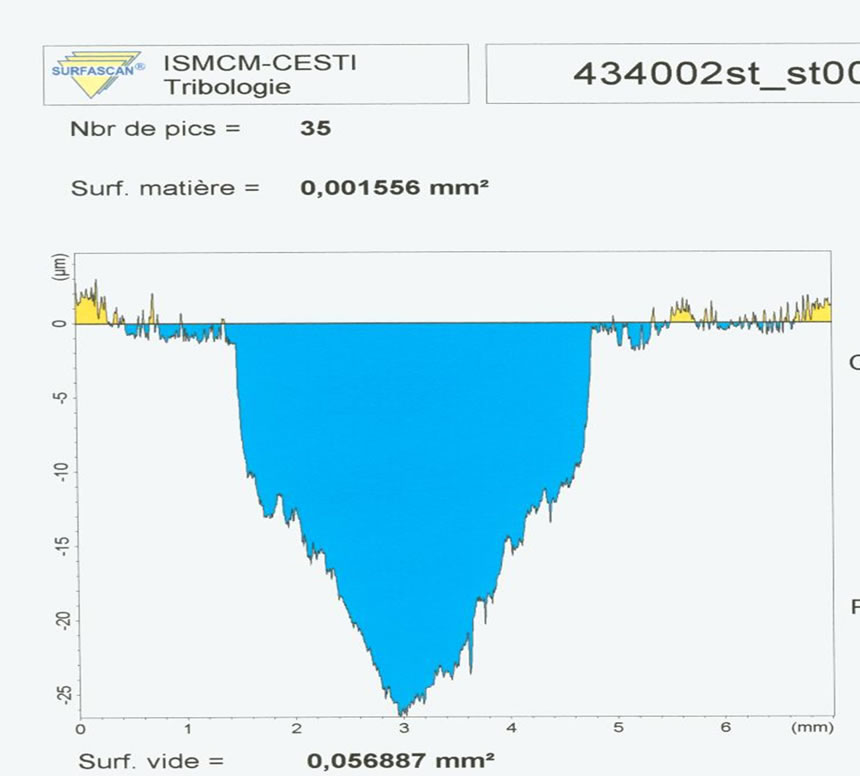
The wear tracks (Figure 9) were scanned using a profilometer (Talysurf 5 M kind).
The quantification of wear consists in measuring the trace dimensions obtained by the registration of the profile. For more precision we used the average of three values at the center and made the quarter-tracks.
After calculating the volume, we determined the rate
 (a)
(a)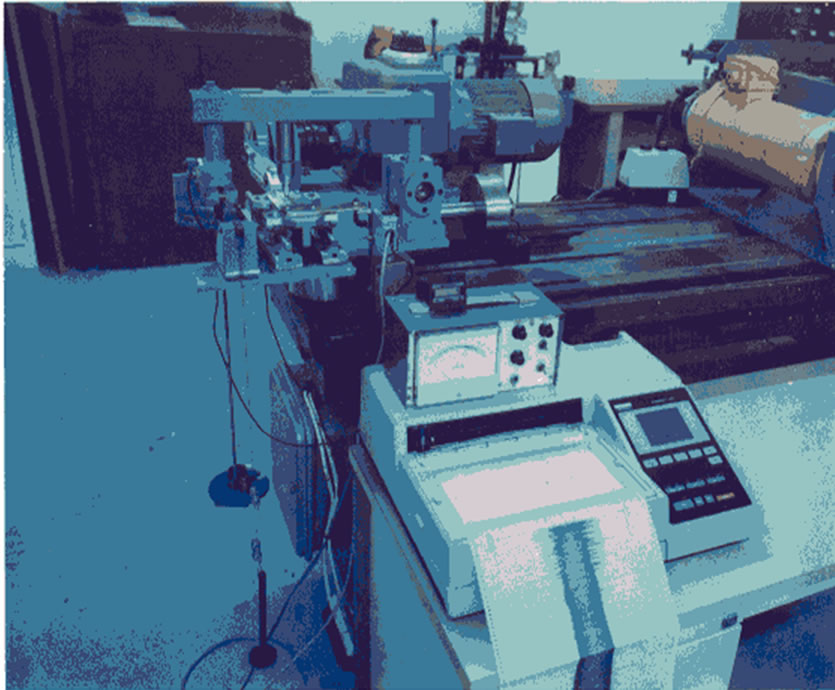 (b)
(b)
Figure 7. Tribometer used alternative. (a) General view of the tribometer; (b) Detail of the contact pin/track.
 (a)
(a)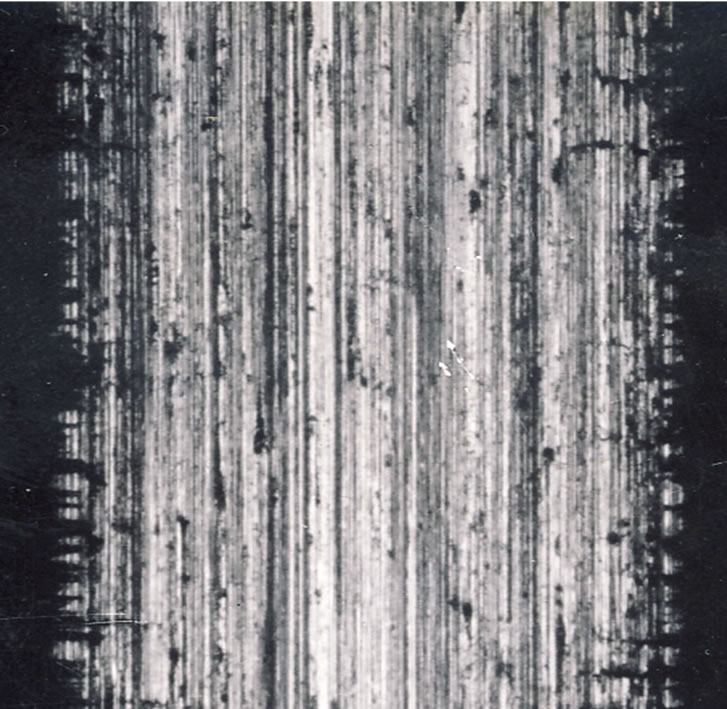 (b)
(b)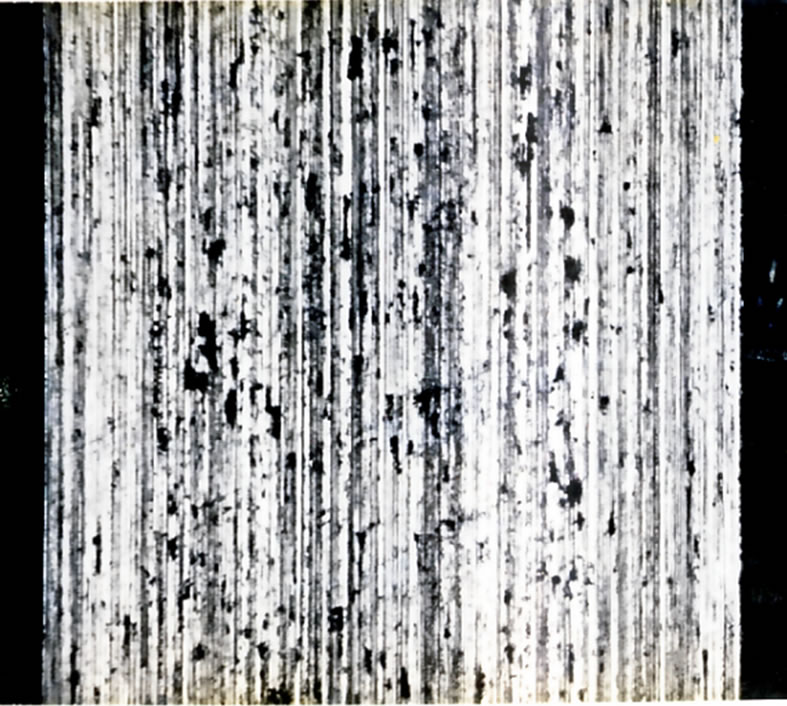 (c)
(c)
Figure 8. Surface appearance of wear on the slopes for the different treatments. (a) State of runway surface after quenching and tempering; (b) State of runway surface gas nitriding 36 h; (c) State of runway surface nitriding 24 h.
 (a)
(a)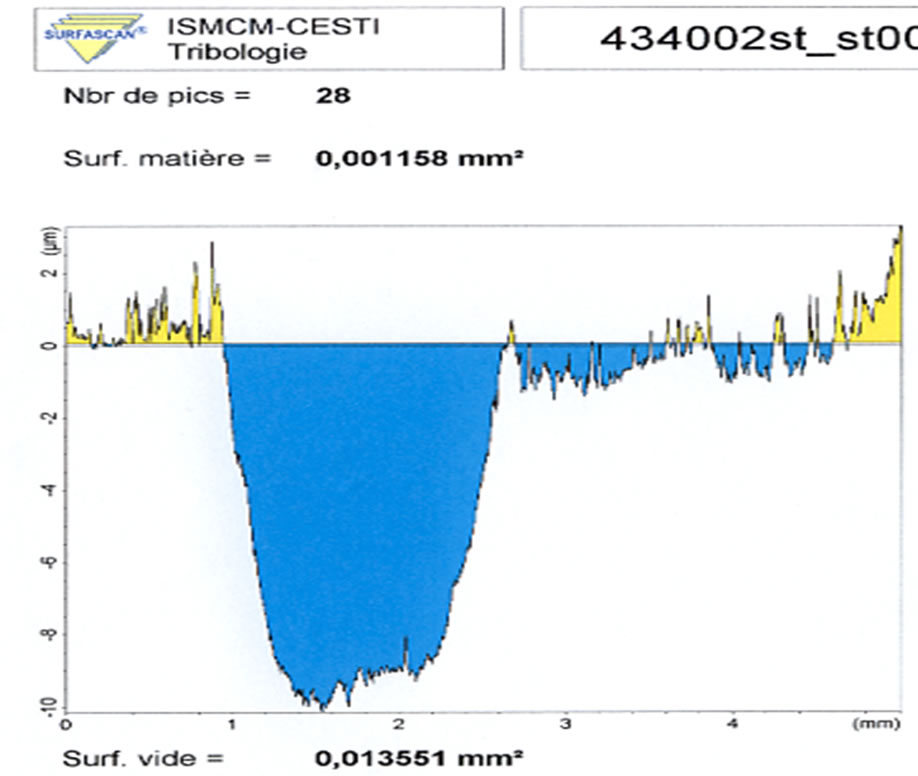 (b)
(b)
Figure 9. Picture-in marks on the track. (a) Material after quenching and tempering; (b) Nitride material ionically.
of wear volume Kv defined as follows:
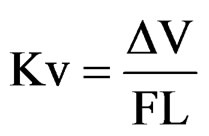
F: normal force;
L: distance traveled by the wiper.
We measured the volume used and the wear rate of the surface state quenched and tempered, condition of gas nitrided and ionically nitrided. The results obtained in all these tests show better resistance to wear of the nitride material and a more satisfying behavior for the plasma nitriding (Figure 10).
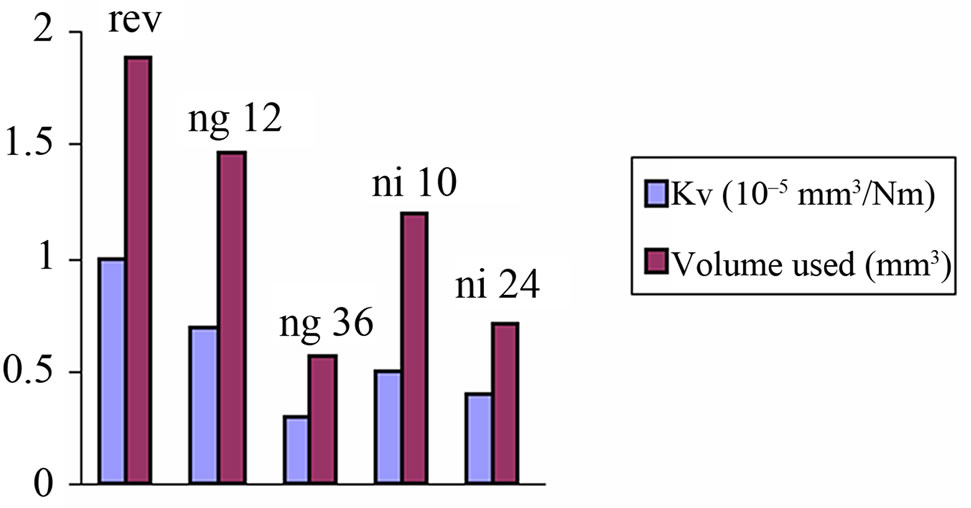
Figure 10. Change in volume worn and wear rate of the different treatment received.
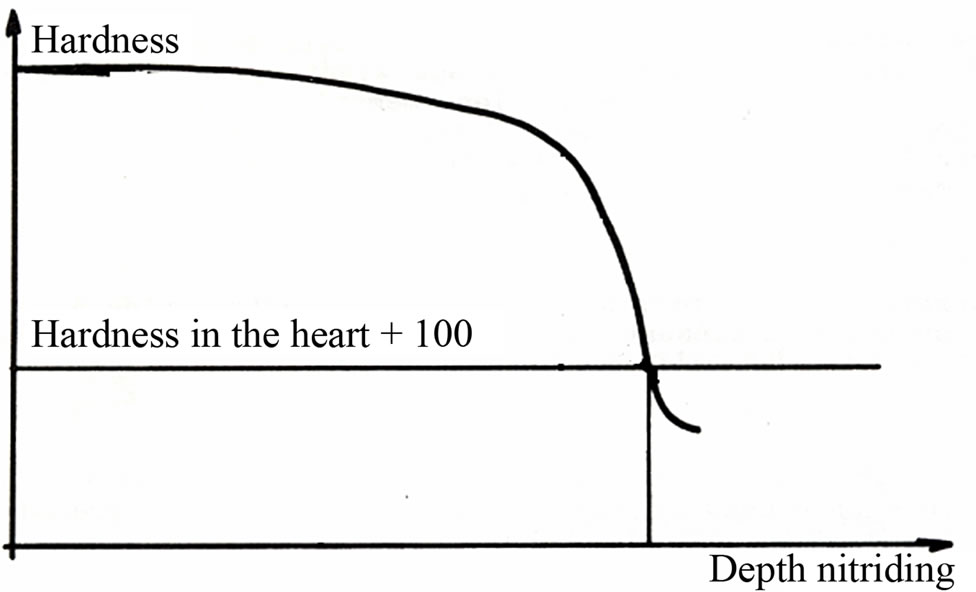
Figure 11. Calculation of microhardness profile.
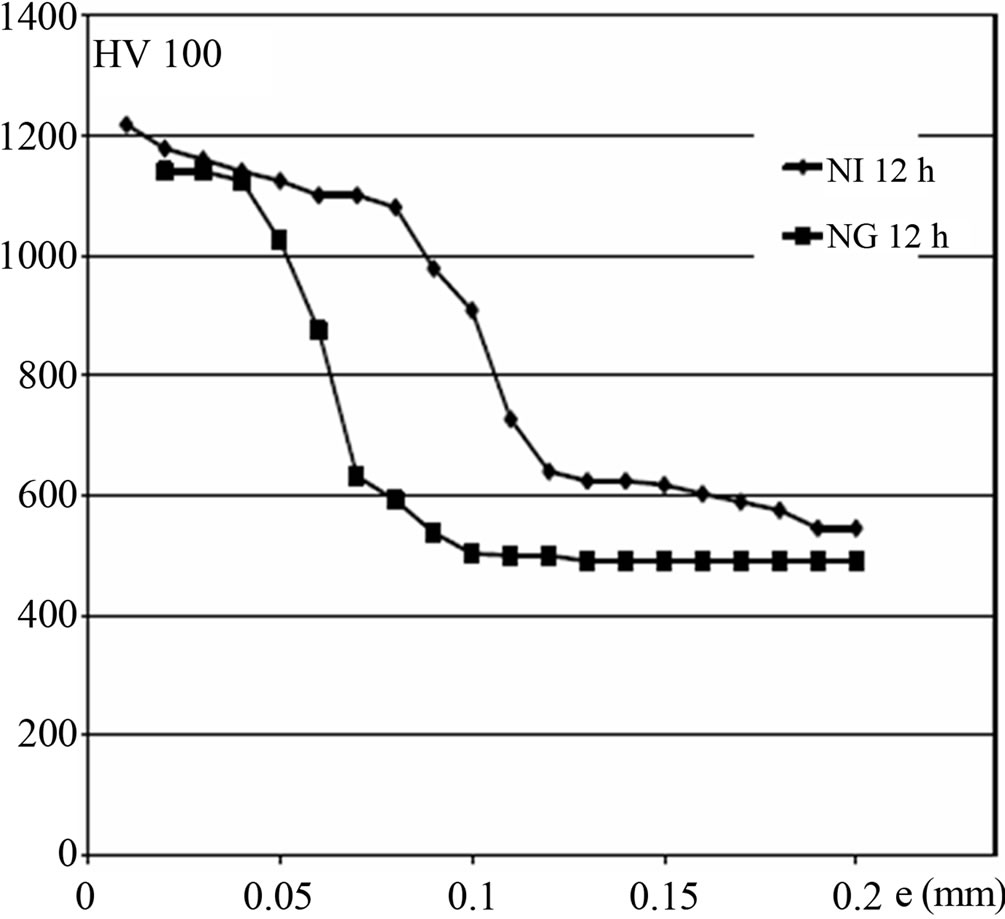
Figure 12. Comparison of microhardness profiles obtained by and ion nitriding gas nitriding ionically.
The case depth was estimated from the microhardness profile as the depth corresponding to the hardness of 100 HV added heart (Figure 11) [5,6].
The nitriding depths vary between 80 and 120 microns for gas nitriding and between 100 and 140 microns for plasma nitriding and maintain this for the respectively 12 and 24 h (Figure 12).
 (a)
(a)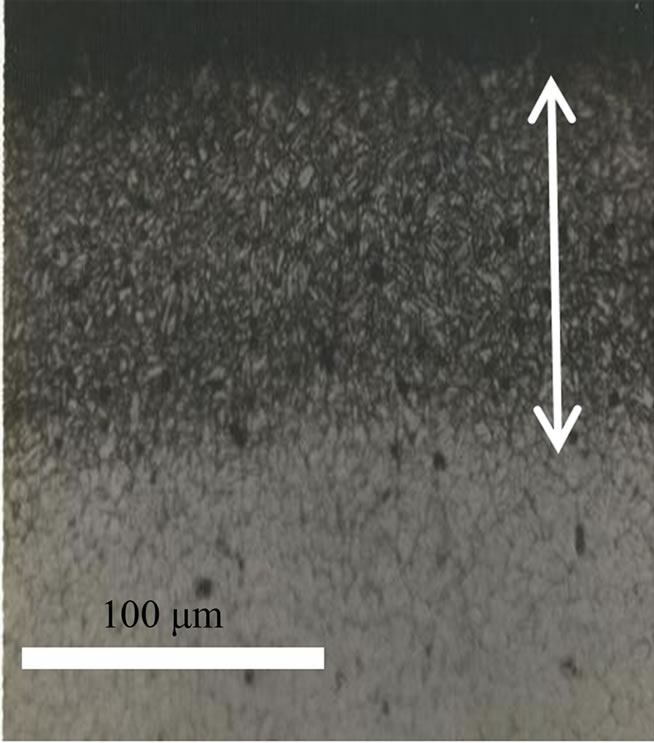 (b)
(b)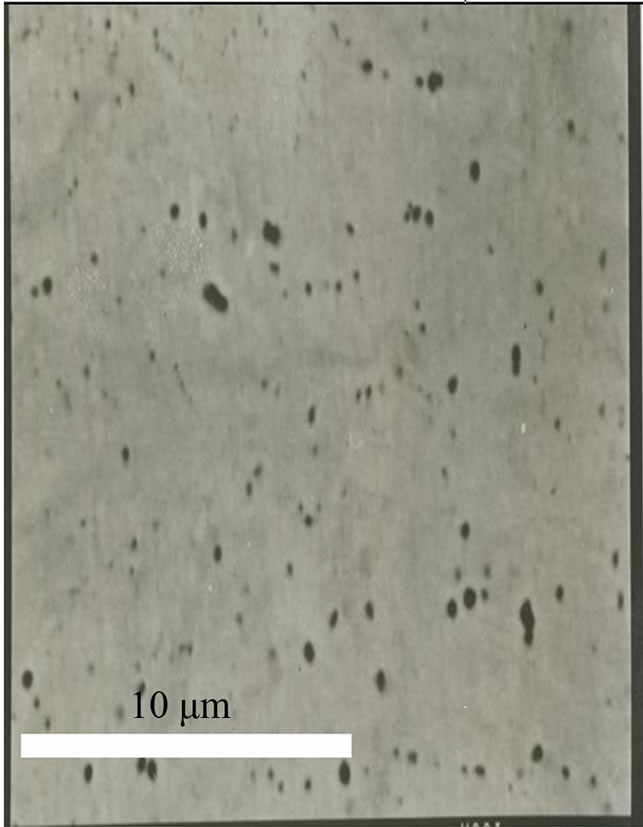 (c)
(c)
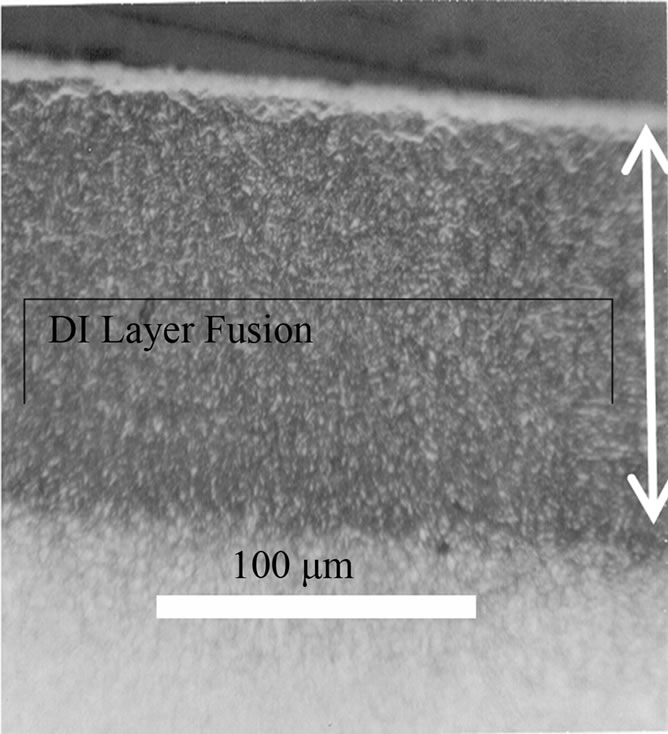
Figure 13. Observations by light microscopy and scanning electron microscope. (a) Observation by light microscopy gas nitriding 36 h; (b) Optical microscope observation Nitriding Ion 12 h; (c) Observation in SEM ion nitriding 24 h.
Plasma nitriding produces a layer of single-phase combinations, compact and thin enough to delay spalling and even the possibility of having only a diffusion layer (Figure 13). The quality of the diffusion layer having a distribution of very fine nitrides and carbonitrides distributed in a base structure which is also very thin.
The gas nitriding is a slower process for the same depth of treatment. Fur thermore, the control parameters for controlling the processing temperature and nitriding potential remains poorly controlled. Nitriding shows a relative improvement in wear resistance compared to steel (quenching + income). Moreover, the sliding of two surfaces (ceramic ball made of Al2O3 + material) generates an abrasive wear causing a loosening of the surface carbides with a loss of material.
6. Conclusions
In conclusion, it emerges from this study that, compared to gas nitriding, plasma nitriding ensures a better depth of treatment, for the same holding time. Nitrided materials yielded the best wear results wear with wear rates similar between 10−6 and 0.410−6 mm3/Nm. The observation of the surface of different materials by light microscopy shows that the trace of wear decreases with surface treatments. Indeed for plasma nitriding the track is smaller regularay and without hollow.
Nitriding increases the ability of the surface, reduces or eliminates the digging of trenches in the surface by hard roughness. Furthermore, it seems to cause a change in the mechanism of wear: a thin nitride layer can reduce the adhesion between the contacting surfaces and the deformation of the substrate. Some relate this to the formation of nitrides during implantation and their decay during wear due to friction by raising the temperature in the zones.
REFERENCES
- G. F. Vander Vort, “Atlas of Time-Temperature Diagrams for Irons and Steels,” ASM International Pub, Russell Township, 1991, p. 151.
- H. Nilson, O. Sandberg and W. Roberts, “The Influence of Austenitisation Temperature and the Cooling Rate after Autenitisation on the Mechanical Properties of the Hot Work Tool Steels H11and H13, Tools for Die Casting,” Uddeholm/Swedish Institute for Metals Research, Stockolm, 1983, pp. 50-69.
- J. Mongis, J.-P. Peyre and C. Tournier, “La Nitruration des Aciers,” Traitement Thermique, No. 178, 1983, pp. 33-43.
- J. I. Onate, J. K. Dennis and S. Hamilton, “Implantation d’azote dans les aciers à outils,” Traitement Thermique, No. 227, 1989, pp.41-47.
- La Nitruration des Outillages de Forge à Chaud, Recueil de Conférences, Mécanique et Procédés CETIM.
- G. Krauss, “Steels Heat Treatment and Processing Principals,” ASM International, Russell Township, pp. 305- 325.

