Open Journal of Metal
Vol.08 No.03(2018), Article ID:86709,20 pages
10.4236/ojmetal.2018.83003
Metallography of an Underground Oil Pipeline
Francisco Casanova-del-Angel, Alejandra Córdova-Castillo
Sección de Estudios de Posgrado e Investigación, Escuela Superior de Ingeniería y Arquitectura, Unidad Profesional Adolfo López Mateos, Instituto Politécnico Nacional, Mexico City, Mexico

Copyright © 2018 by authors and Scientific Research Publishing Inc.
This work is licensed under the Creative Commons Attribution International License (CC BY 4.0).
http://creativecommons.org/licenses/by/4.0/


Received: June 1, 2018; Accepted: August 14, 2018; Published: August 17, 2018
ABSTRACT
The purpose of this article is to show a metallographic analysis of an underground pipeline taken out of operation upon failure. The pipeline had an 8.89 cm (3.5”) diameter and a 7 mm thickness. The study was based on a 45 cm long pipe sample, visibly and entirely corroded, with a fish-mouth crack along its length. The work contributes to finding new ways to prevent structural failure, which has high-impact consequences from the point of view of production, damage to property, pollution, and risks to human live. Through this analysis the knowledge on behavior of failures in terrestrial ducts has been extended. Development of the research included metallographic, chemical, and mechanical tests on the sample in order to know the composition of the material, its strength and its physical conditions upon taking it out of operation. After the analysis of the laboratory tests, the physical and chemical features were compared to existing national and international regulations, which allowed a specific characterization of the conditions of the sample. In accordance with the regulations, the grade of the pipe was between ×65 and ×70. Tensile testing was carried out to obtain mechanical properties in order to corroborate the grade of pipeline steel and complement the metallographic analysis.
Keywords:
Metallography, Microscopy, Oil Pipeline, Failure, Tensile Testing

1. Introduction
Studies on pipeline failures have taken into account the origin of small fissures which cause collapse of the pipeline and serious damage. The main objective of such studies has been and will continue to be finding new ways to prevent structural failure, since this has high-impact consequences from the point of view of production, damage to property, pollution, and risks to human live. However, despite multiple failure studies on structural elements which have allowed the improving of calculation and design of underground pipeline, not all the possible causes of failure have been determined.
It is worth commenting on a couple of studies on failure, not necessarily buried pipelines. Van Vliet and his two collaborators claim that in two standard scenarios have been examined: leaks and ruptures. The failure frequencies for piping are derived from European data for transmission pipelines, since there is no specific information present for above-ground natural gas pipelines in literature or databases. Moreover, the Dutch gas industry data contain no relevant leaks or ruptures. For flange leaks, the failure frequency is based on statistics for the Dutch gas industry. Flange connections themselves cannot rupture. However, a leak from a flange connection can lead to a rupture of a pipe; it is therefore recommended to take this domino effect into account in risk calculations. This study also shows that the contribution of external events, such as vehicle impact and lifting operations, should be included in the accident scenarios and failure frequencies [1] .
Hopkins to say that the pipeline failure is dependent on many factors: design factor is one. However, third-party damage and corrosion have consistently been the major cause of pipeline failures in the developed world. This means that the safety of our pipeline is critically dependent on how we manage its condition during its life. And a pipeline must have adequate toughness, strength, etc., to be able to withstand the presence of defects that will inevitably be present at the start of its life and are likely to grow in numbers and size during the lifetime of the pipeline. Consequently, a fracture-control plan is needed that includes such considerations as crack arrest, stress-corrosion cracking, low-temperature operation, and girth weld integrity under high axial loads. It may also include resistance to penetration, and leak before break criteria. If this plan concludes that any fracture element of the pipeline design cannot be controlled, then the design factor may need to be changed to obtain the necessary control [2] .
Among the external means that may be considered when studying pipeline failure are the features of the place where the pipeline has been buried. This includes the type of soil, its hydrography and moisture. Some physical and chemical mechanisms between structures and their materials causing irreparable damage are due, among others things, to bad design calculation, behavior or reaction of the structure due to the external surrounding environment, mechanical failures and corrosion. As human beings develop new and complex structures, the need to find new technological improvements in the strength of materials at a low-cost and with a high-performance technology arises. This implies higher risk problems regarding reliability, safety, quality, and durability of materials used in engineering.
Deformation of materials includes changes in shape and size of material, caused by internal and external forces which act upon them [3] . Changes can be elastic or non-elastic. Non-elastic deformation occurs when a material is subject to various forces and its original shape changes. A fissure in a material may be described as showing thermodynamic changes since there is a higher elastic potential energy, therefore, its deformation is permanent. On the other hand, elastic deformation can be reversed, since the material only shows changes while a load is being applied and, while when withdrawn, the material recovers its original shape. Since changes cannot be observed by sight, therefore, their thermodynamic changes last only for a moment.
A definition on the mechanics of the fracture is a discipline quantifying the conditions under which a structural element can be broken due to the existence and growth of a dominant fissure in the structure [4] . The mechanics of the fracture is based on Griffith’s criteria: in a body subject to an arbitrary load condition, with an elastic behavior and a fissure, propagation of the fissure will begin as the elastic potential energy decrease in the body per thickness unit and length units regarding progress of the fissure’s vortex, whether it is equal or higher to the surface energy increase per thickness unit and length unit regarding progress of the fissure that will be generated as a consequence of creation of new surfaces due to such propagation [5] . Griffith’s work is based on explanation of the elastic fracture of a fragile material such as glass. Much more recently, Irwin and Orowan have modified this theory to apply it to ductile materials, such as steel [6] [7] . Irwin concludes that fractures can propagate in a controlled direction in accordance with the orientation of the maximum main stress at the tip of the failure.
The objective of the present research is to analyze the metallography of an underground oil pipeline in order to know the causes of failure, complementing the study with a tensile analysis.
Problem and Justification
Environmental conditions are important for the analysis of underground pipelines since the soil, hydrography, and humidity, together with other factors involving the material of the pipeline, as well to do with that which is carried through it, have an influence on the apparition and propagation of fissures. Underground ducts exposed to high load conditions and degradation of the material can cause the apparition and propagation of fissures, with tragic consequences. For instance, the spill of a dangerous material carried by an underground pipeline can pollute the surrounding soil, flora and fauna, with the corresponding probability of diseases in the area and economic consequences for companies and the population in general.
Terrestrial ducts are the main means by which various chemical materials used in the oil industry are carried. With technology of steel materials, a series of needs to be covered were created, since these may have failures due to various causes. The existing theories do not allow us to fully explain failures in pipeline, therefore, in this work, laboratory tests were carried out on a pipeline sample in order to find out variables influencing the fissure. Features of the environment surrounding an underground pipeline such as the type of soil, the limit conditions of the pipeline and working loads to which it is subject were taken into account [8] .
2. Laboratory Tests
In this stage of the research work, we will show the development of laboratory tests to make the analysis and characterization of the steel pipe, in accordance with standards of the American Society for Testing and Materials [9] [10] [11] and the American Petroleum Institute [12] ; where metallographic tests included observing the microstructure of steel in the optical and scanning electron microscope. Chemical analyses were based on the search of chemical components of the material of the pipeline and the tensile test was used to know fluency and ultimate strength of steel to fracture.
To know the microstructure of steel under study, the following techniques in accordance with ASTM E3, 2001 standard were used [9] .
2.1. Preparation of the Sample
The steel pipeline was buried and, from the conditions in which it was found, it may be concluded that it was taken out of operation upon collapsing. The type of soil found in the remains of the pipeline, after visual analysis, was defined as clayey. To analyse it, a 45 cm long sample with failure was used. Observations based on the sample are that it was entirely corroded and it had tar coating waste, which we know is used for substrates subject to extreme humidity and corrosive environments.
In order to clean it, first, the ground adhered on the outer side of the sample was removed using a chisel, since samples of the soil in which the pipe was buried were needed (Figure 1). The same procedure was used to remove the ground adhered inside the pipeline (Figure 2), where stones and dry sludge were found.
Having gathered part of the material adhered to the pipeline, it was washed internally and externally based on water and, for a better cleaning, thinner was used in a tray, where the pipe was left for 5 hours, turning it every hour and applying the thinner with a brush all around.
Upon completion of cleaning, the ends of the sample had varied thickness. This may have been due to the advanced corrosion in the entire structure. Some longitudinal deformations such as dents and small cracks were observed (Figure 3). After examining the sample, proper areas for cutting the probes that would be used in the metallographic analysis were chosen. Such cut was divided in two stages (A and B) in order to properly manage the samples.
In Stage A, a longitudinal and a transversal sample were made, both of them with a base lower than 1 cm2, taken from the end with the healthiest thickness. In Stage B, cuts were made in the middle of the piece, taking the same features of the previous case.
Due to the size of samples and as the first test, probes of Stage A were mounted separately in Bakelite, a synthetic plastic substance, in order to make management easier, since it may be molded and solidified at a certain temperature in a hydraulic press. The sample was put inside the embolus of the hydraulic press, and then 30 ml of Bakelite were added. The embolus was closed and put down to choose an 180˚C temperature and apply a 20 KN pressure for 7 minutes. After such time, the sample was cooled (Figure 4).


Figure 1. External cleaning of pipe.

Figure 2. Internal cleaning of pipe.
 (a)
(a)
 (b)
(b)
 (c)
(c)
Figure 3. (a) Sample after washing it in water; (b) Cleaning based on thinner; and (c) Upon completing cleaning.

Figure 4. Mounting probes of Stage A.
Samples of Stage B were not mounted since they would be observed in the scanning electron microscope at various magnifications, with measurements lower than 1 cm3. At the same time, samples of Stage A were observed with smaller magnifications of up to 50×. Grinding was carried out in order to remove coarseness left by the cut, then the corrosion surface was cleaned and a single plane for final polishing was attained. To achieve this, sandpapers with various grain sizes abrasives were used. The faces of the samples were also corrected in a conveyor grinder to smooth the surface and continue with the remaining sandpapers. Wet #240 sandpaper was placed on a flat surface grinder and each sample was passed on it, vertically, making a uniform grinding. The same process was used with #320, #400, #600, #1000, and #1500 sandpapers. Before changing the abrasive, the sample position was turned to 90˚ to remove lines and make it smoother than the one left by the previous sandpaper [13] [14] .
Polishing allowed the smoothing of lines left by grinding and the attaining of a mirror-like surface. For this, a special cloth was used on a spinning disc and a solution made of base: 8.75 g of 0.3 Micra alumina and 250 ml of distilled water. The disc was programmed at 300 RPM before placing the sample, cleaning it with a brush and water to remove any waste that could scratch the probes. Then, the alumina solution was poured on the cloth and each probe was polished spinning the disc counter-clock to obtain a better surface.
Chemical test was used to reveal microstructural features of steel under study. For this it was necessary to use Nital 1 (solution composed by 99% ethylic alcohol and 1% nitric acid). The solution was poured in a crystal catalyzer and each polished probe was submerged for 16 seconds. Upon completion, the samples were washed with distilled water and dried with an automatized dryer. After attack on the samples surface, the grain limits were drawn with an opaque color which helped to observe them in the optical microscope.
2.2. Microscopy
In order to determine the microstructure of prepared samples, a macroscopic and microscopic study was carried out using as basic tools optical and electronic microscopy, respectively. These were done in order to make a detailed analysis of the structure of steel under study. Scanning electron microscope works with electrons, which, after bombing the sample, produce an electric signal reflecting the image. Such equipment has objectives up to 300 times deeper than those used in the optical microscope [15] .
2.3. Microstructural Description of Stage A
Probes of Stage A were made to compare them with those of Stage B and verify that the microstructure showed no variation throughout the sample. Figure 5 shows two pictures taken with the optical microscope.
Figure 5 shows the polished longitudinal sample observed at 10x of Stage A, where pitting may be observed as black dots of various sizes, which was due to the state of corrosion of the sample. Figure 5(b) shows the polished transversal sample observed at 20× of Stage A, also with pitting.
Figure 6(a) and Figure 6(b) show the probes after the chemical test, showing the microstructure of steel. It may be observed that the metal base is ferrite (light shades). On the other hand, dark areas are colonies of perlites, carbon particles uniformly distributed on the Fe base.
2.4. Microstructural Description of Stage B
The following pictures were macroscopically studied with an optical microscope.
Figure 7 shows four pictures of probes observed with magnification up to 50×. In Figure 7(a), the longitudinal probe was observed at a 10x magnification. It clearly shows a ferrite layer followed by a perlite layer, which shows relationship with flow lines or lamination of steel. Figure 7(b), on the contrary, shows transversal probe with the same magnification, and its distribution shows no order whatsoever. Its grains seem to form a homogeneous layer of both components, while Figure 7(c) and Figure 7(d) are shown at a 50× magnification on both faces. This may be more clearly observed at small magnification.
 (a)
(a)
 (b)
(b)
Figure 5. (a) Polished longitudinal sample observed at 10×; (b) Polished transversal sample observed at 20×.
 (a)
(a)
 (b)
(b)
Figure 6. Samples observed after chemical test. (a) Longitudinal sample at 50×, with a 45˚ inclination, approx; and (b) Transversal sample at 50×.
 (a)
(a)
 (b)
(b)
 (c)
(c)
 (d)
(d)
Figure 7. Samples observed with the optical microscope after chemical test: (a) Longitudinal sample at 10×; (b) Transversal sample at 10×; (c) Longitudinal sample at 50×; and (d) Transversal sample at 50×.
3. Longitudinal Sample
The following pictures were studied with a scanning electron microscope. It should be born in mind that the optical microscope works with reflection of light revealing the microstructure of the object, therefore, in previous figures, perlite colonies are shown in dark shades. In contrast, the scanning electron microscope works by reflecting electrons through the object, making the perlite content to look white and ferrite to look dark.
Figure 8 shows 4 pictures with various magnifications, higher than those obtained with the optical microscope. The first 2 pictures clearly reflect the perlite colonies and ferrite base. The granular structure and location of steel components under study may be gradually observed. Based on previous observations using the two microscopes, perlite is in a degradation stage, as small spherical particles. Figure 9 shows an inclusion in various magnifications. Inclusions are impurities resulting from waste created by combining chemical components of steel manufacturing. Inclusions adhere as small vacuum capsules from manufacturing up to the laminating process.
Pictures in Figure 9 were taken close to the external wall of the pipe and clearly show the flow lines of the material and, as has already been mentioned, it is an inclusion following the same flow pattern.
For other magnifications, despite the same lamination process throughout, no delimitations were observed in the lamination flow of material or in the layers between ferrite and perlite shown in Figure 9. This means that degradation of steel was from the inside to the outside. Even though there are still some inclusions, in the middle of the probe, lamination lines are more visible, with more inclusions than those observed in the inner wall, but less than those in the external wall.
3.1. Transversal Sample
In pictures of Figure 10, the microstructure of the transversal probe is shown. The distribution of its ferrite grains and perlite colonies are not aligned. The latter delimit or cut the boundaries of the ferrite groups. At a 5000× magnification, perlites are more visible and delimited, distributed over the ferrite base.
In other pictures, not shown here, granular structure can be uniformly seen with small magnifications. With large magnifications, ferrite can be seen over perlite, and the colonies can be observed within a delimited area. The structure of perlite in a new steel pipe can be observed in small concentrations distributed within a delimited area, making the ferrite grain pervade over perlite. In turn, these may be observed as long strips close to each another.
Some black stains can be observed in other pictures, which are inclusions observed from a transversal section. As we know, these can be observed in longitudinal probes with long shapes, as if those were small fissures or vacuum, mostly, material waste, while in the pictures of the transversal probe they can be seen as small black stains not aligned with the structure of components. Unlike the pictures

Figure 8. (a) Magnification: 500×; (b) Magnification: 1000×; (c) Magnification: 5000×; and (d) Magnification 3000×.

Figure 9. Picture taken close to the external wall of pipe. (a) Magnification: 500×; (b) Magnification: 1000×; and (c) Magnification: 3000×.

Figure 10. (a) Magnification: 500×; (b) Magnification: 1000×; (c) Magnification: 3000×; (d) Magnification: 5000×.
taken close to the external wall of the sample, where ferrite grains are delimited and perlite colonies are more visible and organized in small groups, in pictures taken close to the inner wall, perlite colonies can be observed as small groups throughout the ferrite base, so that the grain is not delimited.
As the external and the internal parts, the microstructure can be uniformly observed in the middle of the probe. However, if the pictures are observed from the inside to the outside of the pipeline, perlite has been observed to be aligned to larger groups, and the distribution of ferrite grain becomes more evident. There are no significant changes or alterations in any of them, and inclusions are lower in the starting probe.
3.2. General Chemical Composition of Steel under Study
In general, the chemical composition of steel under study is an alloy with high carbon content, since it is 5% in weight, while iron corresponds to most of its content with an average of 95% in weight (Figure 11). Other components are manganese and silicon, which are present in commonly used steels (Table 1).
4. Chemical Composition per Zones
Figure 12 shows some zones in colors, which chemical composition is shown in Table 2, where a uniform structure of chemical components clearly appears.
Figures 13-15, respectively, show the chemical composition, in kiloelectrons per second, of zones 1, 2, and 3, respectively.
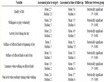
Table 1. Chemical components in % weight and % atom.
Table 2. Chemical components.

Figure 11. Graph of chemical composition in kiloelectrons, per second of analysis. Acc.Voltage: 20.0 kV.

Figure 12. Chemical composition of zones observed in micrography. Magnification: 3000×.

Figure 13. Graph of chemical composition in kiloelectrons per second. Zone 1.

Figure 14. Graph of chemical composition in kiloelectrons per second. Zone 2.

Figure 15. Graph of chemical composition in kiloelectrons per second. Zone 3.
Chemical Mapping of Samples
Figure 16 shows pictures of each chemical element of the longitudinal sample with an inclusion. It is clear that the inclusion is mainly composed by sulphur and aluminum, as well as some manganese. On the other hand, there is the highest content of iron, while the remaining elements are present almost in the same proportion, except carbon, which is the one with the lowest content. Since the Figure makes reference to an impurity, it makes all the surrounding space become polluted by its elements. Components may also be seen aligned in a uniform manner and, without inclusions, there are no sulphur and aluminum.
5. Tensile Test
The tensile test was carried out to obtain the mechanical properties and to determine the steel grade [16] . Figure 17 shows the three probes used in such test and results obtained in a continual manner [17] [18] [19] . Table 3 shows length, width and thickness measurements for each probe before being tested. This table also shows their ultimate features.
Probes 1 and 2 were in good conditions on the neck, that is, they did not have pitting or cracks rendering them less resistant compared to Probe 3, which showed pitting due to corrosion and, by sight, it was concluded that it would be the less resistant to the test.
5.1. Probe 1
This probe has a linear elongation ratio due to time, in accordance with Figure 18. In 180 seconds, it elongated up to 10.9 mm. Figure 19 shows the load-strain ratio for the same probe 1. Results of the tensile test showed that the sample could have a 764.7 MPa fluency strength and a 936 MPa ultimate tensile strength, on average. This shows that it was a high-resistance steel. General results of the three probes are shown in Table 4.
5.2. Probe 2
The elongation-time graph for this probe is also linear, very probably due to the fact that it is an isotropic material, that is, its properties are the same in all directions.
Figure 20 shows the load-strain ratio for Probe 2 and Figure 21 shows the behavior of the stress-strain graph, which is the same for Probe 1, where a minimum variation of the result with 769 MPa fluency strength and 941 MPa ultimate tensile strength was obtained.
With the results obtained we have found that, on average, fluency strength is 764.7 MPa and that the ultimate tensile strength is 936 MPa.
Probe 3 collapsed in less than half a second, which shows that, since it was entirely corroded, the sample could not bear the loads to which it was subject. Therefore, it may be said that corrosion greatly contributed to failure. However, its fluency and ultimate tensile strength results were between the parameters of results of other probes.
In the literature there are no specific studies on assay to traction on buried oil pipelines, we believe that it is due to the different types of soil and the environment. At the moment we are preparing a document on the implementation of a finite element model that takes into account the continuity of the material and its structure metallographic.

Figure 16. Mapping of a longitudinal sample section. Magnification: 3000×.

Figure 17. Probes for tensile test.

Figure 18. Elongation-time graph for Probe 1.

Figure 19. Load-strain graph for Probe 1.

Figure 20. Load-strain graph for Probe 2.

Figure 21. Stress-strain graph for Probe 2.
Table 3. Features of probes.
Table 4. Ultimate results of tensile test.
6. Conclusions and Discussion
Linear-elastic analysis is commonly used in analyses of underground ducts or pipeline under high pressure and, therefore, the elastic limits are exceeded. In addition to this, there is commonly also the pressure generated by the soil and the temperature at which the ducts work.
Observations of the sample were that it was entirely corroded and it had tar coating waste. It was observed that the metal base is ferrite. On the other hand, pictures showed dark areas, that is, colonies of perlites and carbon particles uniformly distributed over the Fe base.
In accordance with observations using the two microscopes, perlite was found in a degradation phase. It was mainly present as small spherical particles. No delimitations were observed in the lamination flow of the material or in the layers between ferrite and perlite. This means that degradation of steel went from the inside to the outside.
In general, the chemical composition of steel under study is an alloy with high carbon content, since it is 5% of its weight, while iron corresponds to most of its content with an average of 95% of its weight. Other components are manganese and silicon, which are present in commonly used steels in this type of ducts. In accordance with standards [12] [20] [21] [22] , the pipeline grade was between ×65 and ×70.
Results of the tensile test showed that the sample had a 764.7 MPa fluency strength and a 936 MPa ultimate tensile strength, on average. This shows that it was a high-resistance steel and, at last, the collapse of the last probe shows that, since it was entirely corroded, the sample could not bear the loads to which it was subject. Therefore, it may be said that corrosion greatly contributed to failure.
Since the steel had high carbon content, it had many perlite colonies which, in turn, degraded and exceeded the elastic range as a consequence of solicitations and limit conditions acting on the pipeline. Carbon laminates separate and, when they reach the grain limit, make steel lose its mechanical properties. In designing pipelines, it is important to consider that the pressure of the fluid against it does not exceed the fluency limit; otherwise, a section change will be made.
The results obtained in this analysis show that variables, altogether, contributed to failure of the pipe.
The temperature to which the pipe was subject was the most influential factor for the material to exceed its elastic limit. This could be due to the fact that the steel in question is made based on casting in order to be molded. Therefore, heat makes material to degrade, as the internal and external pressures of the pipe also have an influence on it.
Future Work
Try Charpy to a certain number of specimens for the obtaining of the fracture tenacity and apply test load and discharge to the specimens in order to obtain a material degradation factor applying the theory of damage mechanics.
Acknowledgements
This article its corresponding research was carried out, in part, with the research projects IPN-SIP-20080512, IPN-SIP-20090376 and IPN-SIP-20171058. The author is very grateful to the reviewers for carefully reading the paper and for their constructive comments and suggestions which have improved the papers.
Conflicts of Interest
The authors declare no conflicts of interest regarding the publication of this paper.
Cite this paper
Casanova-del-Angel, F. and Córdova-Castillo, A. (2018) Metallography of an Underground Oil Pipeline. Open Journal of Metal, 8, 35-54. https://doi.org/10.4236/ojmetal.2018.83003
References
- 1. van Vliet, A.A.C., Gooijer, L. and Laheij, G.M.H. (2011) On-Site Natural Gas Piping. Scenarios and Failure Frequencies, Report 620550004/2011. National Institute for Public Health and the Environment.
- 2. Hopkins, P. (2005) High Design Factor Pipelines: Integrity Issues. Penspen Integrity. Units 7-8 St. Peter’s Wharf. Newcastle upon Tyne. NE6 1TZ. United Kingdom. http://www.penspenintegrity.com
- 3. Echevarría. R. (2003) Fractura de Materiales, Universidad Nacional del COMHAUE, Laboratorio de Análisis no Destructivos, 9-10. Facultad de Ingeniería, Buenos Aires.
- 4. Anglada, M.J., Alcalá, J., Llane, L., Mateo, M. and Salan, N. (2002) Fractura de Materiales. Ediciones UPC, Barcelona, 53-56.
- 5. Griffith, A.A. (1921) The Phenomena of Rupture and Flow in Solids. Philosophical Transactions of Royal Society, A221, 163. https://doi.org/10.1098/rsta.1921.0006
- 6. Irwin, G.R. (1948) Fracture Dynamics, Fracturing of Metals. American Society for Metals, Cleveland, 147-166.
- 7. Orowan, E. (1948/49) Fracture and Strength of Solids. Reports on Progress in Physics, 12, 185-232. https://doi.org/10.1088/0034-4885/12/1/309
- 8. Félix, J.L. (2004) Estudio de grietas externas en ductos terrestres para transporte de hidrocarburos. Master’s Thesis, SEPI-ESIA-IPN, Mexico.
- 9. ASTM E3 (2001) Standard Guide for Preparation of Metallographic Specimens. Published July 2001.
- 10. ASTM E8 (2001) Standard Test Methods for Tension Testing of Metallic Materials. Published December 2001.
- 11. ASTM E45 (2001) Standard Test Methods for Determining the Inclusion Content of Steel. Published June 2001.
- 12. API 5L (2004) Specification for Line Pipe. 44th Edition, October 4, 2004.
- 13. Toquiantzi, R. (2007) Corrosión de perfiles estructurales expuestos a la atmósfera. Master’s Thesis, SEPI-ESIA-IPN, Mexico.
- 14. Zamora, M. (2007) Comportamiento mecánico en especímenes de acero estructural expuestos a una condición marina. Master’s Thesis, SEPI-ESIA-IPN, Mexico.
- 15. Gil Mur, F.J. and Manero Planella, J.M. (2005) Metalografía. Ediciones UPC, Barcelona.
- 16. Liang-Chuan, P. (1978) Stress Analysis Methods for Underground Pipe Lines. AAA Technology and Specialties Co., Houston. https://www.scribd.com/doc/49777885/Stress-Analysis-Methods-for-Underground-Pipe-Lines-Part-1-Basic-Calculations
- 17. Retama, J. (2005) Mecánica de fractura fractal en aluminio estructural. Master’s Thesis, SEPI-ESIA-IPN, Mexico.
- 18. Pytel, A. and Singer, F.L. (1994) Resistencia de materiales. Oxford University Press, Oxford. https://www.slideshare.net/eden1jonathan/resistencia-de-materiales-singer-13212497
- 19. Vesic, A.S. and Jones, J.A. (1973) Analysis of Ultimate Loads of Shallow Foundations. Journal of the Soil Mechanics and Foundations Division, 99, 45-73.
- 20. ASCE (2001) Guideline for the Design of Buried Steel Pipe.
- 21. NRF-001-PEMEX (2007) Tubería de acero para recolección y transporte de hidrocarburos.
- 22. NRF-030-PEMEX (2009) Diseno, construcción, inspección y mantenimiento de ductos terrestres para transporte y recolección de hidrocarburos.